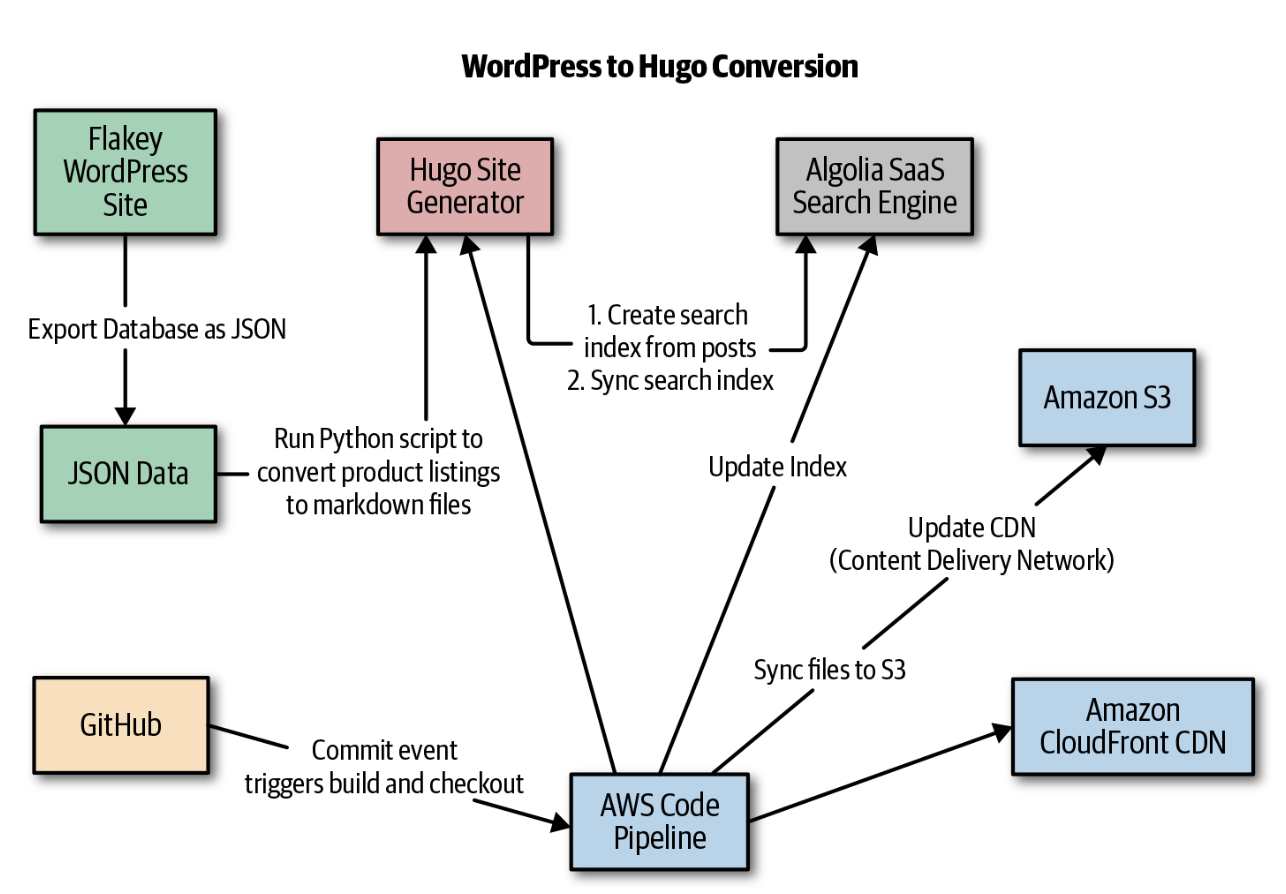
1. Introduction• A CI system:– Clones the codebase for the software under consideration from a source control system such as GitHub, – Builds the software into an artifact that can be a binary, a tar archive, or a Docker image, – and, very importantly, also runs unit and/or integration tests for the software. • A CD system: – Deploys the artifacts built by the CI system to a target environment. – This deployment can be automated for non-production environments, but usually includes a manual approval step for production.– • Note: A more advanced type of such systems is a continuous delivery platform, which automates the deployment step to production and is capable of rolling back the deployment based on metrics obtained from monitoring and logging platforms.2. Real-World Case Study: Converting a Poorly Maintained WordPress Site to Hugo• An inventory website is served via a WordPress site that is frequently hacked and performs horribly. • The steps to convert it to a solid high performing site is:– Backup– Convert– Upgrade– Deploy• Some of the requirements to consider:– It needed to be continuously deployed.– It needed to be fast to run and develop against!– It should be a static site hosted from a cloud provider.– There should be a reasonable workflow for converting from WordPress.– It should be possible to create a reasonable search interface using Python.• • In the end I decided to use Hugo, AWS, and Algolia. You can find the code repo here.• The general architecture looked like Figure 1.
Figure 1:Continuous deployment with Hugo
2.1. Setting Up Hugo• Getting started with Hugo is very straightforward (see the getting started Hugo guide). First, install the software.• •
brew install hugo
• The only thing left to do is to initialize a skeleton Hugo app and install a theme:
hugo new site quickstart
• This creates a new site called quickstart. You can build this site again, VERY QUICKLY, by running hugo. This compiles the markdown files to HTML and CSS.2.2. Converting WordPress to Hugo Posts• Next, we converted the WordPress database to JSON via a raw dump. • Then we write a Python script to convert this data into Hugo posts in markdown format. Here is that code:• •
1"""Conversion code of old database fields into markdown example.23If you did a database dump of WordPress and then converted it to JSON, you could4tweak this."""56import os7import shutil8from category import CAT9from new_picture_products import PICTURES1011defcheck_all_category():12 ares ={}13 REC =[]14for pic in PICTURES:15 res = check_category(pic)16ifnot res:17 pic["categories"]="Other"18 REC.append(pic)19continue2021 title,key = res22if key:23print("FOUND MATCH: TITLE--[%s], CATEGORY--[%s]"%\24(title, key))25 ares[title]= key26 pic["categories"]= key27 REC.append(pic)28return ares, REC2930defcheck_category(rec):3132 title =str(rec['title'])33for key, values in CAT.items():34print("KEY: %s, VALUE: %s"%(key, values))35if title in key:36return title,key37for val in values:38if title in val:39return title,key4041defmove_image(val):42"""Creates a new copy of the uploaded images to img dir"""4344 source_picture ="static/uploads/%s"% val["picture"]45 destination_dir ="static/img/"46 shutil.copy(source_picture, destination_dir)4748defnew_image_metadata(vals):49 new_paths =[]50for val in vals:51 pic = val['picture'].split("/")[-1:].pop()52 destination_dir ="static/img/%s"% pic53 val['picture']= destination_dir54 new_paths.append(val)55return new_paths5657CAT_LOOKUP ={'2100':'Foo',58'a':'Biz',59'b':'Bam',60'c':'Bar',61'1':'Foobar',62'2':'bizbar',63'3':'bam'}6465defwrite_post(val):6667 tags = val["tags"]68 date = val["date"]69 title = val["title"]70 picture = val["picture"]71 categories = val["categories"]72 out ="""73+++74tags = ["%s"]75categories = ["%s"]76date = "%s"77title = "%s"78banner = "%s"79+++80[](%s)81 **Product Name**: %s"""%\82(tags, categories, date, title, picture.lstrip("/"),83 title, picture, picture, title)8485 filename ="../content/blog/%s.md"% title86if os.path.exists(filename):87print("Removing: %s"% filename)88 os.unlink(filename)8990withopen(filename,'a')as the_file:91 the_file.write(out)9293if __name__ =='__main__':94from new_pic_category import PRODUCT95for product in PRODUCT:96 write_post(product)
2.3. Creating an Algolia Index and Updating It• The next step is to write some Python code that creates an Algoliaindex and syncs it. • Algolia is a great tool to use because it quickly solves the search engine problem and has nice Python support as well.• This script crawls through all of the markdown files and generates a search index that can be uploaded to Algolia:• •
1"""2Creates a very simple JSON index for Hugo to import into Algolia. Easy to extend.34#might be useful to run this on content directory to remove spaces5for f in *\ *; do mv "$f" "${f// /_}"; done67"""8import os9import json1011CONTENT_ROOT ="../content/products"12CONFIG ="../config.toml"13INDEX_PATH ="../index.json"1415defget_base_url():16for line inopen(CONFIG):17if line.startswith("baseurl"):18 url = line.split("=")[-1].strip().strip('""')19return url2021defbuild_url(base_url, title):2223 url ="<a href='%sproducts/%s'>%s</a>"%\24(base_url.strip(), title.lower(), title)25return url2627defclean_title(title):28 title_one = title.replace("_"," ")29 title_two = title_one.replace("-"," ")30 title_three = title_two.capitalize()31return title_three3233defbuild_index():34 baseurl = get_base_url()35 index =[]36 posts = os.listdir(CONTENT_ROOT)37for line in posts:38print("FILE NAME: %s"% line)39 record ={}40 title = line.strip(".md")41 record['url']= build_url(baseurl, title)42 record['title']= clean_title(title)43print("INDEX RECORD: %s"% record)44 index.append(record)45return index4647defwrite_index():48 index = build_index()49withopen(INDEX_PATH,'w')as outfile:50 json.dump(index,outfile)5152if __name__ =='__main__':53 write_index()
• Finally, the index can be sent to Algolia with this snippet:• •
2.4. Orchestrating with a Makefile• Using a Makefile allows you to replicate the steps your deployment process will use later. • We typically set up a Makefile to orchestrate this locally. Here is what the entire build and deploy process looks like:• •
build:rm -rf public hugowatch: clean hugo server -wcreate-index:cd algolia;python make_algolia_index.py;cd..update-index:cd algolia;python sync_algolia_index.py;cd..make-index: create-index update-indexclean: -rm -rf publicsync: aws s3 --profile <yourawsprofile>sync --acl \"public-read" public/ s3://example.combuild-deploy-local: build syncall: build-deploy-local
2.5. Deploying with AWS CodePipeline• Amazon Web Services (AWS) is a common deployment target for hosting a static website via Amazon S3, Amazon Route 53, and Amazon CloudFront. • • AWS CodePipeline, their build server service, works very well as the deployment mechanism for these sites. – You can log into AWS CodePipeline, set up a new build project, and tell it to use a buildspec.yml file. The code can be customized and the portions that are templated out can be replaced with actual values.– As soon as GitHub gets a change event, CodePipeline runs the install in a container. * First it grabs the specific version of Hugo specified. * Next it builds the Hugo pages. Thousands of Hugo pages can be rendered subsecond because of the speed of Go.– Finally, the HTML pages are synced to Amazon S3. – • Because this is running inside of AWS and is synced, it is also extremely fast. The final step is that CloudFront is invalidated:• •
3. Real-World Case Study: Deploying a Python App Engine Application with Google Cloud Build• The Google Cloud Platform (GCP) Cloud Build works a lot like AWS CodePipeline. • Here is a config file that is checked into a GitHub repo. The config file is named cloudbuild.yaml. • You can see all of the source code for this project in this Git repository.• •
• Note that the cloudbuild.yaml file installs the packages seen here in the requirements.txt file.• It also runs gcloud app deploy, which deploys the App Engine application on check-in to GitHub:• •
Flask==1.0.2gunicorn==19.9.0pylint==2.3.1
• Here is a walk-through of how to set up this entire project:1. Create the project.2. Activate the cloud shell.3. Refer to the hello world docs for the Python 3 App Engine.4. Run describe:4. 1.
verify project is working```bashgcloud projects describe $GOOGLE_CLOUD_PROJECT```output of command:```bashcreateTime: '2019-05-29T21:21:10.187Z'lifecycleState: ACTIVEname: hellomlprojectId: helloml-xxxxxprojectNumber: '881692383648'```
• 5. You may want to verify that you have the correct project. If not, do this to switch → gcloud config set project $GOOGLE_CLOUD_PROJECT6. Create the App Engine app → gcloud app create* This will ask for the region. Go ahead and pick us-central [12].* *
Creating App Engine application in project [helloml-xxx]and region [us-central]....done.Success! The app is now created.Please use `gcloud app deploy` to deploy your first app.
* 7. Clone the hello world sample app repo and cd into the repo:7. 7.
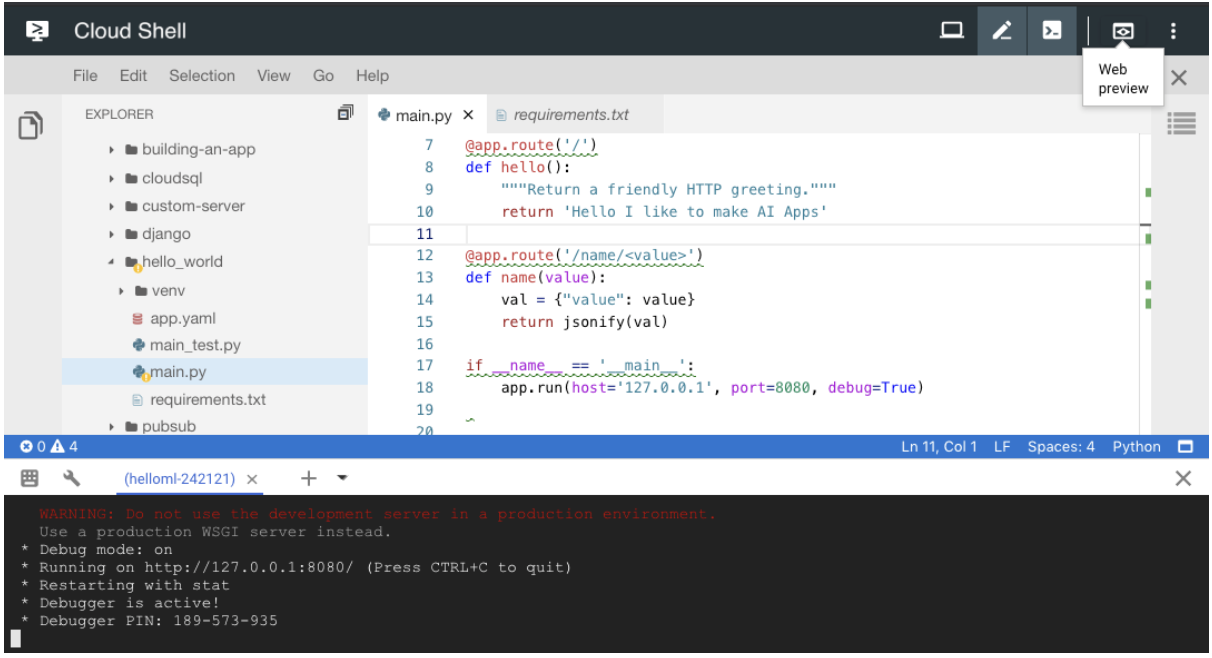
10. Activate the cloud shell editor and install the required packages → pip install -r requirements.txt* This should install Flask → Flask==1.0.211. Run Flask locally. This runs Flask locally in the GCP shell → python main.py12. Use the web preview:12.
Figure 2:Web preview
1. 13. Update main.py:13. 13.
from flask import Flaskfrom flask import jsonifyapp = Flask(__name__)@app.route('/')defhello():"""Return a friendly HTTP greeting."""return'Hello I like to make AI Apps'@app.route('/name/<value>')defname(value): val ={"value": value}return jsonify(val)if __name__ =='__main__': app.run(host='127.0.0.1', port=8080, debug=True)
13. 14. Test out passing in parameters to exercise this function:14. 14.
@app.route('/name/<value>')defname(value): val ={"value": value}return jsonify(val)
14. * For example, calling this route will take the word lion and pass it into the name function in Flask → https://8080-dot-3104625-dot-devshell.appspot.com/name/lion* Returns a value in the web browser → {value: "lion"}* 15. Now, deploy the app → gcloud app deploy• Be warned! The first deploy could take about 10 minutes. You might also need to enable the cloud build API.• •
Do you want to continue(Y/n)? yBeginning deployment of service[default]...╔════════════════════════════════════════════════════════════╗╠═ Uploading 934 files to Google Cloud Storage ═╣
• 16. Now stream the log files → gcloud app logs tail -s default16. 17. The production app is deployed and should like this:17. 17.
Setting traffic splitforservice[default]...done.Deployed service[default] to [https://helloml-xxx.appspot.com]You can stream logs from the command line by running: $ gcloud app logs tail -s default $ gcloud app browse(venv) noah_gift@cloudshell:~/python-docs-samples/appengine/\ standard_python37/hello_world (helloml-242121)$ gcloud app logs tail -s defaultWaiting for new log entries...2019-05-29 22:45:02 default[2019][2019-05-29 22:45:02 +0000][8]2019-05-29 22:45:02 default[2019][2019-05-29 22:45:02 +0000][8](8)2019-05-29 22:45:02 default[2019][2019-05-29 22:45:02 +0000][8]2019-05-29 22:45:02 default[2019][2019-05-29 22:45:02 +0000][25]2019-05-29 22:45:02 default[2019][2019-05-29 22:45:02 +0000][27]2019-05-29 22:45:04 default[2019]"GET /favicon.ico HTTP/1.1"4042019-05-29 22:46:25 default[2019]"GET /name/usf HTTP/1.1"200
17. 18. Add a new route and test it out:18. 18.
@app.route('/html')defhtml():"""Returns some custom HTML"""return""" <title>This is a Hello World World Page</title> <p>Hello</p> <p><b>World</b></p> """
18. 19. Install Pandas and return JSON results. At this point, you may want to consider creating a Makefile and doing this:19. 19.
touch Makefile#this goes inside that fileinstall: pip install -r requirements.txt
19. i. You also may want to set up lint:i.
pylint --disable=R,C main.py------------------------------------Your code has been rated at 10.00/10
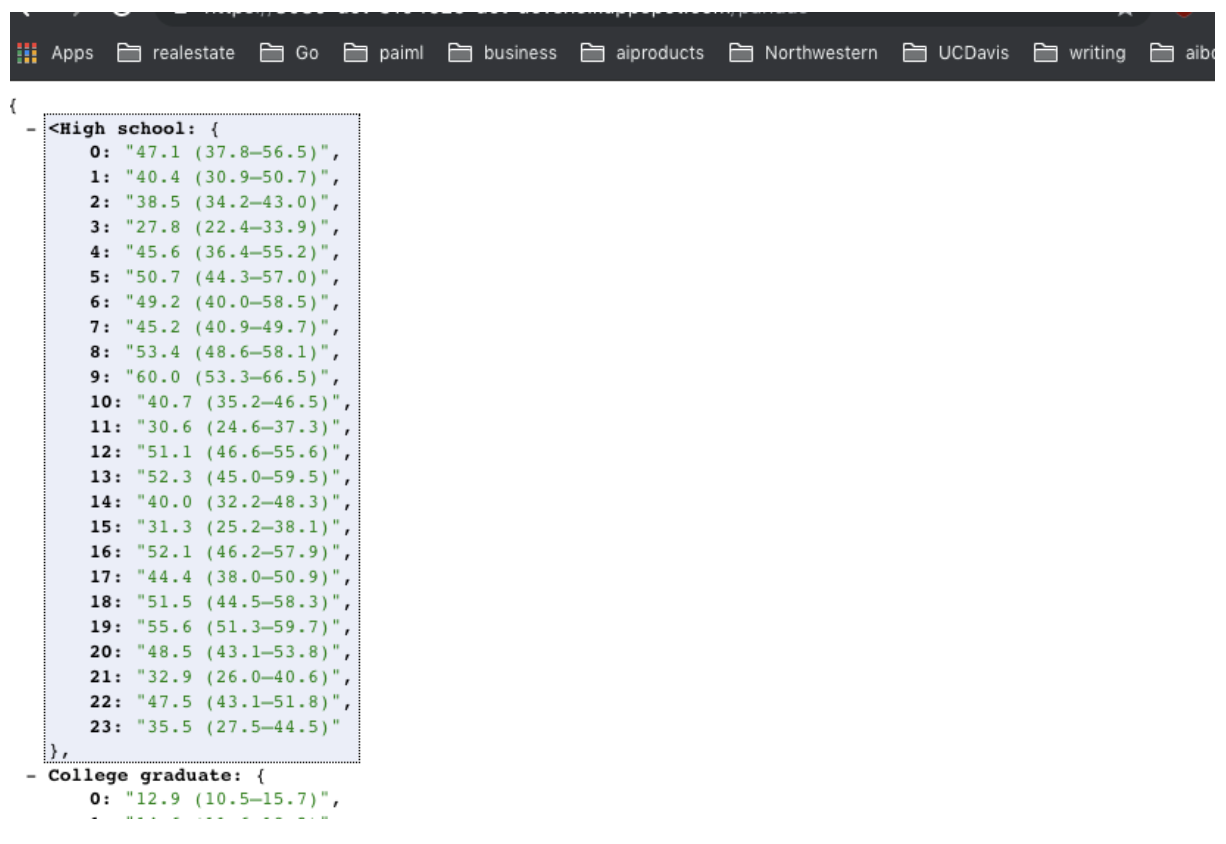
• – The web route syntax looks like the following block. Add Pandas import at the top:– –
import pandas as pd@app.route('/pandas')defpandas_sugar(): df = pd.read_csv( "https://raw.githubusercontent.com/noahgift/sugar/\ master/data/education_sugar_cdc_2003.csv")return jsonify(df.to_dict())
– – When you call the route https://<yourapp>.appspot.com/pandas, you should get something like Figure 3.–
Figure 3:Example of JSON output
• 20. Add this Wikipedia route:20. 20.
import wikipedia@app.route('/wikipedia/<company>')defwikipedia_route(company): result = wikipedia.summary(company, sentences=10)return result
20. 21. Add NLP to the app:* Run IPython Notebook.* Enable the Cloud Natural Language API.* Run pip install google-cloud-language:* *
In [1]:from google.cloud import language...:from google.cloud.language import enums...:...:from google.cloud.language import typesIn [2]:In [2]: text ="LeBron James plays for the Cleveland Cavaliers."...: client = language.LanguageServiceClient()...: document = types.Document(...: content=text,...:type=enums.Document.Type.PLAIN_TEXT)...: entities = client.analyze_entities(document).entitiesIn [3]: entities
* 22. Here is an end-to-end AI API example:22. 22.
from flask import Flaskfrom flask import jsonifyimport pandas as pdimport wikipediaapp = Flask(__name__)@app.route('/')defhello():"""Return a friendly HTTP greeting."""return'Hello I like to make AI Apps'@app.route('/name/<value>')defname(value): val ={"value": value}return jsonify(val)@app.route('/html')defhtml():"""Returns some custom HTML"""return""" <title>This is a Hello World World Page</title> <p>Hello</p> <p><b>World</b></p> """@app.route('/pandas')defpandas_sugar(): df = pd.read_csv( "https://raw.githubusercontent.com/noahgift/sugar/\ master/data/education_sugar_cdc_2003.csv")return jsonify(df.to_dict())@app.route('/wikipedia/<company>')defwikipedia_route(company):# Imports the Google Cloud client libraryfrom google.cloud import languagefrom google.cloud.language import enumsfrom google.cloud.language import types result = wikipedia.summary(company, sentences=10) client = language.LanguageServiceClient() document = types.Document( content=result,type=enums.Document.Type.PLAIN_TEXT) entities = client.analyze_entities(document).entitiesreturnstr(entities)if __name__ =='__main__': app.run(host='127.0.0.1', port=8080, debug=True)
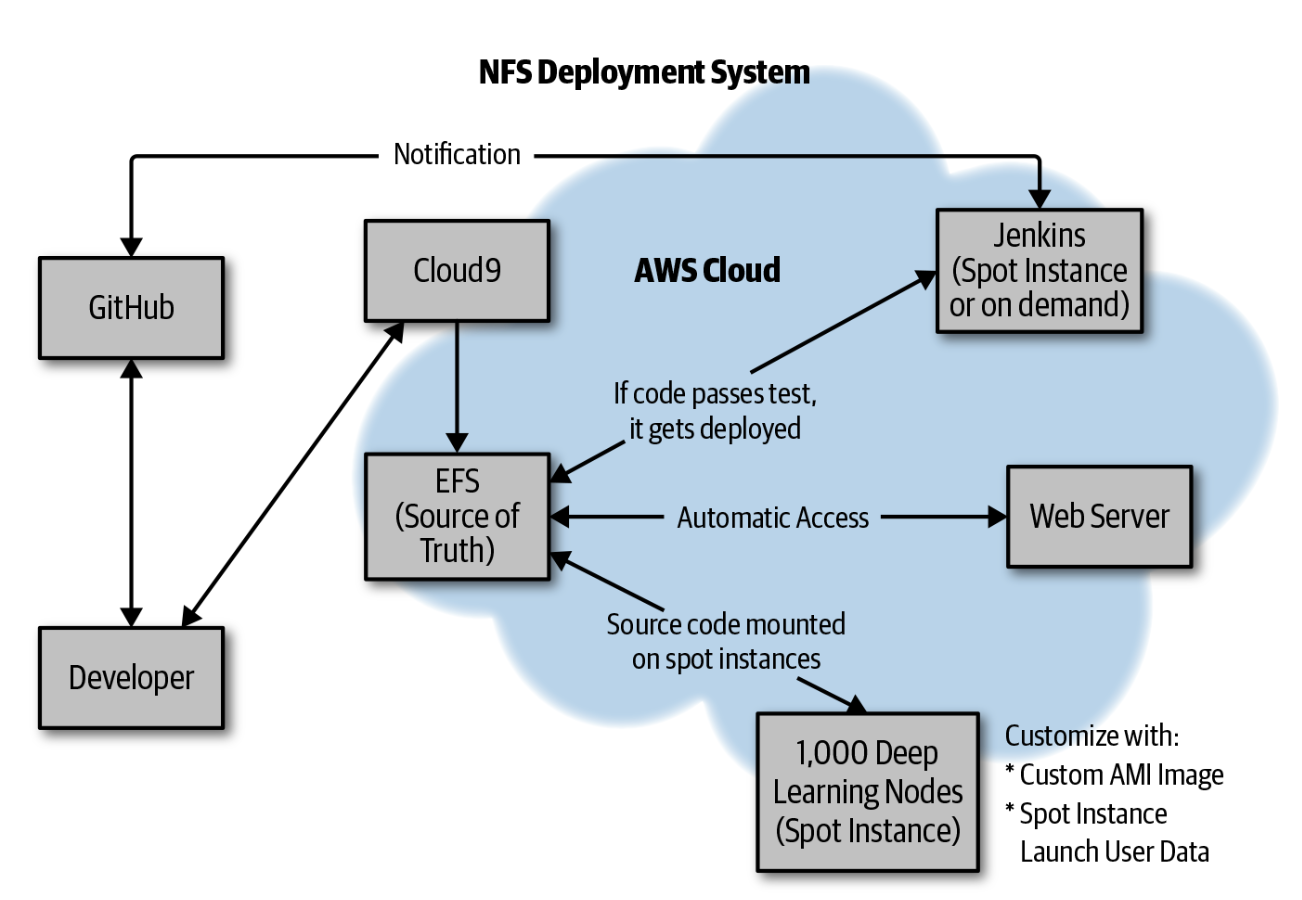
• This section has shown how to both set up an App Engine application from scratch in the Google Cloud Shell, as well as how to do continuous delivery using GCP Cloud Build.4. Real-World Case Study: NFSOPS• NFOPS is an operational technique that uses NFS (Network File System) mount points to manage clusters of computers. • It sounds like it is a new thing, but it has been around since Unix has been around. • As a part-time consultant at a virtual reality startup in San Francisco, one problem I faced was how to build a jobs framework, quickly, that would dispatch work to thousands of AWS Spot Instances.• The solution that ultimately worked was to use NFSOPS (Figure 4) to deploy Python code to thousands of Computer Vision Spot Instances subsecond.•
Figure 4:NFSOPS
• NFSOPS works by using a build server, in this case Jenkins, to mount several Amazon Elastic File System (EFS) mount points (DEV, STAGE, PROD). • When a continuous integration build is performed, the final step is an rsync to the respective mount point:• •
• The “deploy” is then subsecond to the mount point. • When spot instances are launched by the thousands, they are pre-configured to mount EFS (the NFS mount points) and use the source code. • This is a handy deployment pattern that optimizes for simplicity and speed. • It can also work quite well in tandom with IAC, Amazon Machine Image (AMI), or Ansible.