Unity ML-Agents
Unity Machine Learning Agents (ML-Agents) is an open-source Unity plugin that enables games and simulations to serve as environments for training intelligent agents.
For game developers, these trained agents can be used for multiple purposes, including controlling NPC behavior (in a variety of settings such as multi-agent and adversarial), automated testing of game builds and evaluating different game design decisions pre-release.
In this course, you will use Unity's rich environments to design, train, and evaluate your own deep reinforcement learning algorithms. You can read more about ML-Agents by perusing the GitHub repository.
Note: The Unity ML-Agent team frequently releases updated versions of their environment. We are using the v0.4 interface. To avoid any confusion, please use the workspace we provide here or work with v0.4 locally.

Winner of the Unity ML-Agents Challenge: A robotic arm that can make pancakes!
The Environment
For this project, you will train an agent to navigate (and collect bananas!) in a large, square world.

A reward of +1 is provided for collecting a yellow banana, and a reward of -1 is provided for collecting a blue banana. Thus, the goal of your agent is to collect as many yellow bananas as possible while avoiding blue bananas.
The state space has 37 dimensions and contains the agent's velocity, along with ray-based perception of objects around the agent's forward direction. Given this information, the agent has to learn how to best select actions. Four discrete actions are available, corresponding to:
0- move forward.1- move backward.2- turn left.3- turn right.
The task is episodic, and in order to solve the environment, your agent must get an average score of +13 over 100 consecutive episodes.
Note
The project environment is similar to, but not identical to the Banana Collector environment on the Unity ML-Agents GitHub page.
You are required to work with the environment that we will provide as part of the project.
In particular, your project submission should not use the environment on the ML-Agents GitHub page.
Remark
Please exercise extreme caution in robotic applications!
Found on Twitter
The Environment
Follow the instructions in the Jupyter notebook below to play the game, as a human agent!
The available controls are:
W- move forward. (Note: when playing the game, the agent will move forward, if you don't select a different action in time, so you can also think of this action as the "do nothing" action.)S- move backward.A- turn left.D- turn right.
Spend a couple of minutes to move around and collect some yellow bananas. Once you feel like you understand the agent's task, feel free to move on to the next part of the lesson!
The Environment - Play
Check out the codes under the code section.
The Environment
Follow the instructions below to explore the environment on your own machine! You will also learn how to use the Python API to control your agent.
Step 1: Clone the DRLND Repository
If you haven't already, please follow the instructions in the DRLND GitHub repository to set up your Python environment. These instructions can be found in README.md at the root of the repository. By following these instructions, you will install PyTorch, the ML-Agents toolkit, and a few more Python packages required to complete the project.
(For Windows users) The ML-Agents toolkit supports Windows 10. While it might be possible to run the ML-Agents toolkit using other versions of Windows, it has not been tested on other versions. Furthermore, the ML-Agents toolkit has not been tested on a Windows VM such as Bootcamp or Parallels.
Step 2: Download the Unity Environment
For this project, you will not need to install Unity - this is because we have already built the environment for you, and you can download it from one of the links below. You need only select the environment that matches your operating system:
- Linux: click here
- Mac OSX: click here
- Windows (32-bit): click here
- Windows (64-bit): click here
Then, place the file in the p1_navigation/ folder in the DRLND GitHub repository, and unzip (or decompress) the file.
(For Windows users) Check out this link if you need help with determining if your computer is running a 32-bit version or 64-bit version of the Windows operating system.
(For AWS) If you'd like to train the agent on AWS (and have not enabled a virtual screen), then please use this link to obtain the "headless" version of the environment. You will not be able to watch the agent without enabling a virtual screen, but you will be able to train the agent. (To watch the agent, you should follow the instructions to enable a virtual screen, and then download the environment for the Linux operating system above.)
Step 3: Explore the Environment
After you have followed the instructions above, open Navigation.ipynb (located in the p1_navigation/ folder in the DRLND GitHub repository) and follow the instructions to learn how to use the Python API to control the agent.
Watch the (silent) video below to see what kind of output to expect from the notebook, if everything is working properly!
Watch this video.
In the last code cell of the notebook, you'll learn how to design and observe an agent that always selects random actions at each timestep. Your goal in this project is to create an agent that performs much better!
(Optional) Build your Own Environment
For this project, we have built the Unity environment for you, and you must use the environment files that we have provided.
If you are interested in learning to build your own Unity environments after completing the project, you are encouraged to follow the instructions here, which walk you through all of the details of building an environment from a Unity scene.
Project Instructions
For this project, you will train an agent to solve the provided environment.
To submit the project, you will provide a link to a GitHub repository with your implementation. If you would like a refresher on GitHub, please check out the lessons on GitHub in the extracurricular content.
To review the detailed project requirements, please read the project rubric.
The format of this project is largely open-ended; you need only satisfy the points in the rubric. For instance, while we suspect that the majority of students will train the agent in a Jupyter notebook, you are welcome to instead structure your repository so that your Python code is run from the command line instead.
Your GitHub Submission
As described in the rubric, your GitHub submission should contain:
- a README that describes how someone not familiar with this project should use your repository. The README should be designed for a general audience that may not be familiar with the Nanodegree program; you should describe the environment that you solved, along with how to install the requirements before running the code in your repository.
- the code that you use for training the agent, along with the trained model weights.
- a report describing your learning algorithm. This is where you will describe the details of your implementation, along with ideas for future work.
This GitHub repository will serve as a portfolio piece to share your new skills with the global community of reinforcement learning students and practitioners, along with potential employers!
Project Workspace
While you are welcome to train the agent locally on your own machine, you can also complete the project in the Workspace that appears towards the end of this lesson. Note that the Workspace does not allow you to see the simulator of the environment; so, if you want to watch the agent while it is training, you should train locally.
The Workspace provides a Jupyter server directly in your browser and has GPU support. You can learn more about the Workspace by perusing the Udacity Workspaces lesson in the extracurricular content.
Benchmark Implementation
For this project, you can use any algorithm of your choosing to solve the task. You are strongly encouraged to do your own research, to devise your own approach towards solving this problem.
In case you get stuck, note that you should be able to solve the project by making only minor modifications to the DQN code provided as part of the Deep Q-Networks lesson. Please see the image below for an example of how you might expect your agent's score to evolve. If you're interested in about how long it should take, in the solution code for the project, we were able to solve the project in fewer than 1800 episodes.
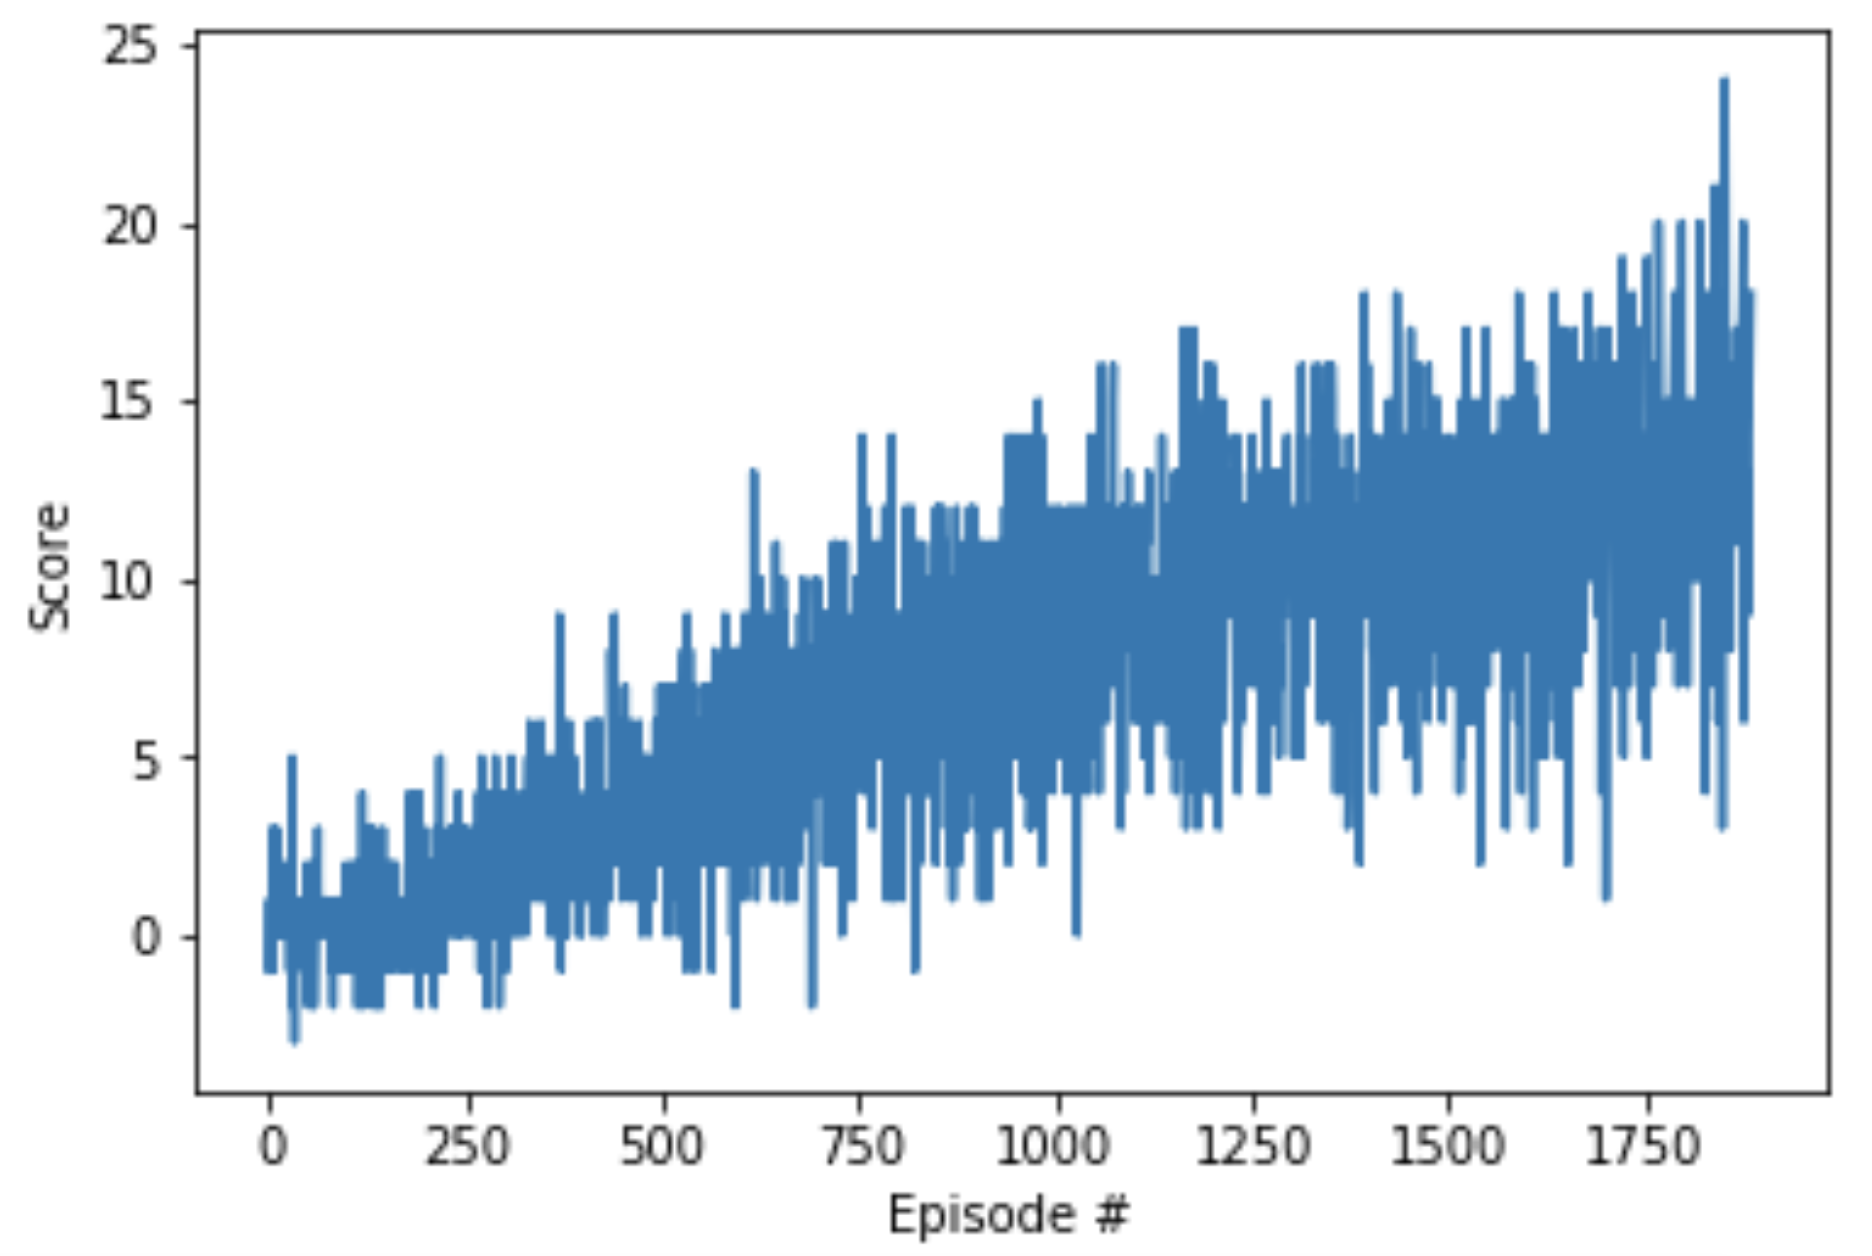
(Example) Plotted Rewards for Project 1
Your agent might take longer (or solve the task much faster!) -- this is perfectly fine, and we provide this estimate only as an estimate for how long you should wait before assessing if your agent is learning.
Not sure where to start?
If you're not sure where to start, here are some suggestions for how to make some progress with the project. You need not follow this advice; these are only suggestions, and you should follow whatever path works best for you!
Step 1: Master the details of Deep Q-Networks (DQN).
Read the DQN paper to master all of the details. Refer to the lesson on Deep Q-Networks to cement your understanding. If you have any questions, post them in Slack or Knowledge!
Step 2: Study the coding exercise from the lesson.
In the Deep Q-Networks lesson, you applied a DQN implementation to an OpenAI Gym task. Take the time to understand this code in great detail. Tweak the various hyperparameters and settings to build your intuition for what should work well (and what doesn't!).
Step 3: Adapt the code from the lesson to the project.
Adapt the code from the exercise to the project, while making as few modifications as possible. (Remember that the code that you use to interact with the Unity environment is different from the OpenAI gym interface.) Don't worry about efficiency, and just make sure the code runs. Don't worry about modifying hyperparameters, optimizers, or anything else of that nature just yet.
For this step, you do not need to run your code on a GPU. In particular, if working in the Udacity Workspace, GPU should not be enabled. Save your GPU hours (if needed) for the next step!
Step 4: Optimize the hyperparameters.
After you have verified that your DQN code runs, try a few long training sessions while running your code on CPU. If your agent fails to learn, try out a few potential solutions by modifying your code. Once you're feeling confident (or impatient 😃) try out your implementation with GPU support! (Note that you may not need GPU at all. For instance, we found that our implementation trained quickly enough on CPU.)
(Optional) Challenge: Learning from Pixels
After you have successfully completed the project, if you're looking for an additional challenge, you have come to the right place!
In the project, your agent learned from information such as its velocity, along with ray-based perception of objects around its forward direction. A more challenging task would be to learn directly from pixels!
This environment is almost identical to the project environment, where the only difference is that the state is an 84 x 84 RGB image, corresponding to the agent's first-person view of the environment.
Download the Unity Environment
To solve this harder task, you'll need to download a new Unity environment.
You need only select the environment that matches your operating system:
- Linux: click here
- Mac OSX: click here
- Windows (32-bit): click here
- Windows (64-bit): click here
Then, place the file in the p1_navigation/ folder in the DRLND GitHub repository, and unzip (or decompress) the file.
(For AWS) If you'd like to train the agent on AWS, you must follow the instructions to set up X Server, and then download the environment for the Linux operating system above.
Please do not submit a project with this new environment. You are required to complete the project with the version of the environment that was provided earlier in this lesson, in The Environment - Explore.
Explore the Environment
After you have followed the instructions above, open Navigation_Pixels.ipynb (located in the p1_navigation/ folder in the DRLND GitHub repository) and follow the instructions to learn how to use the Python API to control the agent.
Important Note
To solve this environment, you will need to design a convolutional neural network as the DQN architecture. For inspiration about how to set up this architecture, please refer to the DQN paper.
This task will take much longer to train than the project, and (unless you are very patient 😄) you're encouraged to use a GPU to train. If you don't have a local GPU setup, you can learn how to train the project on AWS by following the instructions here. Note that it is not possible to train this agent in the provided Udacity Workspace.