Unity ML-Agents
Unity Machine Learning Agents (ML-Agents) is an open-source Unity plugin that enables games and simulations to serve as environments for training intelligent agents.
For game developers, these trained agents can be used for multiple purposes, including controlling NPC behavior (in a variety of settings such as multi-agent and adversarial), automated testing of game builds and evaluating different game design decisions pre-release.
In this course, you will use Unity's rich environments to design, train, and evaluate your own deep reinforcement learning algorithms. You can read more about ML-Agents by perusing the GitHub repository.
Note: The Unity ML-Agent team frequently releases updated versions of their environment. We are using the v0.4 interface. To avoid any confusion, please use the workspace we provide here or work with v0.4 locally.

Winner of the Unity ML-Agents Challenge: A robotic arm that can make pancakes!
The Environment
For this project, you will work with the Reacher environment.

Unity ML-Agents Reacher Environment
In this environment, a double-jointed arm can move to target locations. A reward of +0.1 is provided for each step that the agent's hand is in the goal location. Thus, the goal of your agent is to maintain its position at the target location for as many time steps as possible.
The observation space consists of 33 variables corresponding to position, rotation, velocity, and angular velocities of the arm. Each action is a vector with four numbers, corresponding to torque applicable to two joints. Every entry in the action vector should be a number between -1 and 1.
Distributed Training
For this project, we will provide you with two separate versions of the Unity environment:
- The first version contains a single agent.
- The second version contains 20 identical agents, each with its own copy of the environment.
The second version is useful for algorithms like PPO, A3C, and D4PG that use multiple (non-interacting, parallel) copies of the same agent to distribute the task of gathering experience.
Solving the Environment
Note that your project submission need only solve one of the two versions of the environment.
Option 1: Solve the First Version
The task is episodic, and in order to solve the environment, your agent must get an average score of +30 over 100 consecutive episodes.
Option 2: Solve the Second Version
The barrier for solving the second version of the environment is slightly different, to take into account the presence of many agents. In particular, your agents must get an average score of +30 (over 100 consecutive episodes, and over all agents). Specifically,
- After each episode, we add up the rewards that each agent received (without discounting), to get a score for each agent. This yields 20 (potentially different) scores. We then take the average of these 20 scores.
- This yields an average score for each episode (where the average is over all 20 agents).
As an example, consider the plot below, where we have plotted the average score (over all 20 agents) obtained with each episode.
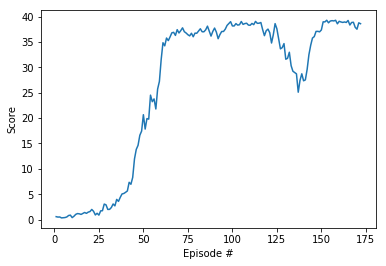
Plot of average scores (over all agents) with each episode.
The environment is considered solved, when the average (over 100 episodes) of those average scores is at least +30. In the case of the plot above, the environment was solved at episode 63, since the average of the average scores from episodes 64 to 163 (inclusive) was greater than +30.
The Environment
As you've seen, the environment for this project involves controlling a double-jointed arm, to reach target locations.
Real-World Robotics
Watch this YouTube video to see how some researchers were able to train a similar task on a real robot! The accompanying research paper can be found here.
Training robotic arm to reach target locations in the real world. (Source)
Sharing Experience
In the second version of the project environment, there are 20 identical copies of the agent. It has been shown that having multiple copies of the same agent sharing experience can accelerate learning, and you'll discover this for yourself when solving the project!
Sharing experience can accelerate learning. (Source)
The Environment
Follow the instructions below to explore the environment on your own machine! You will also learn how to use the Python API to control your agent.
Step 1: Activate the Environment
If you haven't already, please follow the instructions in the DRLND GitHub repository to set up your Python environment. These instructions can be found in README.md at the root of the repository. By following these instructions, you will install PyTorch, the ML-Agents toolkit, and a few more Python packages required to complete the project.
(For Windows users) The ML-Agents toolkit supports Windows 10. While it might be possible to run the ML-Agents toolkit using other versions of Windows, it has not been tested on other versions. Furthermore, the ML-Agents toolkit has not been tested on a Windows VM such as Bootcamp or Parallels.
Step 2: Download the Unity Environment
For this project, you will not need to install Unity - this is because we have already built the environment for you, and you can download it from one of the links below. You need only select the environment that matches your operating system:
Version 1: One (1) Agent
- Linux: click here
- Mac OSX: click here
- Windows (32-bit): click here
- Windows (64-bit): click here
Version 2: Twenty (20) Agents
- Linux: click here
- Mac OSX: click here
- Windows (32-bit): click here
- Windows (64-bit): click here
Then, place the file in the p2_continuous-control/ folder in the DRLND GitHub repository, and unzip (or decompress) the file.
(For Windows users) Check out this link if you need help with determining if your computer is running a 32-bit version or 64-bit version of the Windows operating system.
(For AWS) If you'd like to train the agent on AWS (and have not enabled a virtual screen), then please use this link (version 1) or this link (version 2) to obtain the "headless" version of the environment. You will not be able to watch the agent without enabling a virtual screen, but you will be able to train the agent. (To watch the agent, you should follow the instructions to enable a virtual screen, and then download the environment for the Linux operating system above.)
Step 3: Explore the Environment
After you have followed the instructions above, open Continuous_Control.ipynb (located in the p2_continuous-control/ folder in the DRLND GitHub repository) and follow the instructions to learn how to use the Python API to control the agent.
Watch the (silent) video below to see what kind of output to expect from the notebook (for version 2 of the environment), if everything is working properly! Version 1 will look very similar (where you'll see a single agent, instead of 20!).
Watch this video.
In the last code cell of the notebook, you'll learn how to design and observe an agent that always selects random actions at each timestep. Your goal in this project is to create an agent that performs much better!
(Optional) Build your Own Environment
For this project, we have built the Unity environment for you, and you must use the environment files that we have provided.
If you are interested in learning to build your own Unity environments after completing the project, you are encouraged to follow the instructions here, which walk you through all of the details of building an environment from a Unity scene.
Project Instructions
For this project, you will train an agent to solve the provided environment.
To submit the project, you will provide a link to a GitHub repository with your implementation. If you would like a refresher on GitHub, please check out the lessons on GitHub in the extracurricular content.
To review the detailed project requirements, please read the project rubric.
The format of this project is largely open-ended; you need only satisfy the points in the rubric. For instance, while we suspect that the majority of students will train the agent in a Jupyter notebook, you are welcome to instead structure your repository so that your Python code is run from the command line instead.
Your GitHub Submission
As described in the rubric, your GitHub submission should contain:
- a README that describes how someone not familiar with this project should use your repository. The README should be designed for a general audience that may not be familiar with the Nanodegree program; you should describe the environment that you solved, along with how to install the requirements before running the code in your repository.
- the code that you use for training the agent, along with the trained model weights.
- a report describing your learning algorithm. This is where you will describe the details of your implementation, along with ideas for future work.
This GitHub repository will serve as a portfolio piece to share your new skills with the global community of reinforcement learning students and practitioners, along with potential employers!
Project Workspace
While you are welcome to train the agent locally on your own machine, you can also complete the project in the Workspace that appears towards the end of this lesson. Note that the Workspace does not allow you to see the simulator of the environment; so, if you want to watch the agent while it is training, you should train locally.
The Workspace provides a Jupyter server directly in your browser and has GPU support. You can learn more about the Workspace by perusing the Udacity Workspaces lesson in the extracurricular content.
Benchmark Implementation
For this project, you can use any algorithm of your choosing to solve the task. You are strongly encouraged to do your own research, to devise your own approach towards solving this problem.
In case you get stuck, here are the details of one approach that worked well for us.
An Amended DDPG Agent
In this part of the Nanodegree program, you learned about a lot of potential ways to solve this project. We instead decided to solve the project by making some amendments to the Deep Deterministic Policy Gradients (DDPG) algorithm.
Attempt 1
The first thing that we did was amend the DDPG code to work for multiple agents, to solve version 2 of the environment. The DDPG code in the DRLND GitHub repository utilizes only a single agent, and with each step:
- the agent adds its experience to the replay buffer, and
- the (local) actor and critic networks are updated, using a sample from the replay buffer.
So, in order to make the code work with 20 agents, we modified the code so that after each step:
- each agent adds its experience to a replay buffer that is shared by all agents, and
- the (local) actor and critic networks are updated 20 times in a row (one for each agent), using 20 different samples from the replay buffer.
In hindsight, this wasn't a great plan, but it was a start! That said, the scores are shown below.
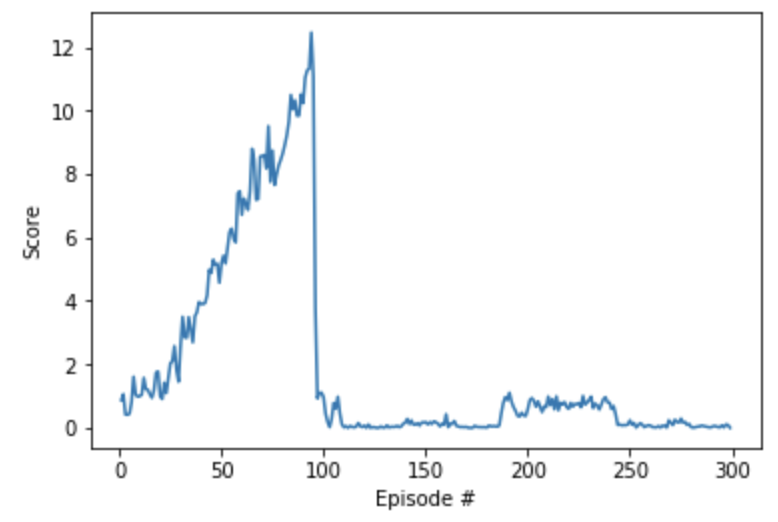
You'll notice that we made some rapid improvement pretty early in training, because of the extremely large number of updates. Unfortunately, also due to the large number of updates, the agent is incredibly unstable. Around episode 100, performance crashed and did not recover.
So, we focused on determining ways to stabilize this first attempt.
Attempt 2
For this second attempt, we reduced the number of agents from 20 to 1 (by switching to version 1 of the environment). We wanted to know how much stability we could expect from a single agent. The idea was that the code would likely train more reliably, if we didn't make so many updates. And it did train much better.
At one point, we even hit the target score of 30. However, this score wasn't maintained for very long, and we saw strong indications that the algorithm was going to crash again. This showed us that we needed to spend more time with figuring out how to stabilize the algorithm, if we wanted to have a chance of training all 20 agents simultaneously.
Attempt 3
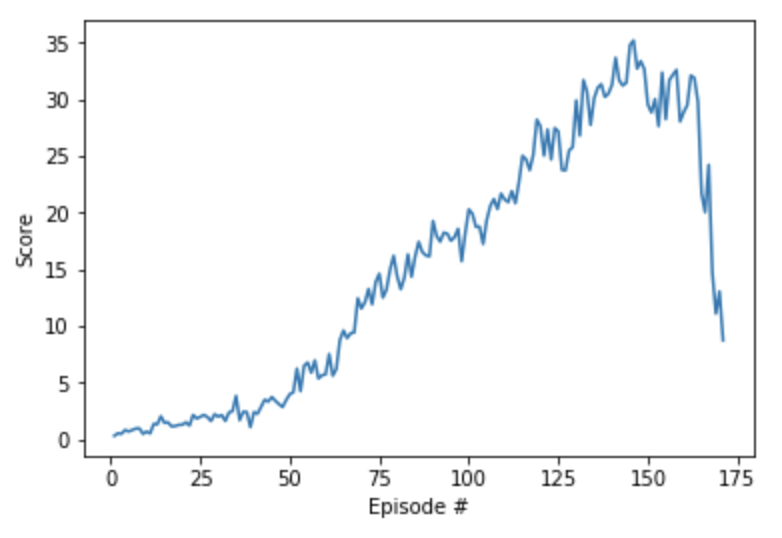
This time, we switched back to version 2 of the environment, and began with the code from Attempt 1 as a starting point. Then, the only change we made was to use gradient clipping when training the critic network. The corresponding snippet of code was as follows:
self.critic_optimizer.zero_grad()
critic_loss.backward()
torch.nn.utils.clip_grad_norm(self.critic_local.parameters(), 1)
self.critic_optimizer.step()
The corresponding scores are plotted below.
This is when we really started to feel hopeful. We still didn't maintain an average score of 30 over 100 episodes, but we maintained the score for longer than before. And the agent didn't crash as suddenly as in the previous attempts!
Attempt 4
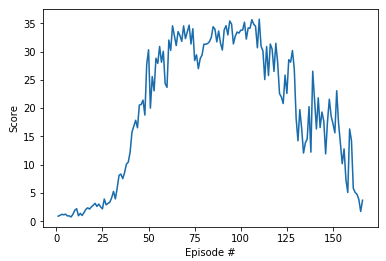
At this point, we decided to get less aggressive with the number of updates per time step. In particular, instead of updating the actor and critic networks 20 times at every timestep, we amended the code to update the networks 10 times after every 20 timesteps. The corresponding scores are plotted below.
And, this was enough to solve the environment! In hindsight, we probably should have realized this fix much earlier, but this long path to the solution was definitely a nice way to help with building intuition! 😃
Note
If you are interested in implementing a method that will be more stable with the project, please explore this paper. As discussed in the paper, Trust Region Policy Optimization (TRPO) and Truncated Natural Policy Gradient (TNPG) should achieve better performance. You may also like to write your own implementation of Proximal Policy Optimization (PPO), which has also demonstrated good performance with continuous control tasks.
You may also like to explore the (very!) recent Distributed Distributional Deterministic Policy Gradients (D4PG) algorithm as another method for adapting DDPG for continuous control.
Not sure where to start?
If you're not sure where to start, here are some suggestions for how to make some progress with the project. You need not follow this advice; these are only suggestions, and you should follow whatever path works best for you!
Step 1: Master the details of the Deep Deterministic Policy Gradients (DDPG) algorithm.
Read the DDPG paper to master all of the details. Focus on the information in 3. Algorithm and 7. Experiment Details to learn how to adapt the implementation for your task. Refer to the lesson on Actor-Critic Methods to cement your understanding. If you have any questions, post them in Slack!
Step 2: Study the coding exercise from the lesson.
In the Actor-Critic Methods lesson, you applied a DDPG implementation to an OpenAI Gym task. Take the time to understand this code in great detail. Tweak the various hyperparameters and settings to build your intuition for what should work well (and what doesn't!).
Step 3: Adapt the code from the lesson to the project.
Adapt the code from the exercise to the project, while making as few modifications as possible. Don't worry about efficiency, and just make sure the code runs. Don't worry about modifying hyperparameters, optimizers, or anything else of that nature just yet.
For this step, you do not need to run your code on a GPU. In particular, if working in the Udacity-provided Workspace, GPU should not be enabled. Save your GPU hours for the next step!
Step 4: Optimize the hyperparameters.
After you have verified that your DDPG code runs, try a few long training sessions while running your code on CPU. If your agent fails to learn, try out a few potential solutions by modifying your code. Once you're feeling confident (or impatient 😃) try out your implementation with GPU support!
Step 5: Continue to explore!
Read this paper, which evaluates the performance of various deep RL algorithms on continuous control tasks. The paper introduces REINFORCE, TNPG, RWR, REPS, TRPO, CEM, CMA-ES and DDPG, and provides some useful suggestions that will help you to figure out which are best suited for the project.
General Advice
In deep RL, failure comes in many flavors. Sometimes your agent doesn't train at all. Sometimes it appears to be learning, but then something weird happens late in training that completely derails its performance.
When this happens, remember that you are part of a community. Please reach out to your fellow students and mentors in Student Hub, ask for advice in Knowledge, submit your project to get feedback from a reviewer. We will figure this out together! Deep RL isn't easy and arguably "doesn't work yet". A large part of mastering cutting-edge algorithms is banging your head against the table - and we'll be right there with you. We promise that it will be so incredibly rewarding when you ultimately get it working!
Failure is Inevitable and Only Temporary
When we wrote a solution to this project, we didn't get it right the first time. Or the second. Or the third. 😃
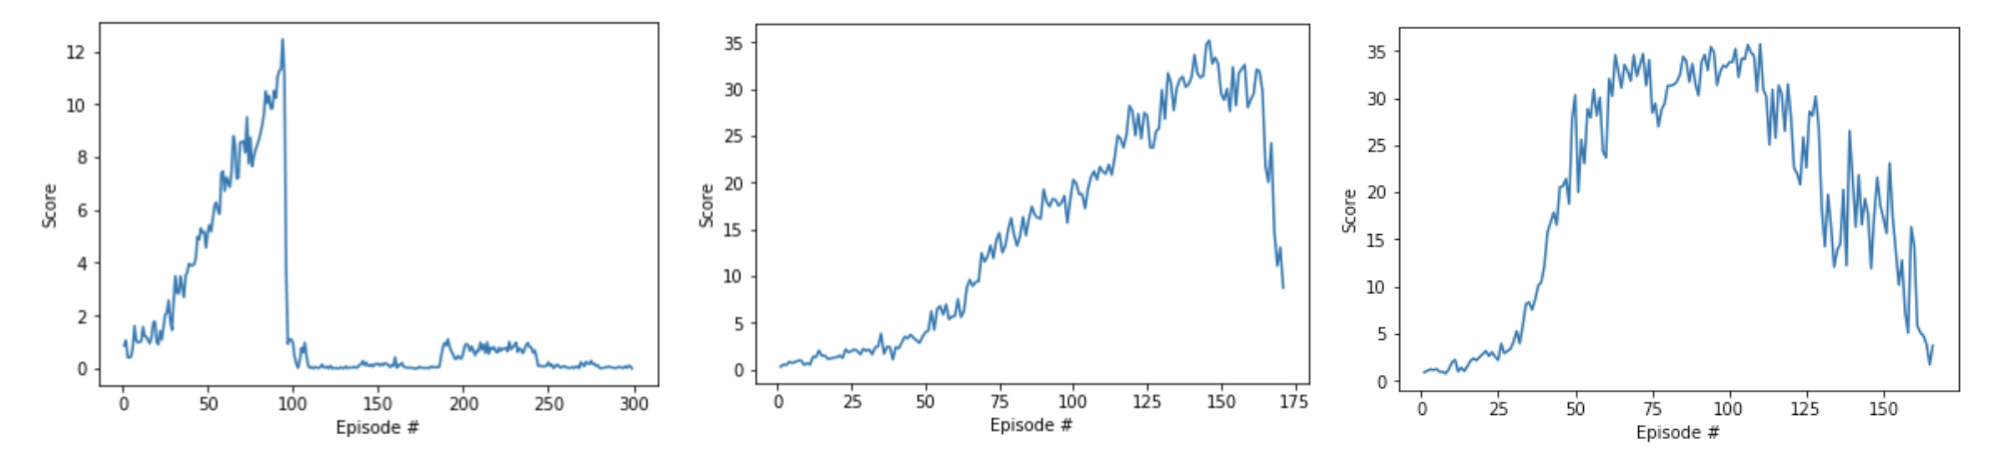
Failed attempts at training the project. (Remember solving is 30!)
(Optional) Challenge: Crawl
After you have successfully completed the project, you might like to solve a more difficult continuous control environment, where the goal is to teach a creature with four legs to walk forward without falling.
You can read more about this environment in the ML-Agents GitHub here.
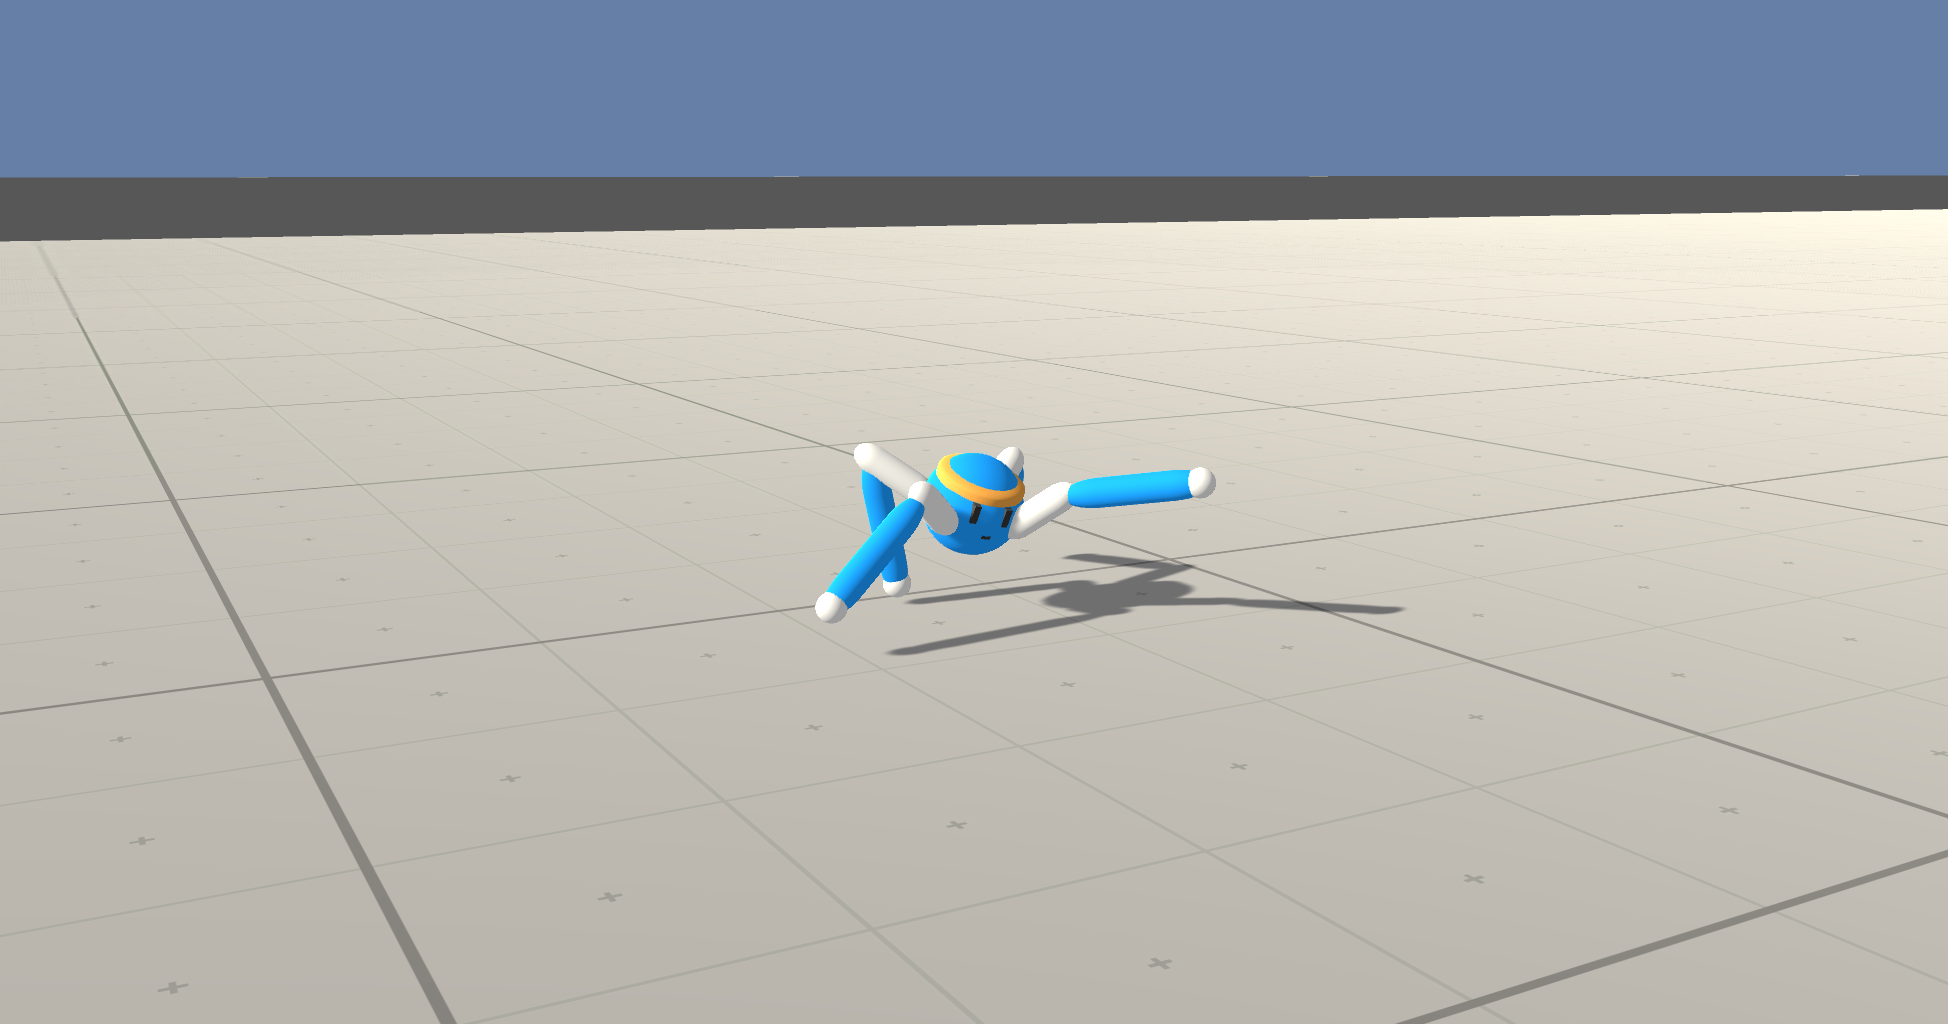
ML-Agents Crawler Environment
Download the Unity Environment
To solve this harder task, you'll need to download a new Unity environment. You need only select the environment that matches your operating system:
- Linux: click here
- Mac OSX: click here
- Windows (32-bit): click here
- Windows (64-bit): click here
Then, place the file in the p2_continuous-control/ folder in the DRLND GitHub repository, and unzip (or decompress) the file.
Please do not submit a project with this new environment. You are required to complete the project with the Reacher environment that was provided earlier in this lesson, in The Environment - Explore.
(For AWS) If you'd like to train the agent on AWS (and have not enabled a virtual screen), then please use this link to obtain the "headless" version of the environment. You will not be able to watch the agent without enabling a virtual screen, but you will be able to train the agent. (To watch the agent, you should follow the instructions to enable a virtual screen, and then download the environment for the Linux operating system above.)
Explore the Environment
After you have followed the instructions above, open Crawler.ipynb (located in the p2_continuous-control/ folder in the DRLND GitHub repository) and follow the instructions to learn how to use the Python API to control the agent.