C++ setup instructions (for MacOS)
Please refer to this document for detailed instructions.
Python C++ Cheatsheet
We are providing you with a cheatsheet showing you Python syntax and the C++ equivalent. You might find this cheatsheet helpful as you learn to program in C++. You'll find that some of the syntax between Python and C++ is exactly the same or at least similar.
Supporting Materials: C++ Python CheatSheet
Elecia White
Elecia White was kind enough to offer her time and expertise as we developed this course (and the next in the Nanodegree).
Elecia White is a principal embedded software engineer at Logical Elegance, Inc., a small consulting firm in California. She enjoys sharing her enthusiasm for engineering and devices through writing and speaking. Elecia is the author of O’Reilly’s Making Embedded Systems, host of Embedded.fm, and editor/blogger at Embedded.fm. Her past projects include children’s toys, a DNA scanner, inertial measurement units, Fitbit, and a gunshot location system.
Why C++?
Watch this video.
Python and C++ Comparison
Goal of this Module
The main goal of this module is to prepare you for writing C++ code. Because you are already familiar with coding practices in Python, the module will emphasize the similarities and differences between the two languages.
These lessons assume you are already familiar with general programming ideas like writing for loops, while loops, assigning values to variables, and writing functions. The fundamentals of how to code remain the same.
Learning a New Programming Language
The best way to learn a new programming language is to practice writing code; therefore, most of this lesson involves learning C++ syntax and then practicing the syntax in an exercise.
By the end of the lesson, you should feel confident translating Python code into C++ code.
Throughout this lesson, you will be presented with Python code and the C++ equivalent. Below is an example of a simple program in Python alongside a C++ version. Both versions do exactly the same thing; they assign an integer 5 to the variable x. Then they output the value of x to the terminal.
Study each example line by line. Notice the similarities as well as the differences:
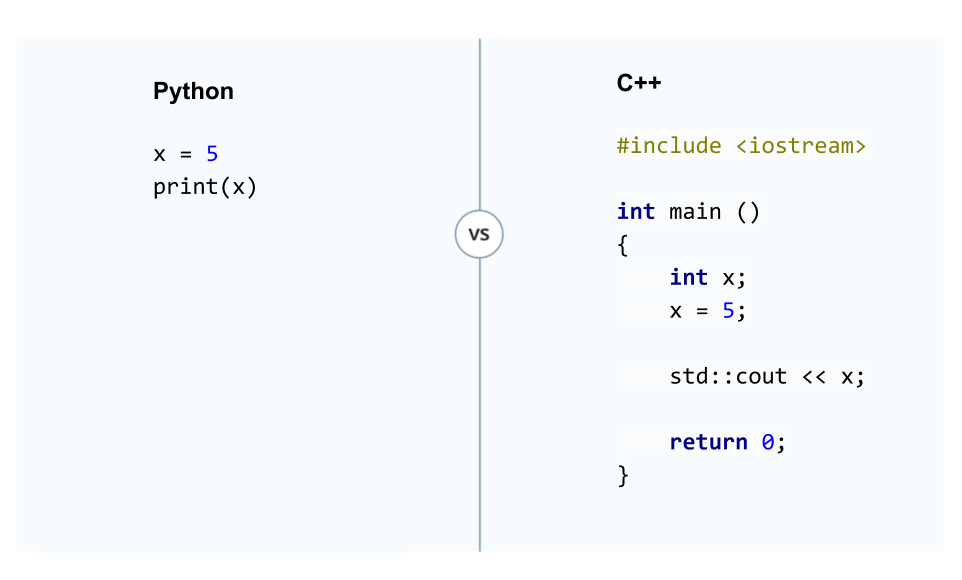
One similarity is variable assignment: x = 5. And the overall structure of the programs are the same.
But there are also a few major differences:
- the C++ program is wrapped with a function called
main() xhas to be explicitly defined as an integer- instead of using
print()to output the results to terminal, the code usesstd::cout
You are going to learn about all of these facets (and more) in this C++ lesson.
Static vs. Dynamic Typing
Watch this video.
Python is Dynamic, C++ is Static
Dynamically Typed versus Statically Typed
On the surface, Python and C++ have a lot in common; for instance, you'll see that if statements, for loops, and basic mathematical expressions are quite similar.
But under the hood, Python and C++ have fundamental differences. One major difference is that C++ is statically typed whereas Python is dynamically typed.
Take a look at this Python code:
vehicle_doors = 4
vehicle_speed = 3.0
vehicle_acceleration = 1.5
vehicle_on = True
vehicle_gear = 'D'
vehicle_doors = vehicle_doors + 1
Python automatically figures out that vehicle_doors is an integer, vehicle_speed is a float, and vehicle_on is a boolean variable. Variable assignment is dynamic. In Python, you do not need to specify the type of value that will go into a variable.
Did you notice the typo "vehicle_dors" instead of "vehicle_doors"? That is legitimate python code, and it won't produce an error.
In C++, none of the above code would work. You need to declare the variable type before you define a value; therefore, C++ is a statically typed language. Below is a C++ version of the code:
int vehicle_doors;
float vehicle_speed;
float vehicle_acceleration;
char vehicle_gear;
bool vehicle_on;

vehicle_doors = 4;
vehicle_speed = 3.0;
vehicle_acceleration = 1.5;
vehicle_gear = 'D';
vehicle_on = True;

vehicle_doors = vehicle_doors + 1;
If you had typed: vehicle_dors = vehicle_doors + 1;, you would get an error. That is because the vehicle_dors variable was never defined.
Declaring Variables in a Statically Typed Language
In this quiz, you will write integer variable declarations in C++. Read through the code below and fill in the TODO sections:
// include all libraries needed
#include <iostream>

/*
*	These are C++ comments. There are two ways to write comments in C++.
*	Using the slash with an asterisk is one way.
*/

// Here is another way to write comments in C++

/* In general, C++ code is run from a file called main.cpp
* The implementation goes into a function called main().
* The main() function almost always returns a zero, which provides evidence that
* the program ran to its end.
*/

// define main function
int main() {

    int integer_one;
    integer_one = 5;

    // TODO: Define a variable called integer_two and assign a value of 9.

    // TODO: Calculate the sum of integer_one and integer_two
    // and assign the result to integer_sum
    int integer_sum;

    // outputs the results to standard out
    std::cout << integer_sum;

    return 0;
}
Variable Assignment Python vs C++
What if the quiz had been in Python instead of C++? Remember, Python is a dynamically typed language whereas C++ is statically typed. In Python, you can assign values and Python automatically figures out what type of variable you wanted to use; however, when programming in C++, you need to declare the variable type prior to assignment.
C++ Tip
In the C++ quiz, you might have written a statement like:
int integer_two;
integer_two = 9;
You can also define and assign a variable in one line of code like this:
int integer_two = 9;
Basic C++ Data Types
Now you know how to declare a variable in a statically typed language like C++. The C++ language has a handful of basic data types that you can use directly in your programs. These include integers, floats, and characters. Here is a table showing the most important basic data types that you will be using in the lesson:
| data type | declaration |
|---|---|
| integer | int |
| floating point | float |
| double floating point | double |
| character | char |
| boolean | bool |
| valueless | void |
Some of these data types might look a bit unfamiliar. Here are some examples of each type:
integer
integers are whole numbers like -20 5 700 -19
floating point
floating points are real numbers containing decimals like 5.109 199.25 -1.278
double floating point
A double floating point can hold more decimals than a floating point; the tradeoff is that a double floating point requires more memory. The next part of the lesson goes into more detail about floating points versus double floating points.
character
The char type definition is for ASCII characters. ASCII represent the English language Roman alphabet and common mathematical symbols. A char variable can only hold one letter at a time; you cannot use a char type definition to represent a string.
examples of characters: a U l & @
boolean
Booleans are variables containing either true or false.
valueless
The void type definition is used for special cases. You cannot declare a void variable in C++. You'll find that void is used when a function does not return anything; a function might print something out to the terminal but not return a value.
Quiz:: Assigning Other Data Types
#include <iostream>

int main() {

    // TODO: define two floating point numbers. Assign 12.07 to the
    // first floating point number. Assign 65.102 to the
    // second floating point number.


    // TODO: Calculate the sum of the two floating point variables into
    // the float_sum variable.

    float float_sum;
    std::cout << float_sum << std::endl;

    // TODO: Calculate difference between the second and first number
    // output the results to cout.

    // TODO: Calculate second_float / first_float and output the results
    // to cout.

    // TODO: Calculate the product of the two numbers and output the results
    // to cout.

    return 0;
}
Floating and Double Floating Point Numbers
In the last section, you saw a table with fundamental C++ data types and their declarations.
What exactly is the difference between a float and a double?
Both data types can represent numbers containing decimals:
float x = 5.79;
and
double x = 5.79;
However, a double can store about twice as many digits as a float. But there is also a cost; a double requires more memory.
As you'll see in the demonstration below, storing more digits can be important especially when calculations require precision.
Demo: Floating versus Double Type Definitions
The following code will show you the difference between a float data type and a double data type. The code assigns the number 11.0 to a float variable as well as a double variable. Next, each variable is divided by one-hundred thousand.
A for loop then sums each variable one-hundred thousand times to see how close each variable can get to 11.0. You will see that neither variable gets back to exactly 11.0 because memory can only hold a finite number of decimal places. But, the double variable gets closer to exactly 11.0.
Read through the code and then hit the "Test Run" button to see the output of the demonstration.
#include <stdio.h>

int main() {

    // define floating point numbers
    float float_num;
    float float_sum = 0;

    double double_num;
    double double_sum = 0;

    int divisions = 100000;

    // divide the floating point numbers by divisions
    float_num = 11.0/divisions;
    double_num = 11.0/divisions;

    // sum the number by the number of divisions to see how close the results
    // get to 11.0
    for (int i = 0; i < divisions; i++) {
        float_sum = float_sum + float_num;
        double_sum = double_sum + double_num;

    }

    printf("Floating point sum: %.15g\n", float_sum);
    printf("Double sum: %.15g\n", double_sum);

    return 0;
}
Doubles are bigger
Watch this video.
Common Errors and Error Messages
As you to start to write your own C++ code, you might end up with some errors when you try to run your code. C++ errors can be very long and difficult to read even with something simple like a missing semi-colon. In this section, you are going to see some common errors you might run into when writing your C++ code. The goal is to become comfortable debugging your own code.
Here is a simple program that you saw in the beginning of the lesson. The program defines an integer x, assigns the value 5, and finally prints the results to terminal.
#include <iostream>

int main ()
{

    int x;
    x = 5;

    std::cout << x << std::endl;

    return 0;
}
Semi-colon Errors
What happens if you forget to end a line with a semi-colon?
#include <iostream>

int main ()
{

    int x
    x = 5;

    std::cout << x;

    return 0;
}
main.cpp:6:7: error: expected ';' at end of declaration
        int x
             ^
             ;
1 error generated.
This error message says that code line 6 at the 7th character in main.cpp should have ended in a semi-colon. Every command in C++ needs to end with a semi-colon.
Declaring and Defining Variable Errors
What about forgetting to declare a variable?
#include <iostream>

int main ()
{
    x = 5;

    std::cout << x;

    return 0;
}
main.cpp:6:2: error: use of undeclared identifier 'x'
        x = 5;
        ^
main.cpp:8:15: error: use of undeclared identifier 'x'
        std::cout << x << std::endl;
                     ^
2 errors generated.
This produced two errors: one for each time the x variable appeared. The error says that on line 6 at the 2nd character, the variable x needs to be declared. The same error occurs at line 8, character 15.
The undeclared identifier errors means that the variable needs a data type definition like int x;.
Namespace Errors
What happens if you forget to include std in the line std::cout?
#include <iostream>

int main ()
{

    int x;
    x = 5;

    cout << x;

    return 0;
}
main.cpp:9:2: error: use of undeclared identifier 'cout'; did you mean
      'std::cout'?
        cout << x;
        ^~~~
        std::cout
/Applications/Xcode.app/Contents/Developer/Toolchains/XcodeDefault.xctoolchain/usr/bin/../include/c++/v1/iostream:54:33: note:
      'std::cout' declared here
extern _LIBCPP_FUNC_VIS ostream cout;
                                ^
1 error generated.
All eleven lines refer to just one error! If you read the error line by line, however, you can get a lot of useful information. The most important part comes at the beginning where you're told that line 9, character 2 has an undeclared identifier cout. The error message tries to help by mentioning you probably meant to use std::cout.
The rest of the error tells points you to the file where std::cout was originally defined.
Library Include Errors
What happens if you forget to include the standard library file that defines std::cout?
int main ()
{

    int x;
    x = 5;

    std::cout << x;

    return 0;
}
main.cpp:7:2: error: use of undeclared identifier 'std'
        std::cout << x;
        ^
1 error generated.
The error says that C++ does not recognize what std means on line 7, character 2.
The definition of std is in the iostream file of the standard library, which needs to be included at the top of the program with the line #include <iostream>. Otherwise, your program won't recognize what std means.
Putting it All Together
So far, you've seen what happens when your program outputs one error at a time. What about when there are multiple errors?
int main ()
{

    x = 5;

    cout << x;

    return 0
}
main.cpp:4:2: error: use of undeclared identifier 'x'
        x = 5;
        ^
main.cpp:6:2: error: use of undeclared identifier 'cout'
        cout << x;
        ^
main.cpp:6:10: error: use of undeclared identifier 'x'
        cout << x;
                ^
main.cpp:8:10: error: expected ';' after return statement
        return 0
                ^
                ;
4 errors generated.
You get a list of errors starting from the top of your program and working down.
Undeclared identifier implies a variable or function needs a definition. And the semi-colon errors reminds you that all C++ commands need to end in a semi-colon.
When you run your code, you might end up with a very long list of errors that can be difficult to decipher. Usually, the first line of the error has the most important information, so start by looking at the top of the output. If you cannot figure out what an error means, try copying the error text and pasting it into a search engine. Oftentimes, there are resources online explaining what the error is and how to fix it.
Quiz: Fix this Code
Click on the Test Run button below. You will see that this code produces quite a few errors. Fix the errors until you have a working solution. You can ignore everything below the "Traceback" errors, which are not C++ errors; the traceback errors are related to the Python backend for running coding quizzes.
int main ()
{

	x = 25
	y = 61.4
	z = 199.2

	division = y / z

	cout << x << '\n'
	cout << y << '\n'
	cout << division << '\n'

	return 0
}
Functions: Python vs C++
In both Python and C++, functions have the same role; functions group statements together to perform some task. Functions help you avoid copying and pasting the same code over and over again.
The syntax for writing functions is slightly different for mainly three reasons:
- Python detects the end of a code line based on seeing a carriage return and new line feed. C++ uses a semi-colon for the same purpose.
- Python uses indentation to group code statements together, but C++ uses curly braces.
- Python is dynamically typed while C++ is statically typed. Much like how you declared variables, you need to declare your functions.
Let's start off with a simple function and compare the Python and C++ code side-by-side.
This function takes in a velocity and time. These are multiplied together to calculate a distance. Besides the differences in syntax, pay special attention to:
- the function declaration
- variable declarations
- what code goes inside main() and what code goes outside of main
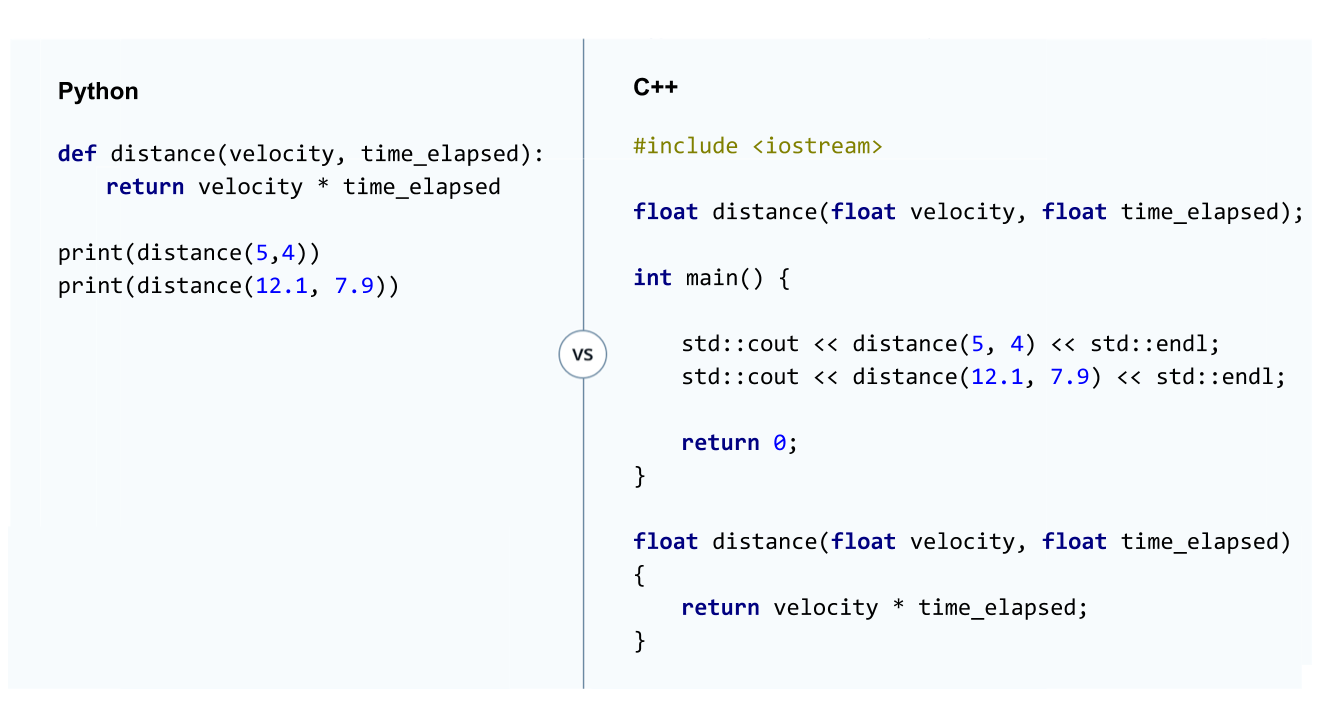
Dissecting the Code
So the C++ code looks much longer than the Python code because the C++ has some extra parts. You are going to dissect this code piece by piece.
The code starts off with
#include <iostream>
That is importing the iostream part of the C++ Standard Library. You need that line of code in order to use cout.
After importing the necessary libraries, you see a function declaration.
float distance(float velocity, float time_elapsed);
That line of code informs your C++ program that there is a function called distance. The function accepts two float variables and returns a float. The first float variable is called velocity and the second float variable is called time_elapsed.
Then comes the main function. All C++ programs require a main() function that returns a zero. The main() function calls the distance function and outputs the results to the terminal.
int main() {

    std::cout << distance(5, 4) << std::endl;
    std::cout << distance(12.1, 7.9) << std::endl;

    return 0;
}
and finally, you have the function definition
float distance(float velocity, float time_elapsed) {
    return velocity * time_elapsed;
}
You have seen the main() function before, so this isn't the first time you have seen how functions work in C++. Notice how the main function and the distance function have very similar syntax. The only difference is that the main function does not accept any arguments and returns an integer of value zero; on the other hand, the distance function accepts two floats and returns a float.
You also don't make a separate declaration for the main function. On the next page, you'll get more practice with understanding functions and writing functions in C++.
Anatomy of a Function
You have seen how to write a function in C++. More generically, a C++ functions consists of a function declaration and a function definition.
Because C++ is statically typed, you need to specify the data types for the function input variables and the data type of whatever the function returns.
// function declaration
returndatatype functionname(datatype variable_a, datatype variable_b, etc.);
// function definition
returndatatype functionname(datatype variable_a, datatype variable_b, etc.) {
     statement_1;
     statement_2;
     etc...

   return returndatatype;
}
Quiz: Write a Function
Write a function, called distance, with three inputs and one output. The inputs are velocity, acceleration and time. The output is the distance traveled over the elapsed time. The equation for calculating distance is:
distance = velocity \times elapsedtime + 0.5 \times acceleration \times elapsedtime \times elapsedtimedistance=velocity×elapsedtime+0.5×acceleration×elapsedtime×elapsedtime
This quiz is not graded. You will see some test cases in the main() function to test out your code. To run your code, click on the "Test Run" button.
A solution has been provided in the solution.cpp so that you can compare your results.
//TODO: include the iostream part of the standard library
#include <iostream>

//TODO: declare your function called distance
float distance(float velocity, float acceleration, float time_elapsed);

// Leave the main function as is
int main() {

    // TODO: The following are examples you can use to test your code.
    // You will need to uncomment them to get them working.

    std::cout << distance(3, 4, 5) << std::endl;
    std::cout << distance(7.0, 2.1, 5.4) << std::endl;

    return 0;
}

//TODO: define your function
float distance(float velocity, float acceleration, float time_elapsed) {
    return velocity*time_elapsed + 0.5*acceleration*time_elapsed*time_elapsed;
}
Functions with More than One Output
In Python, you can write a function that has multiple outputs. For example,
## Python Code
def distance(velocity, time_elapsed):
    return velocity * time_elapsed, velocity / 2
would output both velocity * time_elapsed and velocity / 2.
In C++, functions can only have one output. There are work-arounds, but these work-arounds go beyond the scope of this module.
C++ Tip: Function Declarations
You do not have to put the function declaration at the top of your code to get a working solution. Much like how you can declare and define a variable simultaneously, int x = 5;, you can also declare and define a function simultaneously.
The following code would work as well:
// C++ code
float distance(float velocity, float time_elapsed) {
    return velocity * time_elapsed;
}

int main() {

    std::cout << distance(5, 4) << std::endl;
    std::cout << distance(12.1, 7.9) << std::endl;

    return 0;
}
But note that you have to define your function before the main() function not after; otherwise your code would try to call the distance() function but not have a definition for the function.
However, we encourage you to always declare your functions before main() and define them after main. In the next lesson in the nanodegreee called practical C++, you will learn why; declaring and defining your functions separately helps keep your code organized as your programs become more complex.
Two Functions Same Name
Andy learns about typedef and is reminded to always be suspicious of repeated code.
Note: Elecia and Andy use the word "vector". For now you should think of a vector as something similar to a Python list. So when Elecia says "vector vector float", she is referring to a two-dimensional list (a list of lists) whose elements are floats.
Watch the video here.
The following line of code can be used to define an entirely new type called t_grid which is a vector of vectors of floats (for now you can think of vectors as being similar to Python lists).
typedef vector < vector <float> > t_grid;
Anywhere you would have written vector < vector <float> >, you can now just write t_grid!
In the video below Andy discovered something surprising while translating his histogram filter code from Python to C++. He could have two different functions which each had the same name and this didn't cause any problems.
You can find the code Elecia and Andy discuss below the video.
bool close_enough(float v1, float v2) {
    if (abs(v2-v1) > 0.0001 ) {
        return false;
    }
    return true;
}

bool close_enough(vector < vector <float> > g1, vector < vector <float> > g2) {
    int i, j;
    float v1, v2;
    for (i=0; i<g1.size(); i++) {
        for (j=0; j<g1[0].size(); j++) {
            v1 = g1[i][j];
            v2 = g2[i][j];
            if (abs(v2-v1) > 0.0001 ) {
                return false;
            }
        }
    }
    return true;
}
Watch the video here.
Function Signatures 1
Here Andy and Elecia discuss function signatures. The code for the test_normalize function can be found below the video.
Watch the video here.
bool test_normalize() {
    //declare several variables on one line
    vector < vector <float> > unnormalized, normalized, result;

    unnormalized = zeros(2, 2);
    normalized = zeros(2,2);

    int i,j;

    for (i=0; i<2; i++) {
        for(j=0; j<2; j++) {
            unnormalized[i][j] = 1.0;
            normalized[i][j] = 0.25;
        }
    }

    result = normalize(unnormalized);

    bool correct;
    correct = close_enough(normalized, result);

    if (correct) {
        cout << "! - normalize function worked correctly!\n";
    }
    else {
        cout << "X - normalize function did not work correctly.\n";
        cout << "For the following input:\n\n";
        show_grid(unnormalized);
        cout << "\nYour code returned the following:\n\n";
        show_grid(result);
        cout << "\nWhen it should have returned the following:\n";
        show_grid(normalized);
    }
    return correct;
}
Function Signature 2
Andy and Elecia continue their discussion of function signatures. Code below the video.
The signature for the normalize function is:
vector< vector<float> > normalize(vector< vector <float> > grid);
Watch the video here.
If and Boolean Logic
Control Statements
Now that you know how to declare variables and write functions, you are well on your way to C++ proficiency.
So far, the programs you've worked with have been relatively simple. You will need control statements to make more complex programs. Control statements like if and for are fundamental to many programming languages. They allow you to make conditions about when and how often code statements should be run.
In this section, you will learn to use C++ if statements and the associated boolean logic.
The next section will cover looping with while and for. And then finally, you will learn about the switch statement. Python has equivalents for if, while and for; however, the switch statement does not exist in Python.
After you learn about control statements, you will be ready to write more sophisticated C++ programs.
Python vs. C++ If
Below is an example of a Python set of if statements versus the C++ equivalent.
You will see that the logical structure is exactly the same but the syntax is slightly different. You could imagine that the code below would be part of a traffic light classification program that tells a vehicle the current color of a traffic signal.
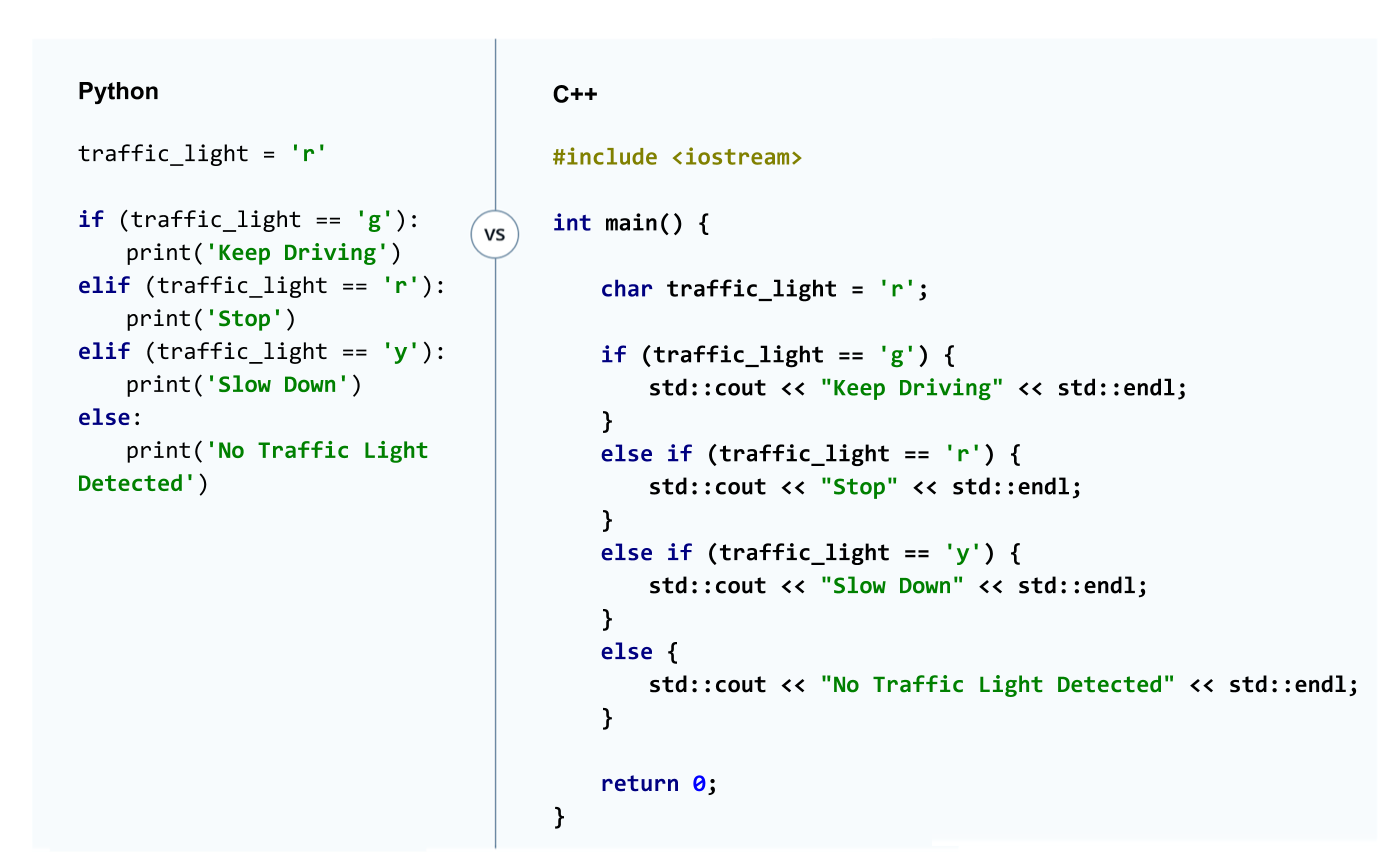
A generic if else statement in C++ looks like this:
if (<some criteria>) {
    statement_1;
    statement_2;
   .... etc.
}
else if (<some other criteria>) {
    statement_1;
    statement_2;
   .... etc.
}
else {
    statement_1;
    statement_2;
   .... etc.
}
Boolean Logic
You need boolean logic to make if statements useful. Boolean logic works the same way in Python and in C++; some of the syntax is the same and some is slightly different.
Here is a table showing comparison operators in the two languages:
| Operator | Python | C++ |
|---|---|---|
| equal | == | == |
| not equal | != | != |
| not equal | != | != |
| greater than or equal | >= | >= |
| less than or equal | <= | <>= |
Yes, indeed, comparison operators are exactly the same in the two languages!
What about logical operators such as and, or, as well as not?
These are not the same in the two languages:
| Operator | Python | C++ |
|---|---|---|
| and | and | && |
| or | or | || |
| not | not | ! |
Playground
Here is a playground for writing your own if statements. In the code comments, you will see a couple of suggestions of what to code. The solution.cpp file has solutions with which you can compare your code.
#include <iostream>

int main() {

    /*
    * TODO: Use this as a playground for writing if, else if and else statements
    * To get you started here, are some ideas:
    *
    * 1. Create an integer variable and a set of if, elseif and else statements that
    * output whether the number is positive or negative.
    *
    * 2. Create a character variable containing 'a' for acceleration, 'b' for braking,
    * 'p' for parked, or 'n' for neutral and outputs whether or not the vehicle is accelerating, braking,
    * parked or in neutral.
    *
    * Practice Using Boolean Logic
    *
    * You can see an example solution in the solution.cpp file
    */

    int x = 5;
    if (x > 0) {
        std::cout << "Positive Number" << std::endl;
    }
    else if (x < 0) {
        std::cout << "Negative Number" << std::endl;
    }
    else {
        std::cout << "Zero" << std::endl;
    }


    char status = 'a';

    if (status == 'a') {
        std::cout << "Accelerating" << std::endl;
    }
    else if (status == 'b') {
        std::cout << "Braking" << std::endl;
    }
    else if (status == 'p') {
        std::cout << "Parking" << std::endl;
    }
    else if (status == 'n') {
        std::cout << "Neutral" << std::endl;
    }
    else {
        std::cout << "Unknown" << std::endl;
    }

    return 0;
}
While and For Loops
Python vs. C++ While
Below you'll see an example of a Python while loop compared with a C++ while loop. They look quite similar!
The example starts with an integer 15 in the elapsed_time variable. With each iteration, the integer is reduced by 1. Once the elapsed_time reaches zero, the program leaves the while loop.
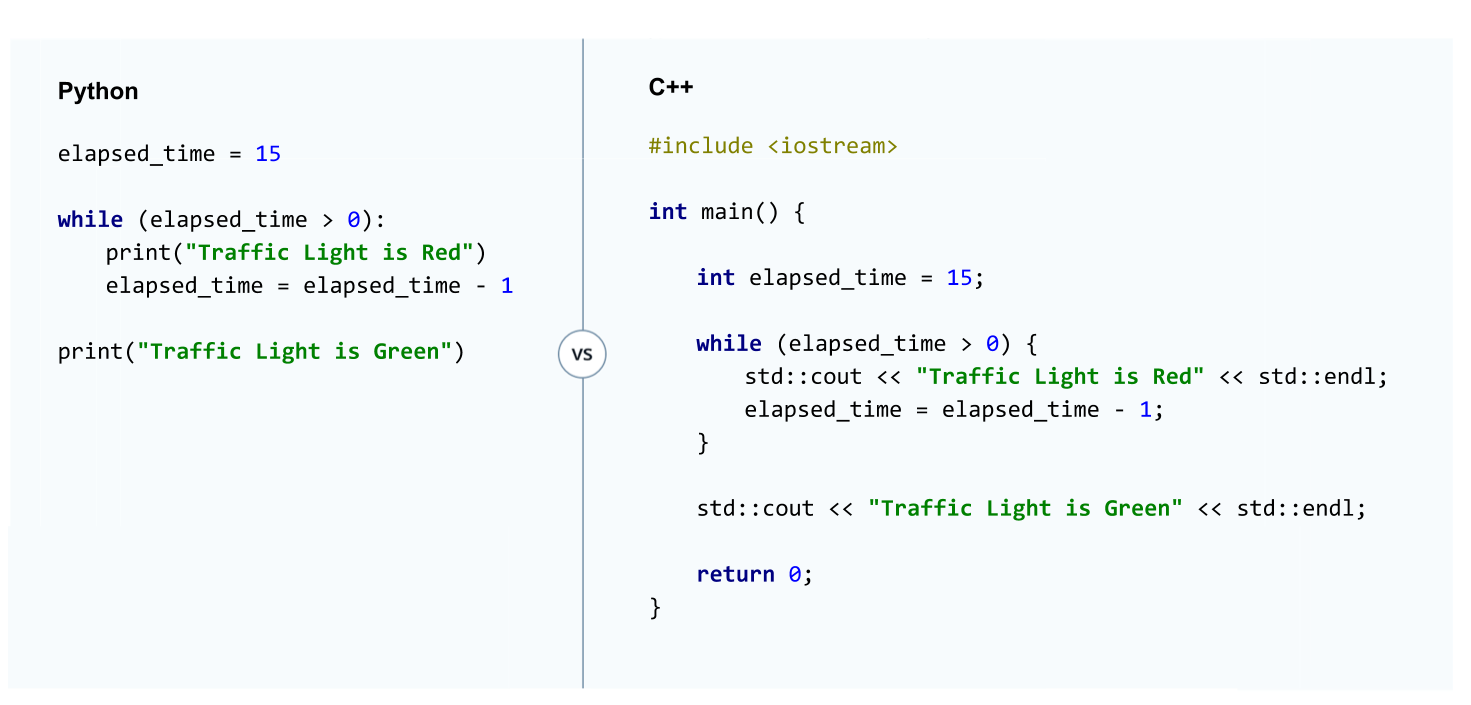
A generic while statement looks like this:
while (<some criteria>) {
    statement_1;
    statement_2;
    statement_3;
    ....etc
}
Python vs. C++ For loops
For loop syntax is very similar in Python and C++ as well.
This following example is like the while loop except the count variable increases instead of decreases (this does not necessarily need to be the case, we just did it that way here).
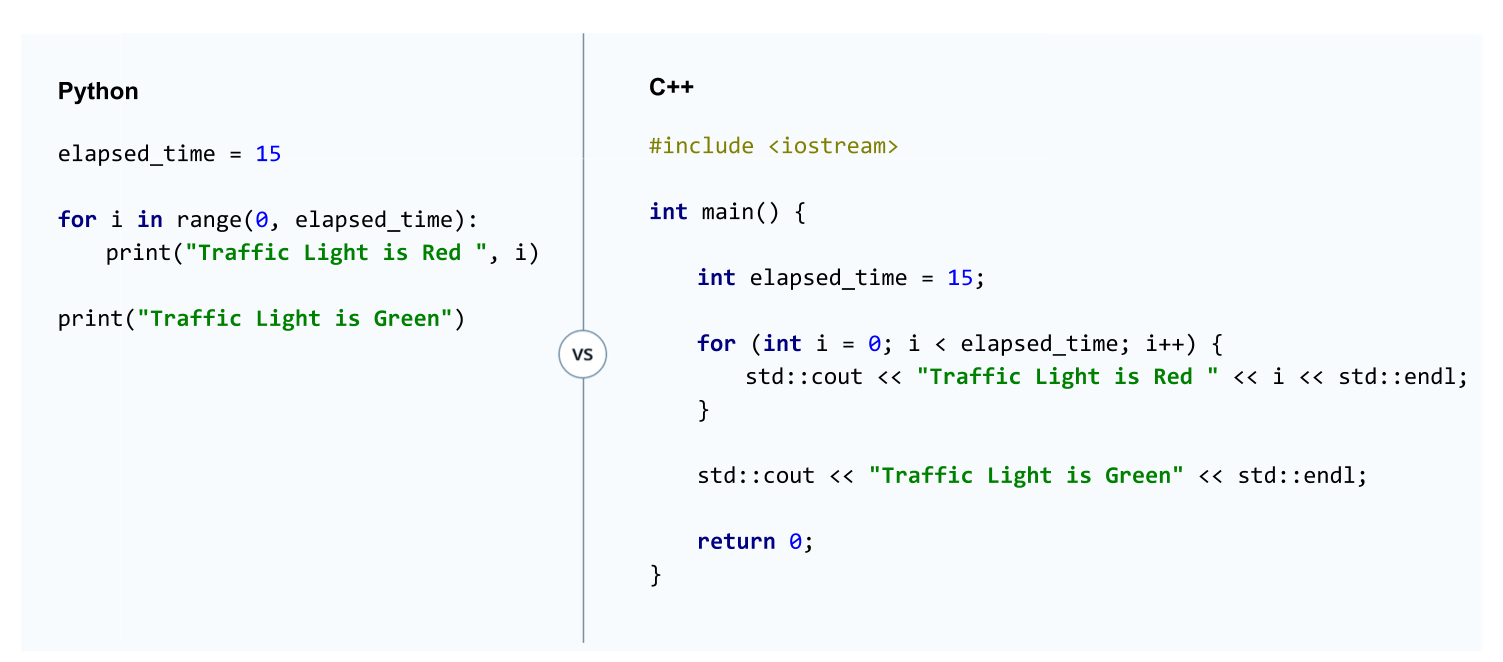
One thing to note is how Python iterates through the i variable versus how C++ does the iteration.
For python the iterator was defined here:
i in range(0, elapsed_time)
Python's range() function generates a list of numbers, which in this case would be
[0, 1, 2, 3, 4, 5, 6, 7, 8, 9, 10, 11, 12, 13, 14]
Then Python assign each of these values in turn to the i variable until reaching the end of the list.
For C++, the iteration happens in this line of code:
(int i = 0; i < elapsed_time; i++)
First you declare the variable i and assigned a value (in this case zero). The for loop then checks if
i < elapsed_time
If true, then the code block is run and then i increases by one. The code i++ is equivalent to saying i=i+1.
When
i = 14
that will be the last time that the code block runs. The code checks that 14 is less than 15, runs the code block and increases i to 15. Then the code checks if 15 is less than 15. Since that is false, the for loop does not run again.
Playground - For Loops
Use this playground to program for loops. The comments have a suggestion to get you started, and you can compare your code with the solution in solution.cpp.
#include <iostream>

int main() {

    for (int i = 0; i < 80; i++) {
        if (i < 10) {
            std::cout << "slow" << std::endl;
        }
        else if (i < 30) {
            std::cout << "medium" << std::endl;
        }
        else if (i < 70) {
            std::cout << "fast" << std::endl;
        }
        else {
            std::cout << "too fast" << std::endl;
        }

    }


    return 0;
}
One item to note in the above playground is that C++ considers something enclosed in single quotes ('a') to be a char, while double quotes ("fast") is a string.
Switch
A switch statement is very similar to an if clause. In fact, you can write a program that does the exact same thing with either a switch statement or a series of if-else clauses.
Then why bother using a switch statement? For reasons we won't detail here, switch statements can oftentimes be faster to execute. Many programming languages have a switch statement including Java, Javascript, PHP, C++ among others; Python is an exception.
Since there is no Python switch statement, we will compare a set of if-else C++ clauses with a C++ switch statement.
Click on the image to zoom in.
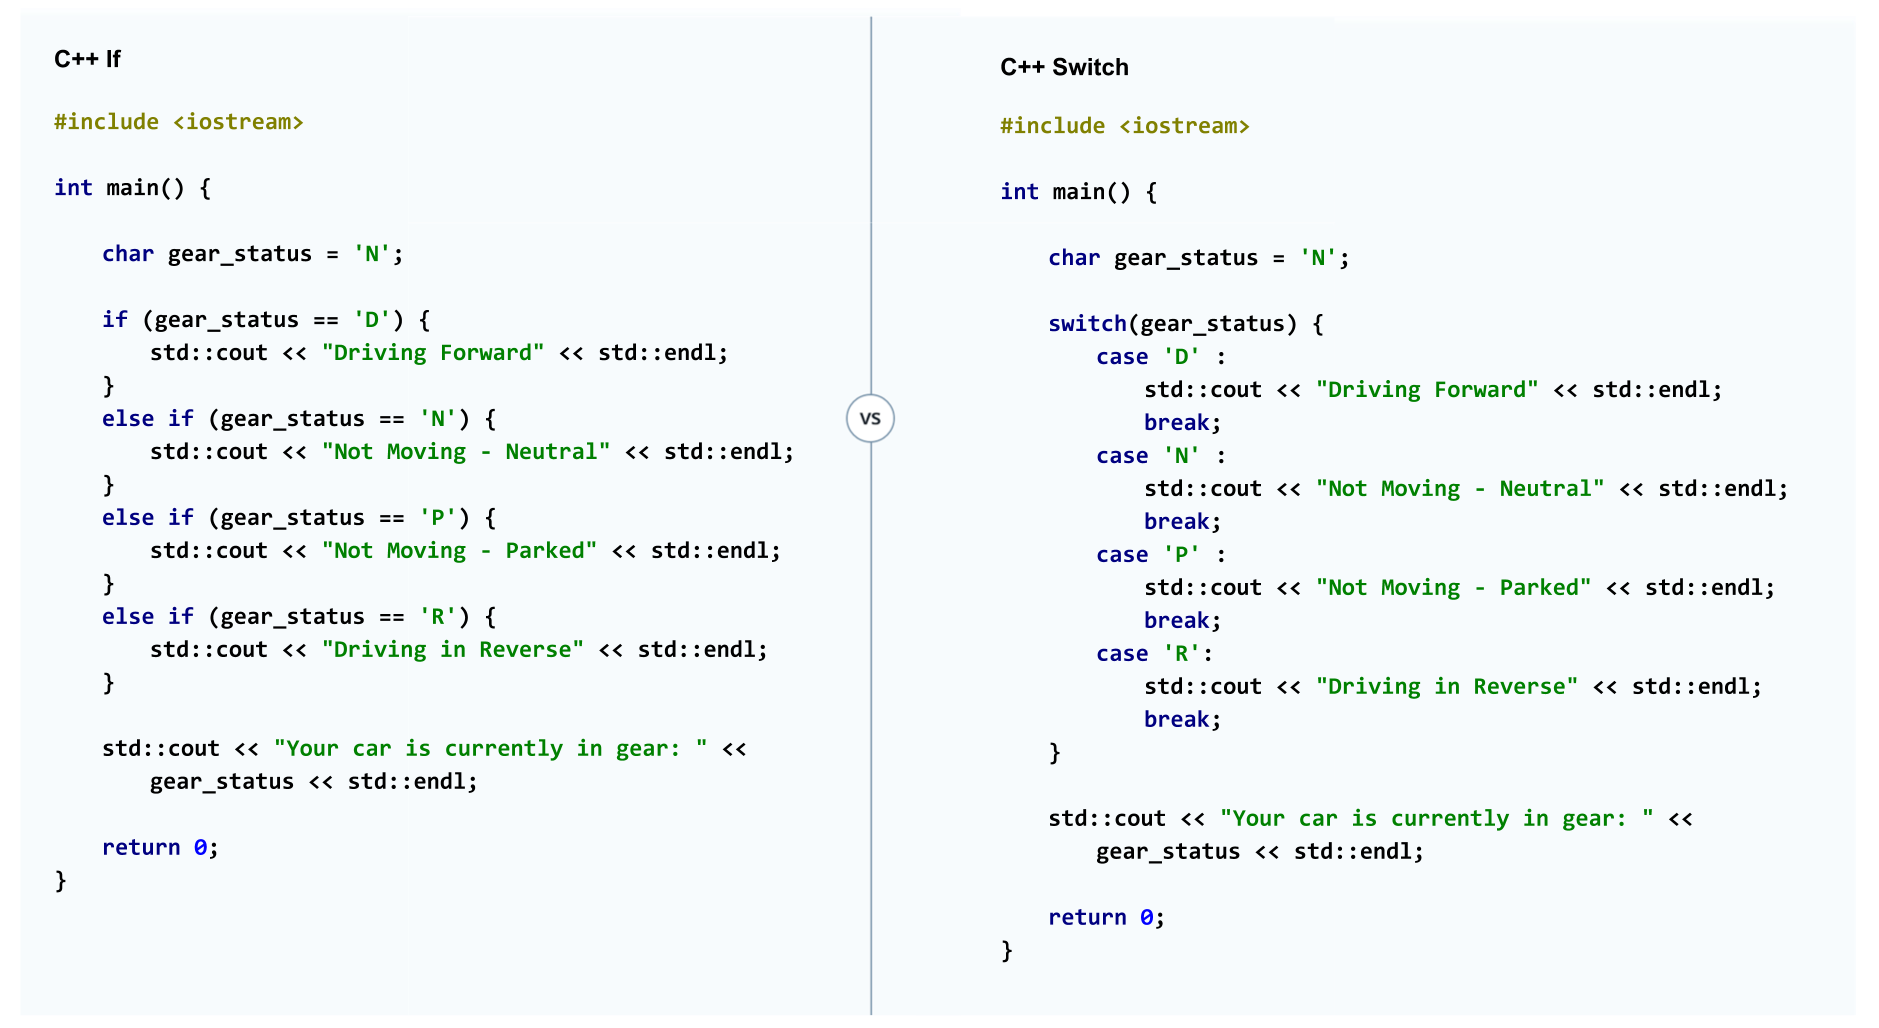
The output of the code would be
Not Moving - Neutral
Your car is currently in gear: N
Let's break down what is happening in the switch statement:
    char gear_status = 'N';

    switch(gear_status) {
        case 'D' :
            std::cout << "Driving Forward" << std::endl;
            break;
        case 'N' :
            std::cout << "Not Moving - Neutral" << std::endl;
            break;
        case 'P' :
            std::cout << "Not Moving - Parked" << std::endl;
            break;
        case 'R':
            std::cout << "Driving in Reverse" << std::endl;
            break;
    }
Each time case appears, the code checks to see if the gear_status variables matches the case. Once gear_status finds a matching case, the code inside the case runs.
In C++, the switch statement was designed to run the code in the matching case and then all of the cases below. You need the break lines of code if you want your code to leave the switch after executing the matching case.
In other words, if the code were written without using break,
#include <iostream>

int main() {

    char gear_status = 'N';

    switch(gear_status) {
        case 'D' :
            std::cout << "Driving Forward" << std::endl;
        case 'N' :
            std::cout << "Not Moving - Neutral" << std::endl;
        case 'P' :
            std::cout << "Not Moving - Parked" << std::endl;
        case 'R':
            std::cout << "Driving in Reverse" << std::endl;
    }

    std::cout << "Your car is currently in gear: " << gear_status << std::endl;

    return 0;
}
the code would still skip the 'D' case. But once the code found a match with the 'N' case, the code in the 'N', 'P', and 'R' cases would execute.
Switch Limitations
If-else statements are much more flexible than switch statements. In fact, the case clauses in switch statements can only make comparisons between integer values. Switch cases can also compare characters like in the example code because C++ is actually converting the characters to integers.
On the other hand, if statements can make comparisons between floating point numbers as well as between integers.
The general form of a switch statement looks like this:
    int variable = integer;

    switch(variable) {
        case 1:
            code statements;
            break;
        case 2 :
            code statements;
            break;
        case 3:
            code statements;
            break;
        case 4:
            code statements;
            break;
        case etc ...
    }
Switch Statement - Playground
Practice writing a switch statement in the playground below. The code comments will help you get started. You can run your code with the "Test Run" button and then compare your solution with "solution.cpp".
//TODO Practice writing switch statements
// Don't forget an include statement if you want to use std::cout

#include <iostream>

int main() {

    // TODO: write a program that outputs whether a vehicle is a motorcycle,
    // 2-door coupe, 4-door car or a 5-door mini-van.
    // You should create a variable that holds the number of doors in the vehicle
    // A motorcycle would have doors = 0 for example.
    // Then use a switch statement to output to the terminal the kind of vehicle
    // you have

    int doors = 5;

    switch(doors) {
        case 0:
            std::cout << "Motorcycle" << std::endl;
            break;
        case 2:
            std::cout << "Coupe" << std::endl;
            break;
        case 4:
            std::cout << "Sedan" << std::endl;
            break;
        case 5:
            std::cout << "Mini-van" <<std::endl;
            break;

    }

    return 0;
}
C++ Libraries
You have learned how to declare variables, write functions, and use control statements. Those are the basic building blocks of any programming language, and you are ready to write programs in C++.
But, what if you want to store a string in a variable or do more advanced math like taking the square root of a number? Just like Python, C++ also uses pre-built libraries to help make programming easier. In python, you use these libraries with an
import
statement.
In C++, you use
#include
You have already been using a file called "iostream" from the C++ Standard Library. The "iostream" file contains functions and classes for outputting to a terminal and also reading in from a terminal.
You were able to take advantage of these pre-built functions by including the appropriate file like so:
#include <iostream>
That include statement essentially pastes the iostream file to the top of your code and gives you access to all of its functions and classes.
As your programs become more complex, you will rely more and more on C++ libraries.
C++ Standard Library
The C++ Standard Library has a lot of functions and classes like a definition for a string, arrays, tuples, functions for reading in and outputting files, random number generators, definitions for complex number variables, mathematical functions and many other functions as well.
And the C++ Standard Library comes with a C++ installation.
Besides this list of files in the Standard Library, search engines are your best friend for finding functionality and libraries in C++. For example, if you are not sure how to do something in C++ like using strings, open a search engine and type "C++ string syntax". You will find many examples online of how to use strings in C++ and quickly find an example like the following:
Example: Strings
To use the part of the library that defines strings, you would include a line at the top of your main.cpp file like:
#include <string>
#include <string>

int main() {
   std::string stringvariable = "stringvalue";
   return 0;
}
Example: Math
Here is another example from the standard library.
#include <iostream>
#include <cmath>

int main ()
{
   // calculate
    std::cout << pow(3.4, 4);
}
The pow() function is raising 3.4 to the fourth power.
Cmath includes logarithmic and exponential functions, power functions, and trigonometric functions. You can see a full list here.
Include Syntax
When you learned about structuring functions, you saw two different include statements:
#include <iostream>
#include "distance.h"
In fact, you could also write,
#include "iostream"
#include "distance.h"
but using quotes instead of brackets is less efficient. When using quotes, your program will first look for the iostream file in the main.cpp directory. When the program cannot find the file, the program will search where the standard library files are kept.
Other Useful Libraries
As previously mentioned, the C++ Standard Library generally comes with a C++ installation; however, there are many other useful C++ libraries that you install separately. Each library will have its own installation procedure and usually comes with instructions. Again, search engines are your best friends when trying to find and install libraries.
This link contains a list of many open source C++ libraries. In the list, you will see all kinds of libraries for math, gaming, computer vision, machine learning, as well as many other topics.
In the next lesson, you will learn to use the C++ vector library.
C++ Vectors
Vectors and Matrix Algebra
Great work! You made it through a bunch of C++ syntax. As you've probably realized, programming in C++ is arguably harder than programming in Python. C++ was designed for fast execution, and the language gives you a lot of different ways to get the same results. Python was designed for writing code quickly but at the expense of execution speed.
There is one last piece of syntax you'll need to translate your Python code from earlier in the nanodegree: C++ vectors, which are like Python lists.
The Vector Library
When you were writing Python programs to store and manipulate matrices, you used Python lists. C++ vectors are just like Python lists. In this lesson, you are going to practice using C++ vectors in preparation for translating Python code to C++.
But hold on! C++ also has something called a list. But this is where things get confusing. However, C++ lists do not work the same way as Python lists.
C++ lists and C++ vectors are both in a family of structures called sequence containers. These containers allow you to store values in series and then access those values. C++ has a handful of sequence containers including lists, vectors, and arrays.
Don't get confused! C++ vectors are the closest to Python lists. You can add elements to a C++ vector just like you can in a Python list. You can remove elements as well and also easily access any element in the vector.
Declaring C++ Vectors
Declaring C++ vector variables is like declaring any other type of variable:
typedefinition variablename;
But the vector type definition has a funny looking syntax because you also need to declare what kind of values will go inside the vector such as integer, char, float, string, etc. Here are some examples of variable declarations using vectors:
std::vector<char> charactervectorvariable;
std::vector<int> integervectorvariable;
std::vector<float> floatvectorvariable;
std::vector<double> doublevectorvariable:
Including the Vector Library
In an actual program, you would need to include the vector file from the Standard Library:
#include <vector>

int main() {
      std::vector<float> floatvectorvariable;
      return 0;
}
The above code will declare an empty vector of type float.
More generically, you declare a vector with:
std::vector<datatype> variablename;
Practice Declaring Vectors
#include <vector>

int main() {

    std::vector<int> vector1;
    std::vector<int> vector2;
    std::vector<int> vector3;

    return 0;
}
Namespaces
C++ vector syntax is a little bit hard to read especially because you have to type std over and over again: like for example, std::cout or std::string or std::vector.
Thankfully, C++ provides a way to avoid writing std all the time.
Std is something called a namespace. Without getting too much into the details, namespaces let you organize code into logical groups. In this case, std is the namespace for the Standard Library.
You can actually declare your namespace at the top of your main.cpp file and then avoid writing
std::
over and over again. Here is an example:
#include <iostream>
#include <vector>
using namespace std;

int main() {
    vector<int> intvectorvariable;
    int intvariable = 5;
    cout << intvariable << endl;
    return 0;

}
Now, the vector declaration, cout and endl no longer needed std::.
Benefits of Namespaces
Declaring the namespace makes the code easier to read and write. The downside is that you have to be careful with how you name your own variables and functions. Previously, you might have written:
std::cout
which lets your program know that you meant the cout function from the standard library.
C++ would have let you actually create a variable or function named cout as well. That's probably not a good idea, but the code won't produce an error. Once you declared the std namespace, your cout variable or function would be in conflict with the standard library cout.
Going forward from this point, the exercises and code examples will include the using namespace std; line of code.
You can now simplify the vector syntax using namespaces. Let's compare Python list and C++ vector syntax and then practice coding C++ vectors.
Namespace Practice
Use the standard library namespace and change the code so that the code no longer uses "std::".
#include <iostream>
#include <string>

using namespace std;

int main() {

    string fruit = "apple";
    string vegetable = "broccoli";

    cout << "My favorite fruit is " << fruit <<
      "and my favorite vegetable is " << vegetable << "\n";

    return 0;
}
Python and C++ Comparison
Let's get back to vectors! You have already seen how to declare an empty vector.
In the code below, you can compare Python lists and C++ vector syntax. You'll see that the C++ vector is using a method called push_back, which appends values to the end of a vector. And the line of code
vector<float> myvector (5);
declares vector of size five but without assigning any values. Assigning values to a C++ vector can be a bit tricky; later in this lesson you will see a few different ways to assign values to a vector variable.
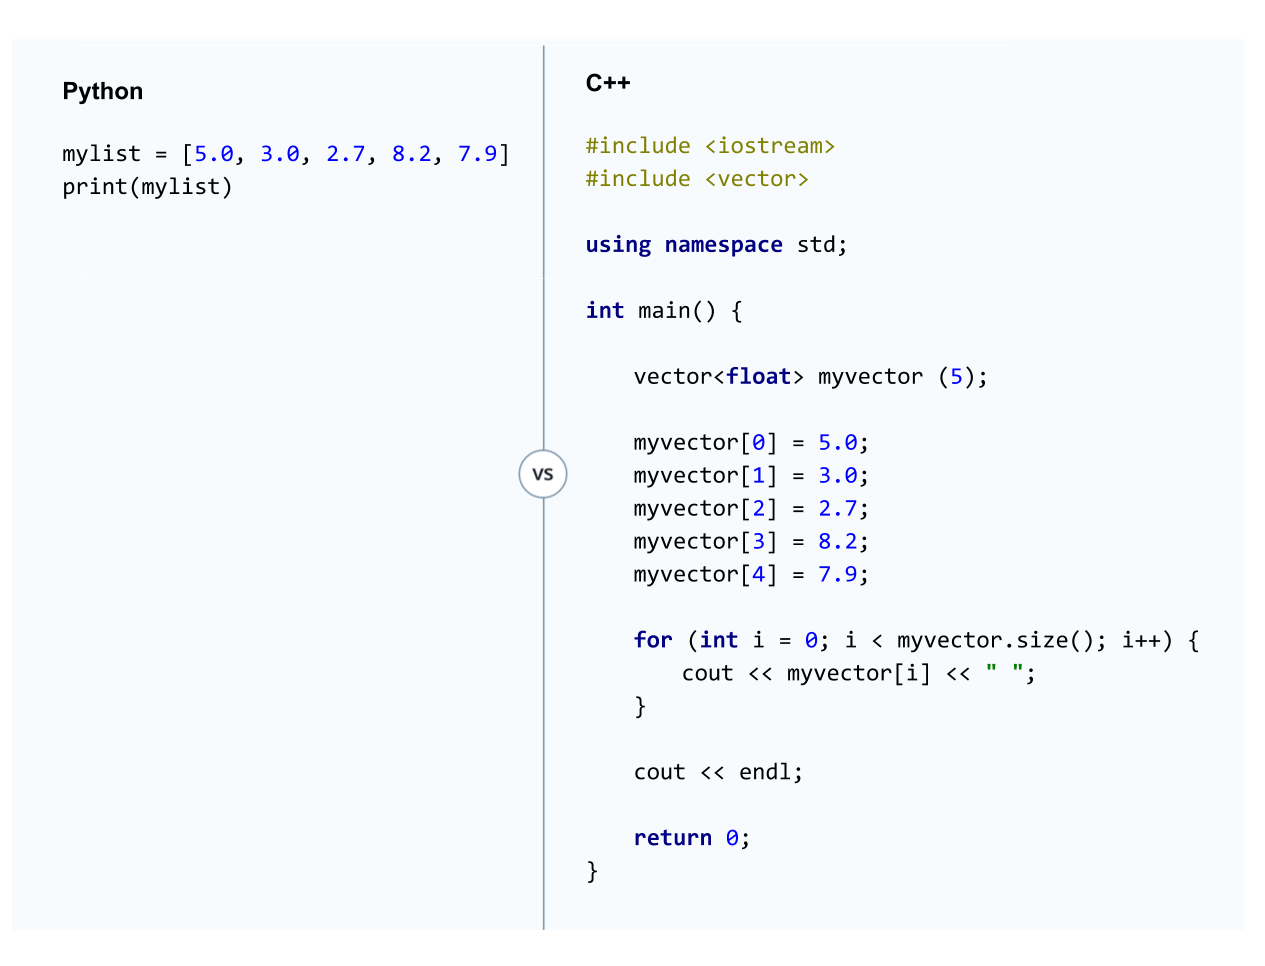
The Python code is, as you've seen previously, much shorter to write than the C++ code. However, there are other ways for inputting values in a vector, which you will see in the next section.
Initializing Vector Values
In the previous part of the lesson, you learned to declare a vector first and then assign values:
vector<float> myvector(5);

myvector[0] = 5.0;
myvector[1] = 3.0;
myvector[2] = 2.7;
myvector[3] = 8.2;
myvector[4] = 7.9;
There are various other ways for assigning initial values to a vector. Here are two other ways:
Declaring and Defining Simultaneously
When declaring a vector, you can also assign initial values simultaneously.
std::vector<int> myvector (10, 6);
The code will declare a vector with ten elements, and each element will have the value 6.
Declaring and Defining Simultaneously with Brackets
There is another way to initialize a vector as well if you are using one of the more recent versions of C++ such as C++11 or C++17; You could also do something like:
std::vector<float> myvector = {5.0, 3.0, 2.7, 8.2, 7.9}
The different versions of C++ (C++98, C++11, C++14, and C++17) will be discussed in the Practical C++ lesson.
Practice Declaring and Defining Vectors
In the space below, follow the TODOs. When you are finished, check out the solution.cpp file.
#include <vector>

using namespace std;

int main() {

    vector<float> vector1(4);
    vector1[0] = 4.5;
    vector1[1] = 2.1;
    vector1[2] = 8.54;
    vector1[3] = 9.0;

    vector<float> vector(4, 3.5);

    return 0;
}
Vector Methods
Vectors have a handful of useful functions, which you can see here. In this part of the lesson, you will go over the ones you will be using in the object oriented programming lesson.
assign
Assign helps you quickly populate a vector with fixed values. For example this code,
vector<int> intvariable;
intvariable.assign(10,16);
is going to populate the vector with ten integers all having the value of 16.
The assign method lets you override your current vector with a new vector.
Remember, you've already seen a similar way to initialize values in a vector:
vector<int> intvariable(10,16);
The difference is that the assign method lets you override your current vector with new values.
push_back
Pushback adds an element to the end of the vector:
vector<int> intvariable;
intvariable.push_back(25);
size
Size returns the size of the vector.
intvariable.size();
Practice with Vector Methods
Before getting practice with these vector methods, move on to the next section to learn about accessing vectors with for loops. In the next section, you'll combine the methods you just learned with for loops.
Vectors and For Loops
Much of the time, you will be using for loops to manipulate vectors. Once you are comfortable using for loops with vectors, you can do things like:
- populate a vector with values
- do math with vectors
Here is a program that initializes a vector and then uses a for loop to populate the vector with values. Then another for loop reads out the vector values.
#include <iostream>
#include <vector>

using namespace std;

int main() {

    vector<float> example;

    for (int i = 0; i < 5; i++) {
        example.push_back(i*5.231);
    }

    for (int i = 0; i < example.size(); i++) {
        cout << example[i] << endl;
    }

    return 0;
}
The output looks like this:
0
5.231
10.462
15.693
20.924
Using i++ Versus ++i
So far, you've learned to write C++ for loops like the following:
for (int i = 0; i < 10; i++) {}
This syntax matches closely to the Python for loop syntax; however, you can also write a for loop like this:
for (int i = 0; i < 10; ++i) {}
What is the difference and why do both ways work?
In practice, both i++ and ++i will give you the same results; these are a shorthand way of writing i = i + 1. The difference between the two is subtle.
int i = 5;
int x = i++; // x = 5, i = 6 (called postfix)
int x = ++i; // x = 6, i = 6 (called prefix)
In both cases, the i variable increases by 1. In the postfix case, i++, int x = i is evaluated first and then i = i + 1 occurs.
In the prefix case, ++i, i = i + 1 occurs first and then int x = i executes.
Many code guidelines recommend using ++i over i++. In reality neither one is more efficient than the other when using integer variables.
However, there is a difference when you write a C++ class that overloads the ++ operator. You saw operational overloading in the Python matrix project; the code overloaded mathematical signs to carry out matrix addition, subtraction, multiplication, etc.
When overloading the postfix operator, C++ needs to keep track of two values. In the example, the values would be 5 and 6. For the prefix operator, C++ only needs to keep track of one value: 6. Hence, when overloading the ++ operator, it's generally more efficient to use prefix than the postfix.
Overloading is an advanced C++ topic that isn't covered in depth here. If you'd like to learn more, here are a few resources:
Practice with Vector Methods and For Loops
#include <iostream>
#include <vector>

using namespace std;

int main() {

    // Part 1: declare and define a vector {5.0, 5.0, 5.0} and print it out
    vector<float> vectorvar(3, 5.0);

    for (int i = 0; i < vectorvar.size(); i++) {
        cout << vectorvar[i] << " ";
    }

    cout << endl;

    // Part 2: Use push back to add the values 3.0, 2.5, 1.4 to the back of the vector
    vectorvar.push_back(3.0);
    vectorvar.push_back(2.5);
    vectorvar.push_back(1.4);

    // Part 3: Print out the vector
    for (int i = 0; i < vectorvar.size(); i++) {
        cout << vectorvar[i] << " ";
    }
    cout << "\n";

    // Part 4: Use the assign method so that the current vector has values
    // {5.0, 5.0, 5.0}
    vectorvar.assign(3, 5.0);

    // Part 5: Print out the vector
    for (int i = 0; i < vectorvar.size(); i++) {
        cout << vectorvar[i] << " ";
    }

    cout << "\n";

    return 0;
}
Math and Vectors
Any vector math you did in Python, you can also do in C++ with for loops.
Example 1
For example, you might want to multiply every element in a vector by a constant:
#include <iostream>
#include <vector>

using namespace std;

int main() {

    vector<float> example;

    // assign 5 floats with value 10
    example.assign(5,10.0);

    // print out the vector
    for (int i = 0; i < example.size(); i++) {
        cout << example[i] << endl;
    }

    // blank line outputted to terminal
    cout << endl;

    //multiply each value in the vector by 20
    for (int i = 0; i < example.size(); i++) {
        example[i] = 20 * example[i];
    }

    // print out the vector
    for (int i = 0; i < example.size(); i++) {
        cout << example[i] << endl;
    }


    return 0;
}
Which gives the output:
10
10
10
10
10

200
200
200
200
200
Example 2
Or you might want to add two vectors together:
#include <iostream>
#include <vector>

using namespace std;

int main() {

    vector<int> exampleone (5);
    vector<int> exampletwo (5);
    vector<int> examplesum (5);

    exampleone[0] = 2;
    exampleone[1] = 6;
    exampleone[2] = 25;
    exampleone[3] = 1;
    exampleone[4] = 18;

    exampletwo[0] = 3;
    exampletwo[1] = 19;
    exampletwo[2] = 8;
    exampletwo[3] = 12;
    exampletwo[4] = 191;

    cout << "vector one ";

    // print out the first vector
    for (int i = 0; i < exampleone.size(); i++) {
        cout << exampleone[i] << " ";
    }

    // create a new line in the terminal
    cout << endl;

    cout << "vector two ";

    // print out the second vector
    for (int i = 0; i < exampletwo.size(); i++) {
        cout << exampletwo[i] << " ";
    }

    // create a new line in the terminal
    cout << endl;

    cout << "vector sum ";

    //add the vectors together
    for (int i = 0; i < exampleone.size(); i++) {
        examplesum[i] = exampleone[i] + exampletwo[i];
    }

    // print out the vector
    for (int i = 0; i < examplesum.size(); i++) {
        cout << examplesum[i] << " ";
    }

    // create a new line in the terminal
    cout << endl;

    return 0;
}
Which gives output:
vector one 2 6 25 1 18
vector two 3 19 8 12 191
vector sum 5 25 33 13 209
Now it's your turn to write programs with C++ vectors. Move on to the next part of the lesson to get some practice coding vectors.
1D Vector Playground
Playground
Now it's your turn to make some programs with vectors. Here is a playground where you can write your program.
Idea 1
First, try writing a program that initializes a vector of size 3. The values for this vector are [5, 10, 27][5,10,27]. Initialize another vector of size 3 with the values [3, 17, 12][3,17,12]. Now subtract the two vectors from each other and output the results.
To get even more practice, write a function that takes in two vectors and then outputs the difference between the vectors. Assume that the two vectors are the same size; otherwise you would have to check that they are the same size and include some error checking.
Idea 2
Initialize a vector with the values [17, 10, 31, 5, 7][17,10,31,5,7]. Initialize another vector with the values [3, 1, 6, 19, 8][3,1,6,19,8]. Then, output another vector that contains the product of each element. In other words, the vector should have [17\times3, \space10\times1, \space 31\times6, \space 5\times19, \space 7\times8][17×3, 10×1, 31×6, 5×19, 7×8].
To get even more practice, write a function that takes in two vectors and then outputs a new vector that is the result of element by element multiplication. Assume that the two vectors are the same size; otherwise you would have to check that they are the same size and do some error checking.
// solution one

#include <iostream>
#include <vector>

using namespace std;

// function declaration
vector<float> vectorsubtraction(vector<float> vector1, vector<float> vector2);

// program that computes the difference between two vectors
int main() {

	// declare and initialize vectors
	vector<float> v1(3);
	vector<float> v2(3);

	v1[0] = 5.0;
	v1[1] = 10.0;
	v1[2] = 27.0;

	v2[0] = 2.0;
	v2[1] = 17.0;
	v2[2] = 12.0;

	vector<float> v3 (v1.size());

	// calculate the difference between the two vectors
	v3 = vectorsubtraction(v1, v2);

	// print out the results of the vector subtraction
	for (int i = 0; i < v3.size(); i++) {
		cout << v3[i] << " ";
	}

	cout << endl;

	return 0;

}

// define the function -
// INPUTS: two vectors
// OUTPUT: the difference between the two vectors
vector<float> vectorsubtraction(vector<float> vector1, vector<float> vector2) {

	vector<float> vectordifference (vector1.size());

	for (int i = 0; i < vector1.size(); i++) {
		vectordifference[i] = vector1[i] - vector2[i];
	}

	return vectordifference;

}
// solution two

#include <iostream>
#include <vector>

using namespace std;

// function declaration
vector<float> vectormultiply(vector<float> vector1, vector<float> vector2);

// program that computes the element-wise multiplication of two vectors
int main() {

	// declare and initialize vectors
	vector<float> v1(5);
	vector<float> v2(5);

	v1[0] = 17.0;
	v1[1] = 10.0;
	v1[2] = 31.0;
	v1[3] = 5.0;
	v1[4] = 7.0;

	v2[0] = 3.0;
	v2[1] = 1.0;
	v2[2] = 6.0;
	v2[3] = 19.0;
	v2[4] = 8.0;

	vector<float> v3 (v1.size());

	// calculate the difference between the two vectors
	v3 = vectormultiply(v1, v2);

	// print out the results of the vector multiplication
	for (int i = 0; i < v3.size(); i++) {
		cout << v3[i] << " ";
	}

	cout << endl;

	return 0;

}

// define the function -
// INPUTS: two vectors
// OUTPUT: multiplies elements together into a new vector
vector<float> vectormultiply(vector<float> vector1, vector<float> vector2) {

	vector<float> vectorproduct (vector1.size());

	for (int i = 0; i < vector1.size(); i++) {
		vectorproduct[i] = vector1[i] * vector2[i];
	}

	return vectorproduct;

}
Two Dimensional Vectors
Next, you are going to use vectors to store matrices. Much like how Python uses a list of lists to store matrices, for the C++ lessons you will use a vector of vectors. The syntax for declaring two-dimensional vectors is a bit tricky.
Say you're using Python and want to store a 3 by 5 matrix. You could do something like this:
matrixexample = [[2, 1, 5], [7, 9, 2], [16, 5, 9], [5, 2, 1], [1, 2, 4]]
In C++, you are going to create a similar structure by appending vectors to vectors. Here is a comparison of Python and C++ code to see what this looks like:
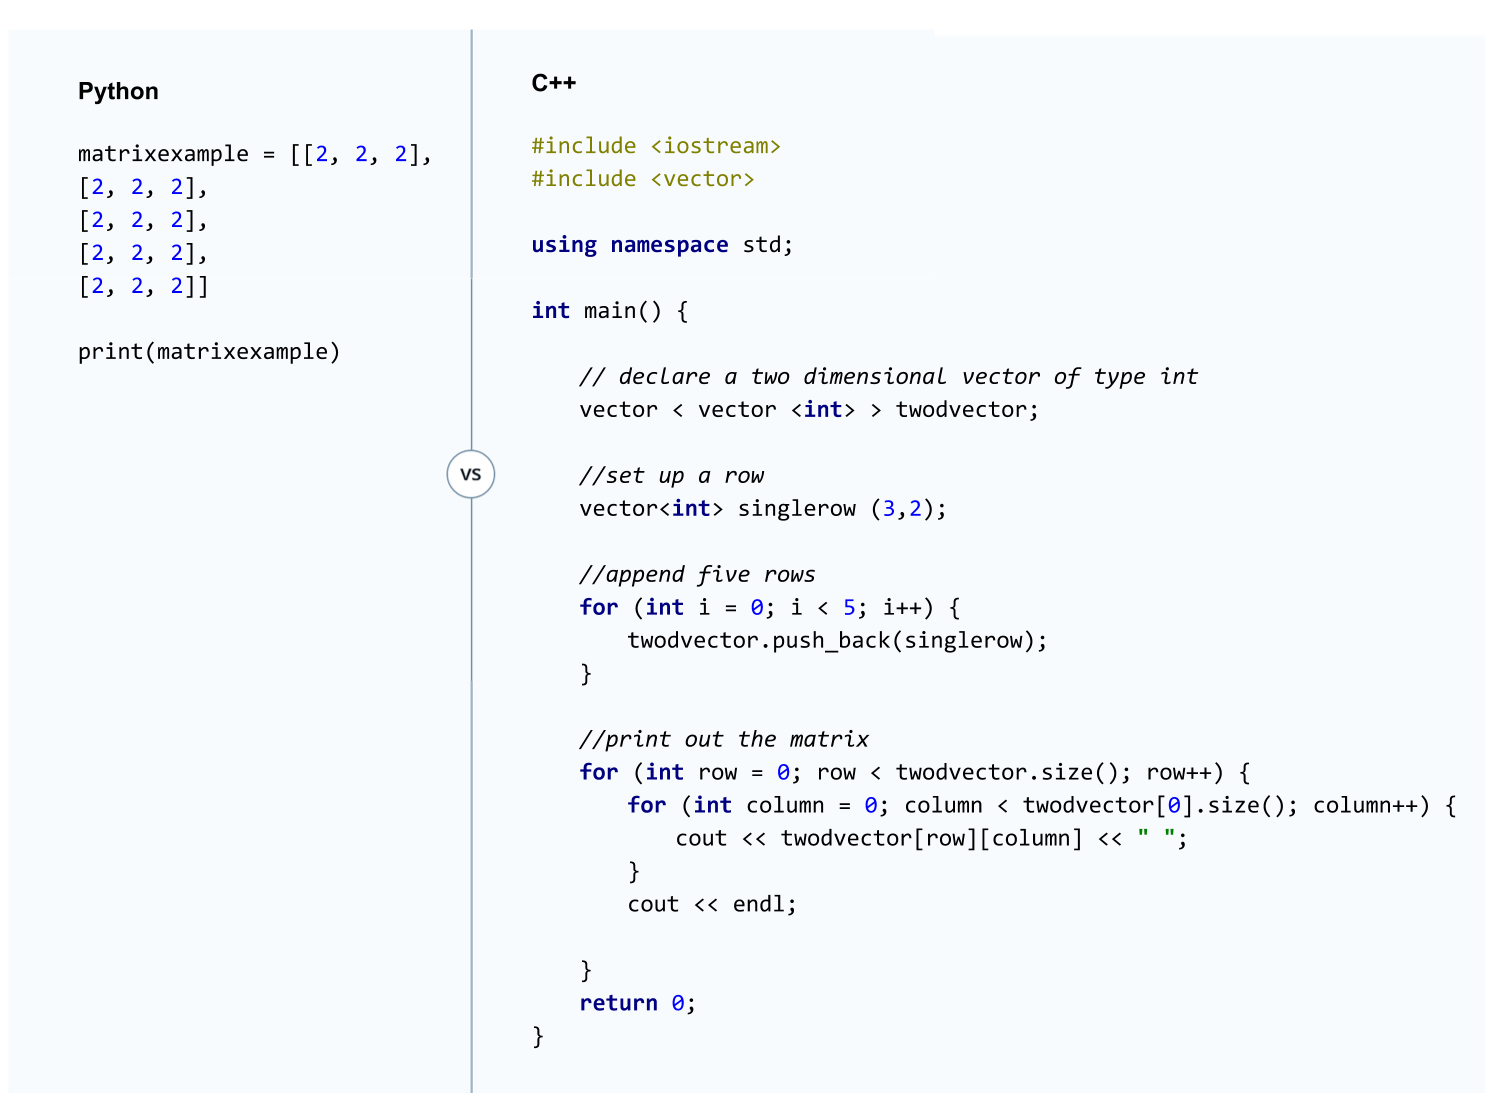
Explanation of the Code
First, the line
vector < vector <int> > twodvector;
declares an empty two dimensional vector named twodvector. A couple of things to notice:
- like with all variables in C++, you have to declare what type of values will go into the vector. In this case, integers will go into the twodvector variable.
- Notice the spaces between brackets
< vector <int> >. Your program probably won't run if the spacing is not done correctly.
Then a one dimensional vector called singlerow is declared. The singlerow vector has the form [2, 2, 2].
vector<int> singlerow (3,2);
Then the singlerow vector is appended to the twodvector five times:
    for (int i = 0; i < 5; i++) {
        twodvector.push_back(singlerow);
    }
You end up with the same two-dimensional structure just like in the Python code. If you were to run this C++ code, the terminal would print out:
2 2 2
2 2 2
2 2 2
2 2 2
2 2 2
Alternative Initialization
Here is another way you could have set up the vector from the previous example:
vector < vector <int> > twodvector (5, vector <int> (3, 2));
The syntax is a little bit more complicated. But if you start from the inside of the parenthesis and work your way out, you see that you have already seen all of the functionality.
The line:
vector <int> (3, 2)
would set up an integer vector like {2, 2, 2}. So even though you don't see the inner vector, the code is essentially doing something like this:
vector < vector <int> > twodvector (5, {2, 2, 2});
So then the code copies {2, 2, 2} five times into the twodvector variable:
{{2, 2, 2},
{2, 2, 2},
{2, 2, 2},
{2, 2, 2},
{2, 2, 2}}
Just keep in mind that only Python represents vectors or matrices with square brackets []. Newer versions of C++ can use squiggly brackets to represent vectors {}, but older implementations of C++ do not have an equivalent representation.
A line of code like the following would not run in C++:
vector < vector <int> > twodvector (5, [2, 2, 2]);
2D Vectors and For Loops
Because 2D vectors are just vectors inside a vector, a 2D vector has the same methods as a 1D vector.
That way the cout code from the example works:
for (int row = 0; row < twodvector.size(); row++) {
        for (int column = 0; column < twodvector[0].size(); column++) {
            cout << twodvector[row][column] << " ";
        }
        cout << endl;
When you type twodvector.size(), that will give you the size of the outside vector. The outside vector had five elements, which represents the number of rows in the matrix being represented:
{2 2 2}
{2 2 2}
{2 2 2}
{2 2 2}
{2 2 2}
When you write twodvector[0].size(), you are taking the first element of the outside vector, [2 2 2], and asking for the size of that vector, which in this case is three. So essentially the for loop is saying:
for (int row = 0; row < 5; row++) {
        for (int column = 0; column < 3; column++) {
            cout << twodvector[row][column] << " ";
        }
        cout << endl;
Program your Own Matrix Function
Practice coding matrices in C++. In this exercise, write a function that has two integer matrices as inputs and then outputs the sum. Assume that the two input matrices have the same size (e.g. matrix one is 5x3 and matrix two is 5x3).
You can find an implementation in the solution.cpp tab if you'd like to compare your solution.
You can use the Test Run button to run your code.
#include <iostream>
#include <vector>

using namespace std;

vector < vector <int> > matrixsum(vector < vector <int> > matrix1, vector < vector <int> > matrix2);
void matrixprint(vector < vector <int> > inputmatrix);

int main() {

	// declare two matrices
	vector < vector <int> > matrix1 (5, vector <int> (3, 2));
	vector < vector <int> > matrix2 (5, vector <int> (3, 26));

	//declare an empty matrix to hold the result
	vector < vector <int> > matrixresult;

	//calculate the sum of the two matrices
	matrixresult = matrixsum(matrix1, matrix2);

	// call the matrix print function to print out the results
	matrixprint(matrixresult);

	return 0;
}

//function to add two matrices together
vector < vector <int> > matrixsum(vector < vector <int> > matrix1, vector < vector <int> > matrix2) {

	// declare a matrix with the same size as matrix1 and matrix2
	vector < vector <int> > matrixsumresult (matrix1.size(), vector <int> (matrix1[0].size(), 0));

	// iterate through matrix1 and assign the sum of each element to the results matrix
	for (int row = 0; row < matrix1.size(); row++) {
		for (int column = 0; column < matrix1[0].size(); column++) {
			matrixsumresult[row][column] = matrix1[row][column] + matrix2[row][column];
		}

	}

	return matrixsumresult;


}

// function to print an integer matrix
void matrixprint(vector < vector <int> > inputmatrix) {

	for (int row = 0; row < inputmatrix.size(); row++) {
		for (int column = 0; column < inputmatrix[0].size(); column++) {
			cout << inputmatrix[row][column] << " ";
		}
		cout << endl;

	}
}
Introduction to Compilation
Watch this video.
Thus far, you've been writing code within the Udacity classroom. But you will also want to be able to run your programs locally on your own computer. This brings up another difference between Python and C++. You learned about the first major difference at the beginning of the C++ lesson; Python is dynamically typed while C++ is statically typed. Another major difference is that Python is an interpreted language whereas C++ is a compiled language.
When you write code in Python or C++, your computer can't actually understand the code that you are writing. But we humans can read and understand these languages, so they are convenient for us to code in.
Your code needs to be translated into a language that your CPU understands. Interpreted languages and compiled languages get translated in different ways. When you run a Python program, there is a translator (ie an interpreter), that reads a line of your code, translates a line of code for the CPU, and then executes your code line on the CPU. Then the next line gets translated and executed. Then the next, etc. The reality is a bit more complex, but that is the gist of an interpreted language like Python.
A compiled language, on the other hand, translates all of your code into the CPU's language. And then your code gets executed. So when running a C++ program, there is an extra step where you first compile your code and then a second step where you execute your code. Python, on the other hand, only has the execution step.
The C++ code you have been writing in the classroom actually is being compiled first and then executed, but it's happening behind the scenes. If you want to run your C++ programs locally on your computer, you're going to need to first compile the code and then execute it yourself.
In the next part of the lesson, you will get your own computer ready for compiling and executing C++ programs.
Running Code Locally
If you haven't already tried running your C++ code locally, now's the time to get things working. In the C++ section, we mentioned how to get code to run locally on your computer. Here are the instructions again for your reference:
Here are some suggested programs for writing and executing your code locally:
- Sublime Text as a general text editor
- Download an IDE (Integrated Development Environment) such as Xcode (Mac only), Visual Studio or any other IDE.
Detailed Setup Instructions
Big thanks to Michael Ikemann! Michael is a student in this Nanodegree and put together some exceptionally detailed documentation to help you get started with C++.
- Windows C++ Setup Guide
- Per student Tarun, the guide document for IDE setup suggests moving the .sln file to parent directory, along with the .vcproj file. To avoid errors, the .sln file needs to be hand modified with updated path.
- Mac C++ Setup Guide
Below you'll find further instructions as well, although Michael's documents should be enough to get things running.
Compiling and Executing C++ Code
If you are on a Windows, Mac, or Linux machine, the basic process is going to be the same; you will compile your code and then execute the compiled code. But the details of how to do this are slightly different on different machines and operating systems.
And there are two different ways you can compile and execute your code:
- using the windows console/mac terminal/linux terminal
- using an IDE (Integrated Development Environment), which is a software program that makes it easier to write, organize, compile and run your code.
Running your Code through the Console or Terminal
This is the quickest way to get started compiling and executing your code.
For Windows
You will first need to download and install the Visual C++ Build Tools, which are provided by Microsoft. The installation process might vary depending on what version of windows you are using. The microsoft website has a helpful guide about how to make sure the installation went correctly. The guide also explains how to compile and run your code: microsoft instructions.
If the Visual C++ Build Tools are installed, you should be able to compile and execute your code from the console. For example, if you have a main.cpp, you would open the console and navigate to the directory with the file.
You will see that the microsoft tutorial suggests compiling your code with the following command:
cl /W4 /EHsc main.cpp
The /W4 and /EHsc are options that will compile your code with warnings and error handing.
The compiler outputs an .obj file, which contains the instructions for the CPU. You will also see a .exe file that will get your code running.
Now typing
main
at the command prompt should get your program running.
If your program has multiple .cpp files, then you compile with:
cl /W4 /EHsc file1.cpp file2.cpp file3.cpp
The name of the .obj and .exe files will be file1.
For Mac
Depending on your OS version, the installation process will be different. In general, you will need to download the "command line developer tools" from the Apple developer website.
As a first step, see if you already have a compiler on your system called g++. Open the Terminal application, and type
g++
If g++ is installed, you should get an error message like no input files. If g++ is not installed and you are using a relatively newer version of Mac OS, a dialogue box will pop up asking you if you would like to install the command line tools. Click "Install".
However, on older Mac OS systems, you'll need to go to the Apple developer's website and download the command line developer tools. Go to this link. You will need to create an Apple ID if you do not already have one. Enter your Apple ID and password.
On the downloads page, there is a search box in the top left corner. Search for "command line developer tools". Then download and install the developer tools for your OS version.
Now go back to the Terminal and type
g++
You should now get an error message no input files.
To compile a program you would type:
g++ filename.cpp
or with multiple .cpp files:
g++ filename1.cpp filename2.cpp filename3.cpp
The compiler will create an executable file named a.out. To run your program, in terminal type:
./a.out
For Linux Ubuntu
The g++ compiler might already be on your system. If you are using Ubuntu, open Terminal and type:
dpkg --list | grep compiler
You will see a list of compilers. Check if g++ is in the list. If not, you can install g++ by typing:
sudo apt-get install g++
The commands to compile and run a program are the same as for Mac:
g++ filename.cpp
./a.out
Using an IDE
Another option is to download an IDE (Integrated Development Environment) to help write, organize, debug, compile and execute your code.
Microsoft provides an IDE called Visual Studio, which you can download here: Visual Studio. Up until recently, Visual Studio was only available for Windows. But there is also a Mac version as well.
For Mac users, Apple also provides an IDE called Xcode, which you can download here.
You can use either of these IDEs to help you develop your C++ programs.
For Linux Ubuntu users, there are a number of free IDEs available such as NetBeans, Code::Blocks, Eclipse, and CodeLite.
Versions of C++
The International Organization for Standardization publishes standards for the C++ language. Every few years the standard is updated with new features and syntax. The C++ standards are written documents providing guidelines for what the C++ language should be able to do and what the language looks like.
The responsibility for implementing a standard is left to the company, person or team that designs a compiler; hence, not all compilers implement all features. And some compilers might implement a feature differently.
There are currently five published C++ standards with the earliest standard called C++98 and the most recent standard C++17. The number designates the year in which the standard was published such as 1998 and 2017.
Thus far, the classroom has been compiling your code with the oldest standard: C++98. We have used C++98 so that you could get the basics of C++ down without worrying about advanced features.
As an example of a more advanced features, C++11, allows you to initialize a vector with the following syntax:
vector<int> myvector = {5, 4, 9, 1, 10}
There is generally a lag of a few years between publication of a standard and industry adoption.
GCC Compiler
The classroom uses a compiler called gcc. Thus far, we have been compiling your code for you when you hit the "Test Run" button. In the "Performance Programming C++" module, you will use a different interface for writing, compiling and running your code. This interface also uses the gcc compiler.
In the classroom, gcc compiles with C++98 by default. As you will see, you can use the command line to tell gcc what version of C++ to use:
g++ -std=c++11 main.cpp
You might find different behavior on your system because of the compiler you are using or because of your compiler options.
Structuring your Functions
In the last lesson, you learned two different ways for declaring and defining functions:
- declaring functions above main() and defining functions below main
- declaring and defining functions simultaneously above main
As your C++ programs get longer and more complex, you might want to separate your code into multiple files. Keeping function definitions and declarations separate will help you with splitting and organizing your code.
For example, take a look at this code from the functions quiz in the previous lesson.
#include <iostream>

float distance(float velocity, float acceleration, float time_elapsed);

int main() {

    std::cout << distance(3, 4, 5) << std::endl;
    std::cout << distance(7.0, 2.1, 5.4) << std::endl;

    return 0;
}

float distance(float velocity, float acceleration, float time_elapsed) {
    return velocity*time_elapsed + 0.5*acceleration*time_elapsed*time_elapsed;
}
Instead of putting everything into a main.cpp like in the previous quiz, the code could be organized into two files. Check out the code below and hit the "Test Run" button.
// main.cpp
#include <iostream>

float distance(float velocity, float acceleration, float time_elapsed);

int main() {

    std::cout << distance(3, 4, 5) << std::endl;
    std::cout << distance(7.0, 2.1, 5.4) << std::endl;

    return 0;
}
// distance.cpp
float distance(float velocity, float acceleration, float time_elapsed) {
    return velocity*time_elapsed + 0.5*acceleration*time_elapsed*time_elapsed;
}
Behind the scenes, both main.cpp and distance.cpp are being compiled. This is happening on the backend of the classroom, so you are not seeing the compilation happen.
But if you were to run this program locally, you could open a terminal and navigate to the folder containing both files. Typing something like
g++ main.cpp distance.cpp
./a.out
would compile both files together and then execute the program.
Because you have defined your function in a separate file outside of main.cpp, you can more easily re-use the function in other parts of your code.
Notice that you still had to declare the distance function at the top of main.cpp to be able to use the function.
Header Files
The function declaration
float distance(float velocity, float acceleration, float time_elapsed);
is oftentimes put into its own file as well. The declaration is kept in what's called a header file because the header is the information above the main() function. Header files generally have either a .h or .hpp extension. Here is the same code above but with the function declaration in a header file. If you click the "Test Run" button, you'll see that this code works as well:
// distance.h
float distance(float velocity, float acceleration, float time_elapsed);
The code line
#include "distance.h"
will paste the contents of distance.h into main.cpp.
Now let's say you wanted to reuse your distance function in a different file. All you have to do is declare the function at the top of your new file with an include statement:
#include "distance.h"
and you can use the function in another part of your program.
Organizing your code into different .cpp files separates out the implementation from the declaration. Furthermore, using header files means that you do not have to remember what the function declaration looked like because you can include it with the simple syntax of
#include "distance.h"
To compile the code, you only need to compile the .cpp files but not the .h file:
g++ main.cpp distance.cpp
File Naming
Naming conventions dictate that the header file and associated cpp file have the same name. Therefore it's clear that distance.h contains the header declarations for distance.cpp. You'll also notice that the function name itself was called distance(). So the function name, .cpp and .h files all match.
These are naming conventions, so your C++ code will still compile if you do not follow these conventions; however, it's highly recommended to stick with these conventions.
Include syntax
You might be wondering why there are two different types of include statements:
#include <iostream>
#include "distance.h"
The include statement with quotes tells the program to look for the distance.h file in the current directory.
The <> syntax will depend on your C++ environment. Generally, environments are set up to look for the file where the C++ libraries are stored like the Standard Library.
Input and Output
There is one last topic to discuss before moving onto the C++ Object Oriented Programming Lesson.
You have already seen how to call a function and then output the results to the terminal using cout. As an example:
std::cout << distance(3, 4, 5);
But how do you get user input from the terminal? Or how do you input data from a file into your program or write out your results to a file?
cin
Much like the Standard Library provides a function for outputting to the terminal, the library also provides a function for reading in data from the terminal.
This code demonstrates how to use cin:
#include <iostream>
#include <vector>

using namespace std;

int main() {

    int integerone;
    int integertwo;

    // declare array and assign values
    cout << "Enter an integer between 1 and 100" << endl;
    cin >> integerone;

    cout << "Enter another integer between 1 and 100" << endl;
    cin >> integertwo;

    // output the difference
    cout << "The difference between your two numbers is: ";
    cout << integerone - integertwo << endl;


    return 0;
}
To see how this code works, you will need to put the code into a .cpp file and run the program locally. The classroom playground does not allow for user input.
Next, you will learn how to input data from an external file.
Reading in Text Files
The Standard Library includes functionality for reading text files line by line. You can then parse each line of the text file one line at a time.
Say, for example, you have a text file with numbers and commas representing a 3 by 4 matrix:
1, 6, 2, 10.5
11, 15.2, 2, 21
3, 9, 1, 7.5
You want to read in this file and create a 2D vector to represent the matrix. Here is code to do this, and then below you can run the code to see that it works.
#include <iostream>
#include <fstream>
#include <string>
#include <sstream>
#include <vector>

using namespace std;

int main() {

    // initialize string variables for reading in text file lines
    string line;
    stringstream ss;

    // initialize variables to hold the matrix
    vector < vector <float> > matrix;
    vector<float> row;

    // counter for characters in a text file line
    float i;

    // read in the file
    ifstream matrixfile ("matrix.txt");

    // read in the matrix file line by line
    // parse the file

    if (matrixfile.is_open()) {
        while (getline (matrixfile, line)) {

            // parse the text line with a stringstream
            // clear the string stream to hold the next line
            ss.clear();
            ss.str("");
            ss.str(line);
            row.clear();

            // parse each line and push to the end of the row vector
            // the ss variable holds a line of text
            // ss >> i puts the next character into the i variable.
            // the >> syntax is like cin >> some_value or cout << some_value
            // ss >> i is false when the end of the line is reached

            while(ss >> i) {
                row.push_back(i);

                if (ss.peek() == ',' || ss.peek() == ' ') {
                    ss.ignore();
                }
            }

            // push the row to the end of the matrix
            matrix.push_back(row);
        }

        matrixfile.close();

        // print out the matrix
        for (int row = 0; row < matrix.size(); row++) {
            for (int column = 0; column < matrix[row].size(); column++) {
                cout << matrix[row][column] << " " ;
            }
            cout << endl;
        }
    }

    else cout << "Unable to open file";

    return 0;
}
Here is a demonstration of how to read in data from a text file. The code reads in a tile file that contains data for a matrix. Then the code outputs the matrix to the terminal display. Read through the code to try to figure out what it does. Then run the code by pressing the "Test Run" button.
Below the demo, there is an explanation of what the code is doing.
// main.cpp
#include <iostream>
#include <fstream>
#include <string>
#include <sstream>
#include <vector>

using namespace std;

int main() {

    // initialize string variables for reading in text file lines
    string line;
    stringstream ss;

    // initialize variables to hold the matrix
    vector < vector <float> > matrix;
    vector<float> row;

    // counter for characters in a text file line
    float i;

    // read in the file
    ifstream matrixfile ("matrix.txt");

    // read in the matrix file line by line
    // parse the file

    if (matrixfile.is_open()) {
        while (getline (matrixfile, line)) {

            // parse the text line with a stringstream
            // clear the string stream to hold the next line
            ss.clear();
            ss.str("");
            ss.str(line);
            row.clear();

            // parse each line and push to the end of the row vector
            while(ss >> i) {
                row.push_back(i);

                if (ss.peek() == ',' || ss.peek() == ' ') {
                    ss.ignore();
                }
            }

            // push the row to the end of the matrix
            matrix.push_back(row);
        }

        matrixfile.close();

        // print out the matrix
        for (int row = 0; row < matrix.size(); row++) {
            for (int column = 0; column < matrix[row].size(); column++) {
                cout << matrix[row][column] << " " ;
            }
            cout << endl;
        }
    }

    else cout << "Unable to open file";

    return 0;
}
# matrix.txt
1, 6, 2, 10.5
11, 15.2, 2, 21
3, 9, 1, 7.5
There are two parts of the code that you haven't seen yet: fstream and sstream. Both of these files are part of the C++ Standard Library.
fstream provides functions and classes for reading in and outputting files.
This line of code reads in the file "matrix.txt" and then creates an object called "matrixfile" that you can use for reading in the text file:
ifstream matrixfile ("matrix.txt");
The if statement that follows checks that the file opened correctly:
if (matrixfile.is_open()) {
and then a while loop reads the file one line at a time. Each line is placed into a variable called "line":
    if (matrixfile.is_open()) {
        while (getline (matrixfile, line)) {
If you look at the text file, each line in this case is a string consisting of floats, commas and spaces. For example, "1, 6, 2, 10.5".
The sstream file in the Standard Library provides functionality for manipulating and parsing the string. In the code, you'll see that first a sstream object was declared and then later the ss object was used to cycle through and parse each line of the text file:
stringstream ss;

....

ss.clear();
ss.str("");
ss.str(line);

while(ss >> i) {
    row.push_back(i);

    if (ss.peek() == ',' || ss.peek() == ' ') {
        ss.ignore();
    }
}
In other words, the code finds a float number and appends the number to the vector called row. The line ss.peek() looks at the next character to see if it is a comma or a space and ignores commas or spaces.
Note as well that when you are done with reading in the file, it's a good habit to close the file.
matrixfile.close();
If you ever write a programming that opens many files simultaneously and never closes them, your program could crash.
Outputting to Text Files
Much like how you can input data from a file, you can also output data to a file. Say you have a matrix and you want to save the results to a text file. You'll see that the code for outputting the matrix to a file looks quite similar to the code for outputting the matrix to the terminal.
You will need to run this code locally in order to see the outputted text file.
#include <iostream>
#include <fstream>
#include <vector>

using namespace std;

int main() {

    // create the vector that will be outputted
    vector < vector <int> > matrix (5, vector <int> (3, 2));
    vector<int> row;

    // open a file for outputting the matrix
    ofstream outputfile;
    outputfile.open ("matrixoutput.txt");

    // output the matrix to the file
    if (outputfile.is_open()) {
        for (int row = 0; row < matrix.size(); row++) {
            for (int column = 0; column < matrix[row].size(); column++) {
                if (column != matrix[row].size() - 1) {
                    outputfile << matrix[row][column] << ", ";
                }
                else {
                    outputfile << matrix[row][column];
                }
            }
            outputfile << endl;
        }
    }

    outputfile.close();

    return 0;
}
You can see that you need to create an ofstream object and then use the object to create a new file.
    ofstream outputfile;
    outputfile.open ("matrixoutput.txt");
The rest of the code iterates through the matrix and outputs the matrix in the format you specify in the code:
    if (outputfile.is_open()) {
        for (int row = 0; row < matrix.size(); row++) {
            for (int column = 0; column < matrix[row].size(); column++) {
                if (column != matrix[row].size() - 1) {
                    outputfile << matrix[row][column] << ", ";
                }
                else {
                    outputfile << matrix[row][column];
                }
            }
            outputfile << endl;
        }
    }
The if statement is checking whether or not the end of the row is reached. If the current value is the end of a row, it's not necessary to put a comma separator after the number:
                if (column != matrix[row].size() - 1) {
                    outputfile << matrix[row][column] << ", ";
                }
                else {
                    outputfile << matrix[row][column];
                }
C++: Objected Oriented Programming
How the Lesson is Organized
This lesson has two parts. In the first part, we show you a complete Python class and its equivalent in C++. You'll get an overview of what C++ classes look like and how to use them.
Then, in the second part, you'll code your own C++ class building up the code piece by piece. By the end of the lesson, you should feel comfortable reading C++ object oriented code and writing a basic class; however, remember that learning a new programming language takes practice. And C++ is often considered a language that takes years to master.
Example: Python Class
Let's go directly to an example. Below is the code for a Python class called 'Gaussian'.
You learned about Gaussian distributions and saw the Gaussian equation earlier in the nanodegree. This class stores the values for the standard deviation and mean. The class also has methods for calculating the probability density function, the sum of two gaussians, and the product of two gaussians.
The class contains two class variables called mu, which is the average and sigma2, which is the variance.
Here is a summary of the three methods contained in the class:
evaluate, which represents the probability density function: normal probability function equationmultiply, which multiplies two independent Gaussian distributions togetheradd, which adds two independent Gaussian distributions together
Read through the code so that you understand how the class works.
Python Code for a Gaussian Class
class Gaussian():

    def __init__(self, mean, variance):
        self.mu = mean
        self.sigma2 = variance

    def evaluate(self, x):
        coefficient = 1.0 / sqrt(2.0 * pi * self.sigma2)
        exponential = exp(-0.5 * (x-self.mu) ** 2 / self.sigma2)
        return coefficient * exponential

    def multiply(self, other):
        # calculate new mean
        denominator = self.sigma2 + other.sigma2
        numerator = self.mu * other.sigma2 + other.mu * self.sigma2
        new_mu = numerator / denominator

        # calculate new variance
        new_var = 1.0 / ( (1.0 / self.sigma2) + (1.0 / other.sigma2) )

        # generate new gaussian
        return Gaussian(new_mu, new_var)

    def add(self, other):
        new_mu = self.mu + other.mu
        new_sigma2 = self.sigma2 + other.sigma2

        return Gaussian(new_mu, new_sigma2)
Example: C++ Class
Now, you will take a look at an equivalent class in C++. Like in other cases you have already seen, the C++ code is longer and has aspects that the Python version did not have. It takes more time and practice to learn object oriented programming in C++ compared to Python.
For example, you will notice that in the C++ class, all of its variables and all of its functions need to be declared first before writing the implementation. The class also has a part labeled private and another part labeled public. Furthermore, the C++ class includes extra functions like setMu, setSigma2, getMu, and getSigma2.
You are going to learn about all of these differences in this lesson. For now, read through the code and see if you can figure out what the set functions and get functions do. Then answer the quiz at the bottom of the page.
#include <math.h>

class Gaussian
{
    // private variable declaration
    private:
        float mu, sigma2;

    // public variable and function declarations
    public:

        // constructor functions
        Gaussian ();
        Gaussian (float, float);

        // change value of average and standard deviation
        void setMu(float);
        void setSigma2(float);

        // output value of average and standard deviation
        float getMu();
        float getSigma2();

        // functions to evaluate
        float evaluate (float);
        Gaussian multiply (Gaussian);
        Gaussian add (Gaussian);
};

// constructor function definitions
Gaussian::Gaussian() {
    mu = 0;
    sigma2 = 1;
}

Gaussian::Gaussian (float average, float sigma) {
    mu = average;
    sigma2 = sigma;
}

// set function definitions
void Gaussian::setMu (float average) {
    mu = average;
}

void Gaussian::setSigma2 (float sigma) {
    sigma2 = sigma;
}

// get function definitions
float Gaussian::getMu () {
    return mu;
}

float Gaussian::getSigma2() {
    return sigma2;
}

// evaluate function definition
float Gaussian::evaluate(float x) {
    float coefficient;
    float exponential;

    coefficient = 1.0 / sqrt (2.0 * M_PI * sigma2);
    exponential = exp ( pow (-0.5 * (x - mu), 2) / sigma2 );
    return coefficient * exponential;
}

// multiply function definition
Gaussian Gaussian::multiply(Gaussian other) {
    float denominator;
    float numerator;
    float new_mu;
    float new_var;

    denominator = sigma2 + other.getSigma2();
    numerator = mu * other.getSigma2() + other.getMu() * sigma2;
    new_mu = numerator / denominator;

    new_var = 1.0 / ( (1.0 / sigma2) + (1.0 / other.sigma2) );

    return Gaussian(new_mu, new_var);
}

// add function definition
Gaussian Gaussian::add(Gaussian other) {

    float new_mu;
    float new_sigma2;

    new_mu = mu + other.getMu();
    new_sigma2 = sigma2 + other.getSigma2();

    return Gaussian(new_mu, new_sigma2);
}
Why objected oriented?
Watch this video.
Using a Class in a Program
Let's start with the big picture. We've written code below with a fully implemented class and a main.cpp file that uses the class. Even though you might not be familiar with some of the C++ syntax, your knowledge of Python object oriented programming should help you understand what the C++ code is doing.
Study the code and then run the code as instructed below.
Main.cpp and Gaussian.cpp
At the bottom of the page, you'll find a main.cpp file and a gaussian.cpp file so that you can see how they work together.
The gaussian.cpp file contains the class definition including all the variables and functions that the Gaussian class needs. You would make a similar file in Python probably called gaussian.py.
The main.cpp file uses the class to run some calculations. You'll see one important difference between C++ and Python. In C++, you need to declare your class before you can use the class. Both main.cpp and gaussian.cpp have the same class declaration at the top of their files:
class Gaussian
{
    private:
        float mu, sigma2;

    public:

        // constructor functions
        Gaussian ();
        Gaussian (float, float);

        // change value of average and standard deviation
        void setMu(float);
        void setSigma2(float);

        // output value of average and standard deviation
        float getMu();
        float getSigma2();

        // functions to evaluate
        float evaluate (float);
        Gaussian mul (Gaussian);
        Gaussian add (Gaussian);
};
Below are all of the files that would be used in this code so that you can see the relationship between the main.cpp and gaussian.cpp
You can't see it on the backend, but this program is first being compiled via the command:
g++ main.cpp gaussian.cpp
Study the two files, and then click the "Test Run" button to run the code and see the results.
// main.cpp
#include <iostream>

// class declaration
class Gaussian
{
	private:
		float mu, sigma2;

	public:

		// constructor functions
		Gaussian ();
		Gaussian (float, float);

		// change value of average and standard deviation
		void setMu(float);
		void setSigma2(float);

		// output value of average and standard deviation
		float getMu();
		float getSigma2();

		// functions to evaluate
		float evaluate (float);
		Gaussian mul (Gaussian);
		Gaussian add (Gaussian);
};

int main ()
{

	Gaussian mygaussian(30.0,100.0);
	Gaussian othergaussian(10.0,25.0);

	std::cout << "average " << mygaussian.getMu() << std::endl;
	std::cout << "evaluation " << mygaussian.evaluate(15.0) << std::endl;

	std::cout << "mul results variance " << mygaussian.mul(othergaussian).getSigma2() << std::endl;
	std::cout << "mul results average " << mygaussian.mul(othergaussian).getMu() << std::endl;

	std::cout << "add results variance " << mygaussian.add(othergaussian).getSigma2() << std::endl;
	std::cout << "add results average " << mygaussian.add(othergaussian).getMu() << std::endl;

	return 0;
}
// gaussian.cpp
#include <math.h>       /* sqrt, exp */

// class declaration
class Gaussian
{
	private:
		float mu, sigma2;

	public:

		// constructor functions
		Gaussian ();
		Gaussian (float, float);

		// change value of average and standard deviation
		void setMu(float);
		void setSigma2(float);

		// output value of average and standard deviation
		float getMu();
		float getSigma2();

		// functions to evaluate
		float evaluate (float);
		Gaussian mul (Gaussian);
		Gaussian add (Gaussian);
};


Gaussian::Gaussian() {
	mu = 0;
	sigma2 = 1;
}

Gaussian::Gaussian (float average, float sigma) {
	mu = average;
	sigma2 = sigma;
}

void Gaussian::setMu (float average) {
	mu = average;
}

void Gaussian::setSigma2 (float sigma) {
	sigma2 = sigma;
}


float Gaussian::getMu () {
	return mu;
}

float Gaussian::getSigma2() {
	return sigma2;
}

float Gaussian::evaluate(float x) {
	float coefficient;
	float exponential;

	coefficient = 1.0 / sqrt (2.0 * M_PI * sigma2);
	exponential = exp ( pow (-0.5 * (x - mu), 2) / sigma2 );
	return coefficient * exponential;
}

Gaussian Gaussian::mul(Gaussian other) {
	float denominator;
	float numerator;
	float new_mu;
	float new_var;

	denominator = sigma2 + other.getSigma2();
	numerator = mu * other.getSigma2() + other.getMu() * sigma2;
	new_mu = numerator / denominator;

	new_var = 1.0 / ( (1.0 / sigma2) + (1.0 / other.sigma2) );

	return Gaussian(new_mu, new_var);
}

Gaussian Gaussian::add(Gaussian other) {

	float new_mu;
	float new_sigma2;

	new_mu = mu + other.getMu();
	new_sigma2 = sigma2 + other.getSigma2();

	return Gaussian(new_mu, new_sigma2);
}
Explanation of the Main.cpp File
In the previous section, there were two files. The gaussian.cpp contained the code that defined the Gaussian class. The main.cpp used the Gaussian class.
The main.cpp file had three parts:
- a header, which is where the #include statements were
- a class declaration
- a main function.
Header
You saw headers in the C++ getting started lessons. In the main.cpp, the header included the iostream library for outputting to the terminal:
#include <iostream>
Class Declaration
Then comes the class declaration. The class declaration is very similar to function declarations, which you learned about previously. In fact, as you'll see later in the lesson, you can put the class declaration into a separate .h file just like you did with function declarations.
The purpose of the class declaration is to give the main function access to the Gaussian class.
// class declaration
class Gaussian
{
    private:
        float mu, sigma2;

    public:

        // constructor functions
        Gaussian ();
        Gaussian (float, float);

        // change value of average and standard deviation
        void setMu(float);
        void setSigma2(float);

        // output value of average and standard deviation
        float getMu();
        float getSigma2();

        // functions to evaluate
        float evaluate (float);
        Gaussian mul (Gaussian);
        Gaussian add (Gaussian);
};
Notice that a class declaration looks a lot like the variable declarations and function declarations you've already been using. Declarations tell the program what the variable types will be. The declarations also show the input and output types for functions.
Main Function
And finally comes the main function. The main function instantiates objects of the Gaussian class. So the main function uses the class whereas gaussian.cpp defined the class. You could take the code in gaussian.cpp and put it at the bottom of main.cpp; however, your code files will become quite large and hard to read through.
Here is the code from the main function:
int main ()
{

    Gaussian mygaussian(30.0,20.0);
    Gaussian othergaussian(10.0,30.0);

    std::cout << "average " << mygaussian.getMu() << std::endl;
    std::cout << "evaluation " << mygaussian.evaluate(15.0) << std::endl;

    std::cout << "mul results sigma " << mygaussian.mul(othergaussian).getSigma2() << std::endl;
    std::cout << "mul results average " << mygaussian.mul(othergaussian).getMu() << std::endl;

    std::cout << "add results sigma " << mygaussian.add(othergaussian).getSigma2() << std::endl;
    std::cout << "add results average " << mygaussian.add(othergaussian).getMu() << std::endl;

    return 0;
}
Practice Using a Class
We are providing the Gaussian class from the previous demo. Now it's your turn to use the class in a program. Fill in the TODOs in the main.cpp file. You'll find a solution in the solution.cpp tab. If you get stuck, go back to the lesson node titled "Using a Class in C++ [Demo]" and study the example.
// main.cpp

int main ()
{
 /*
TODO: Instantiate a Gaussian object called gaussianone.The object
should have mean = 40.0 and variance (aka sigma2) = 225.0
*/

Gaussian gaussianone(40.0, 225.0);

/*
TODO: Instantiate another Gaussian object called gaussiantwo.
The object should have mean = 35.6 and variance = 12.25
*/
Gaussian gaussiantwo(35.6, 12.25);

/*
TODO:
Output to the terminal the following:
- the probability density function value for gaussianone when x = 10.5
- the probability density function value for gaussianone when x = 55.4
- the probability density function value for gaussiantwo when x = 35.6
- the probability density function value for gaussiantwo when x = 29.4
*/

std::cout << gaussianone.evaluate(10.5) << "\n";
std::cout << gaussianone.evaluate(55.4) << "\n";
std::cout << gaussiantwo.evaluate(35.6) << "\n";
std::cout << gaussiantwo.evaluate(29.4) << "\n";

/*
TODO:
- Change the mean value of gaussianone to mean = 45
- Change the variance of gaussiantwo to variance = 15.4
- Output the mean of gaussianone to the terminal
- Output the variance of gaussiantwo to the terminal
*/

gaussianone.setMu(45.0);
gaussiantwo.setSigma2(15.4);
std::cout << gaussianone.getMu() << "\n";
std::cout << gaussiantwo.getSigma2() << "\n";

/*
TODO:
- Multiply gaussian one and gaussian two. Store the resulting gaussian
in a variable called gaussianthree
- Output the mean and variance of gaussianthree to the terminal
- Add gaussian one and gaussian two. Store the resulting gaussian in a
variable called gaussianfour
- Output the mean and variance of gaussianfour to the terminal
*/

Gaussian gaussianthree = gaussianone.mul(gaussiantwo);
std::cout << gaussianthree.getMu() << "\n";
std::cout << gaussianthree.getSigma2() << "\n";

Gaussian gaussianfour = gaussianone.add(gaussiantwo);
std::cout << gaussianfour.getMu() << "\n";
std::cout << gaussianfour.getSigma2() << "\n";


}
// gaussian.cpp
#include <math.h>       /* sqrt, exp */

// class declaration
class Gaussian
{
	private:
		float mu, sigma2;

	public:

		// constructor functions
		Gaussian ();
		Gaussian (float, float);

		// change value of average and standard deviation
		void setMu(float);
		void setSigma2(float);

		// output value of average and standard deviation
		float getMu();
		float getSigma2();

		// functions to evaluate
		float evaluate (float);
		Gaussian mul (Gaussian);
		Gaussian add (Gaussian);
};


Gaussian::Gaussian() {
	mu = 0;
	sigma2 = 1;
}

Gaussian::Gaussian (float average, float sigma) {
	mu = average;
	sigma2 = sigma;
}

void Gaussian::setMu (float average) {
	mu = average;
}

void Gaussian::setSigma2 (float sigma) {
	sigma2 = sigma;
}


float Gaussian::getMu () {
	return mu;
}

float Gaussian::getSigma2() {
	return sigma2;
}

float Gaussian::evaluate(float x) {
	float coefficient;
	float exponential;

	coefficient = 1.0 / sqrt (2.0 * M_PI * sigma2);
	exponential = exp ( -0.5 * pow ((x - mu), 2) / sigma2 );
	return coefficient * exponential;
}

Gaussian Gaussian::mul(Gaussian other) {
	float denominator;
	float numerator;
	float new_mu;
	float new_var;

	denominator = sigma2 + other.getSigma2();
	numerator = mu * other.getSigma2() + other.getMu() * sigma2;
	new_mu = numerator / denominator;

	new_var = 1.0 / ( (1.0 / sigma2) + (1.0 / other.sigma2) );

	return Gaussian(new_mu, new_var);
}

Gaussian Gaussian::add(Gaussian other) {

	float new_mu;
	float new_sigma2;

	new_mu = mu + other.getMu();
	new_sigma2 = sigma2 + other.getSigma2();

	return Gaussian(new_mu, new_sigma2);
}
Anatomy of a Class
If you look back at the gaussian.cpp class file, you'll notice that there were four distinct sections. The file contained:
- a header
- class declarations
- constructor functions
- and method definitions
It might help to think about these four sections as you write your own code. As a review, here is the code from each section of the gaussian.cpp file.
Header
The header has all of the include statements.
#include <math.h>
Class Declaration
The class declaration is a lot like a variable or function declaration. In the class declaration, you let the compiler know what all of the class variables and methods look like in terms of data types, inputs and outputs.
class Gaussian
{
    private:
        float mu, sigma2;

    public:

        // constructor functions
        Gaussian ();
        Gaussian (float, float);

        // change value of average and standard deviation
        void setMu(float);
        void setSigma2(float);

        // output value of average and standard deviation
        float getMu();
        float getSigma2();

        // functions to evaluate
        float evaluate (float);
        Gaussian multiply (Gaussian);
        Gaussian add (Gaussian);
};
We'll talk about the difference between public and private later in the lesson. In essence, a private function or variable is only reachable within the class code whereas a public function or definition is accessible to objects as well.
Constructor Functions
Constructor functions determine how a new object will be initiated. When you declare a new object, should the object have default values? Or will you provide values every time you instantiate an object?
Python had an equivalent syntax with the __init__.
def __init__(self, variable1, variable2, ..., variablen):
The first constructor function is for when you instantiate an object without specifying the average and variance.:
Gaussian::Gaussian() {
    mu = 0;
    sigma2 = 1;
}
The other constructor function specifies what to do when you do specify the average and variance:
Gaussian::Gaussian (float average, float sigma) {
    mu = average;
    sigma2 = sigma;
}
Class Methods
And finally, the class methods define all of the functions that your class needs to have.
The rest of the code contains the definitions for all of the functions, also called methods, that your class has.
The get and set functions are specifically for getting variable values or changing the value of private variables. Again, we'll go into more detail about private and public later in the lesson.
void Gaussian::setMu (float average) {
    mu = average;
}

void Gaussian::setSigma2 (float sigma) {
    sigma2 = sigma;
}

float Gaussian::getMu () {
    return mu;
}

float Gaussian::getSigma2() {
    return sigma2;
}
The rest of the functions (evaluate, multiply, add) are the same functions that were in the Python version of the class.
float Gaussian::evaluate(float x) {
    float coefficient;
    float exponential;

    coefficient = 1.0 / sqrt (2.0 * M_PI * sigma2);
    exponential = exp ( pow (-0.5 * (x - mu), 2) / sigma2 );
    return coefficient * exponential;
}

Gaussian Gaussian::multiply(Gaussian other) {
    float denominator;
    float numerator;
    float new_mu;
    float new_var;

    denominator = sigma2 + other.getSigma2();
    numerator = mu * other.getSigma2() + other.getMu() * sigma2;
    new_mu = numerator / denominator;

    new_var = 1.0 / ( (1.0 / sigma2) + (1.0 / other.sigma2) );

    return Gaussian(new_mu, new_var);
}

Gaussian Gaussian::add(Gaussian other) {

    float new_mu;
    float new_sigma2;

    new_mu = mu + other.getMu();
    new_sigma2 = sigma2 + other.getSigma2();

    return Gaussian(new_mu, new_sigma2);
}
Other Facets of C++ Classes
If you haven't taken one yet, now might be a good time to take a stretch break. We've still got three more topics to cover before you code your own class:
- Private versus Public
- Header Files
- Inclusion Guards
As you'll see in the next lesson node, private variables and functions are only available within your class code. Public functions and variables, on the other hand, are accessible within your class and also by an object of the class.
You are already familiar with header files from the "C++ Getting Started" lesson. While header files are not needed to run code, they are very helpful for organizing and reusing code. We'll explain how to use header files when organizing your C++ code.
C++ compilers do not like it when your code declares the same variables, functions or classes more than once. As your code gets longer and more complex, you'll oftentimes include more than one header file at the top of your code. These header files could contain the same class or function declarations, and then your code won't compile. You'll see how to avoid this situation in the "Inclusion Guards" lesson node.
Continue on to learn about these three aspects of C++ programming.
What do Private, Protected and Public Mean?
In the Gaussian class declaration, the mu and sigma2 variables were marked as private whereas the rest of the variables and functions were in a section marked public. Here is a reminder of the class declaration:
class Gaussian
{
    private:
        float mu, sigma2;

    public:

        // constructor functions
        Gaussian ();
        Gaussian (float, float);

        // change value of average and standard deviation
        void setMu(float);
        void setSigma2(float);

        // output value of average and standard deviation
        float getMu();
        float getSigma2();

        // functions to evaluate
        float evaluate (float);
        Gaussian multiply (Gaussian);
        Gaussian add (Gaussian);
};
Private and Public
These keywords private and public determine which part of your program will have access to the variables and functions. If a variable or function is private, then only the class code itself has access to these variables and functions.
On the other hand, anything marked public can be accessed outside the class; for example, when you instantiate an object, your program will be able to use the set and get functions as well as the evaluate, multiply and add functions; however, your program will not be able to access the mu and sigma2 variables directly.
Protected
There is another keyword called protected, which wasn't used in the example. Basically, protected classes and variables can be accessed by any subclasses. For example, if you wrote a Vehicle class, you might write a Car class, a Van class, and a Truck class that would all inherit from the more general Vehicle class. Any protected variables in the Vehicle class could be accessed in the child classes.
Example of Public vs. Private
Below is another example of the Gaussian class except mu and sigma2 have been made public. Notice how it is no longer necessary to have getMu, getSigma2, setMu and setSigma2 functions because the object has direct access to those variables.
// main.cpp
#include <iostream>
#include "gaussian.h"

int main ()
{

	Gaussian mygaussian(30.0,20.0);
	Gaussian othergaussian(10.0,30.0);

	std::cout << "average " << mygaussian.mu << std::endl;

	std::cout << "evaluation " << mygaussian.evaluate(15.0) << std::endl;

	std::cout << "mul results sigma " << mygaussian.mul(othergaussian).sigma2 << std::endl;
	std::cout << "mul results average " << mygaussian.mul(othergaussian).mu << std::endl;

	std::cout << "add results sigma " << mygaussian.add(othergaussian).sigma2 << std::endl;
	std::cout << "add results average " << mygaussian.add(othergaussian).mu << std::endl;

	std::cout << "average " << mygaussian.mu << std::endl;
    mygaussian.mu = 25;
    std::cout << "average " << mygaussian.mu << std::endl;

	return 0;
}
// gaussian.cpp
#include <math.h>       /* sqrt, exp */
#include "gaussian.h"

Gaussian::Gaussian() {
	mu = 0;
	sigma2 = 1;
}

Gaussian::Gaussian (float average, float sigma) {
	mu = average;
	sigma2 = sigma;
}

float Gaussian::evaluate(float x) {
	float coefficient;
	float exponential;

	coefficient = 1.0 / sqrt (2.0 * M_PI * sigma2);
	exponential = exp ( pow (-0.5 * (x - mu), 2) / sigma2 );
	return coefficient * exponential;
}

Gaussian Gaussian::mul(Gaussian other) {
	float denominator;
	float numerator;
	float new_mu;
	float new_var;

	denominator = sigma2 + other.sigma2;
	numerator = mu * other.sigma2 + other.mu * sigma2;
	new_mu = numerator / denominator;

	new_var = 1.0 / ( (1.0 / sigma2) + (1.0 / other.sigma2) );

	return Gaussian(new_mu, new_var);
}

Gaussian Gaussian::add(Gaussian other) {

	float new_mu;
	float new_sigma2;

	new_mu = mu + other.mu;
	new_sigma2 = sigma2 + other.sigma2;

	return Gaussian(new_mu, new_sigma2);
}
// gaussian.h
class Gaussian
{

	public:

		float mu, sigma2;

		// constructor functions
		Gaussian ();
		Gaussian (float, float);

		// functions to evaluate
		float evaluate (float);
		Gaussian mul (Gaussian);
		Gaussian add (Gaussian);
};
Why Keep Things Private
By default, C++ makes all class variables and functions private. That means you can actually declare private variables and functions at the top of your class declaration without even labeling them private:
class Gaussian
{
    float mu, sigma2;

    public:

        // constructor functions
        Gaussian ();
        Gaussian (float, float);

        // change value of average and standard deviation
        void setMu(float);
        void setSigma2(float);

        // output value of average and standard deviation
        float getMu();
        float getSigma2();

        // functions to evaluate
        float evaluate (float);
        Gaussian mul (Gaussian);
        Gaussian add (Gaussian);
};
C++ thus encourages you to make everything private unless you have a good reason not to do so. For example, by making the mu and sigma2 variables private, you have separated how mu and sigma2 are implemented versus how mu and sigma2 are accessed.
What happens if the way your class calculates mu and sigma2 changes? If these variables had been public, then any code that uses your class might break. When mu and sigma2 were public, a program could directly change the value of mu and sigma with code like:
mygaussian.mu = 25;
But when mu and sigma2 were private, a program had to use code like this:
mygaussian.setMu(25)
If you needed to change something about the implementation of the mu variable, you would be much less likely to break existing code in the private case. A program using the Gaussian class does not need to know how mu was implemented as long as the program can get the mu value and change the value in mu.
Header Files
In the previous example, you saw how to separate a class into one file (gaussian.cpp) that was separate from main.cpp. But both the main program file and the gaussian class file needed the exact same class declaration at the top of the code:
// class declaration
class Gaussian
{
    private:
        float mu, sigma2;

    public:

        // constructor functions
        Gaussian ();
        Gaussian (float, float);

        // change value of average and standard deviation
        void setMu(float);
        void setSigma2(float);

        // output value of average and standard deviation
        float getMu();
        float getSigma2();

        // functions to evaluate
        float evaluate (float);
        Gaussian mul (Gaussian);
        Gaussian add (Gaussian);
};
Instead of writing the entire declaration twice, a better option is to put the declaration into a header file. Then you can include the entire declaration with a single line of code:
// main.cpp
#include <iostream>
#include "gaussian.h"

int main ()
{

	Gaussian mygaussian(30.0,20.0);
	Gaussian othergaussian(10.0,30.0);

	std::cout << "average " << mygaussian.getMu() << std::endl;
	std::cout << "evaluation " << mygaussian.evaluate(15.0) << std::endl;

	std::cout << "mul results sigma " << mygaussian.mul(othergaussian).getSigma2() << std::endl;
	std::cout << "mul results average " << mygaussian.mul(othergaussian).getMu() << std::endl;

	std::cout << "add results sigma " << mygaussian.add(othergaussian).getSigma2() << std::endl;
	std::cout << "add results average " << mygaussian.add(othergaussian).getMu() << std::endl;

	return 0;
}
#include <math.h>       /* sqrt, exp */
#include "gaussian.h"

Gaussian::Gaussian() {
	mu = 0;
	sigma2 = 1;
}

Gaussian::Gaussian (float average, float sigma) {
	mu = average;
	sigma2 = sigma;
}

void Gaussian::setMu (float average) {
	mu = average;
}

void Gaussian::setSigma2 (float sigma) {
	sigma2 = sigma;
}


float Gaussian::getMu () {
	return mu;
}

float Gaussian::getSigma2() {
	return sigma2;
}

float Gaussian::evaluate(float x) {
	float coefficient;
	float exponential;

	coefficient = 1.0 / sqrt (2.0 * M_PI * sigma2);
	exponential = exp ( pow (-0.5 * (x - mu), 2) / sigma2 );
	return coefficient * exponential;
}

Gaussian Gaussian::mul(Gaussian other) {
	float denominator;
	float numerator;
	float new_mu;
	float new_var;

	denominator = sigma2 + other.getSigma2();
	numerator = mu * other.getSigma2() + other.getMu() * sigma2;
	new_mu = numerator / denominator;

	new_var = 1.0 / ( (1.0 / sigma2) + (1.0 / other.sigma2) );

	return Gaussian(new_mu, new_var);
}

Gaussian Gaussian::add(Gaussian other) {

	float new_mu;
	float new_sigma2;

	new_mu = mu + other.getMu();
	new_sigma2 = sigma2 + other.getSigma2();

	return Gaussian(new_mu, new_sigma2);
}
// gaussian.h
class Gaussian
{
	private:
		float mu, sigma2;

	public:

		// constructor functions
		Gaussian ();
		Gaussian (float, float);

		// change value of average and standard deviation
		void setMu(float);
		void setSigma2(float);

		// output value of average and standard deviation
		float getMu();
		float getSigma2();

		// functions to evaluate
		float evaluate (float);
		Gaussian mul (Gaussian);
		Gaussian add (Gaussian);
};
What goes in a header file?
You were introduced to header files in the previous lesson. Header files allowed you to put function declarations in a separate file. Ultimately, using and including header files makes it easier to re-use functions in different parts of your program. Furthermore, if the class declaration changes, you only have to change the declaration in one place.
For classes, header files serve the exact same purpose. When you use the Gaussian class in main.cpp, you can simply include the header file at the top include "gaussian.h". That gives main.cpp access to the Gaussian class.
Likewise, for gaussian.cpp, you can include the header file as well rather than writing out the entire declaration.
Using Include in Header Files
Generally, it's recommended to put the minimum number of #include statements needed into a header file. However, because header files essentially get copied into .cpp files, you might inadvertently include the same library or file multiple times. The consequence is that variables, functions or classes might be declared multiple times as well, and the code will not compile. In the next part of the lesson, you will learn what happens when elements get declared multiple times, and you will also learn how to avoid the multiple declarations.
Inclusion Guards
Take a look at this main.cpp file and click the "Test Run" button. Why doesn't the code compile?
#include <iostream>
#include <string>

using namespace std;

int main()
{

    string color;
    int doors;

    color = "blue";
    doors = 4;

    string color;
    color = "red";

    cout << "This " << color << " car has " << doors << " doors";

    return 0;

}
Declaring variables, functions or classes multiple times
C++ programs will not compile if a variable, function or class gets declared more than once. This might seem easy to avoid when the codebase is small. But imagine what happens when you have a large codebase with many different classes, .cpp files, and personnel working on different parts of the code.
Take a look at this code below. There are two different classes in two separate files. One class represents an engine with a variable storing the size of the engine. The other class represents a car, which has a color variable and a variable representing the number of doors.
But there's a catch. The car class also uses the engine class in order to store the car's engine properties. That is why the car.h header file includes the engine header file with the line:
#include "engine.h"
However, the code will not compile in its current state. Think about why it does not compile correctly when you press the "Test Run" button.
As a hint, look at the include statements on the top of main.cpp. Include statements will essentially copy a file into another file. Remember that a program that defines a class more than once will not compile.
// main.cpp
#include <iostream>
#include <string>
#include "engine.h"
#include "car.h"

using namespace std;

int main() {

	Engine enginelarge("4L");
	Engine enginesmall("2.5L");

	Car carone("red", 5);
	Car cartwo("green", 4);


	cout << "Small engine size "  << enginesmall.getSize() << endl;
	cout << "Large engine size " << enginelarge.getSize() << endl;
	cout << "Car one doors " << carone.getDoors() << endl;
	cout << "Car two doors " << cartwo.getDoors() << endl;

	cout << "Car one engine size " << carone.getEngine() << endl;
	carone.setEngine(enginelarge.getSize());
	cout << "Car one engine size new " << carone.getEngine() << endl;

	return 0;
}
// engine.h
#include <string>

class Engine
{
	private:
		std::string enginesize;

	public:

		Engine ();

		Engine (std::string);

		void setSize(std::string);

		std::string getSize();

};
// engine.cpp
#include "engine.h"

using namespace std;

Engine::Engine () {
	enginesize = "4L";
}

Engine::Engine (string engine) {
	enginesize = engine;
}

void Engine::setSize(string newsize) {
	enginesize = newsize;
}

string Engine::getSize() {
	return enginesize;
}
// car.h
#include <string>
#include "engine.h"

class Car
{
	private:
		std::string color;
		int doors;
		Engine enginetype;

	public:
		Car (std::string, int);

		void setColor(std::string);
		void setDoors(int);
		void setEngine(std::string);

		std::string getColor();
		int getDoors();
		std::string getEngine();

};
// car.cpp
#include "car.h"

using namespace std;

Car::Car (string newcolor, int newdoors) {
	color = newcolor;
	doors = newdoors;
	enginetype.setSize("2.5L");
}

string Car::getColor() {
	return color;
}

int Car::getDoors() {
	return doors;
}

string Car::getEngine() {
	return enginetype.getSize();
}

void Car::setColor(string newcolor) {
	color = newcolor;
}

void Car::setDoors(int newdoors) {
	doors = newdoors;
}

void Car::setEngine(string newengine) {
	enginetype.setSize(newengine);
}
The code would not compile because of these statements:
#include "engine.h"
#include "car.h"
The first include statement will copy the contents of the engine header file into main.cpp. So main.cpp will have the definition of the Engine class.
But then, main.cpp will copy the contents of "car.h" as well. But the "car.h" file also includes engine.h:
#include "engine.h"
The "engine.h" file ends up being included twice, so the Engine class is declared twice. The Car uses the engine class, and main.cpp also uses the engine class.
The modularity of .cpp and .h files is a big advantage of C++. But how can you avoid the multiple declarations?
ifndef
The solution is to use # ifndef statements, which allow you to implement a technique called inclusion guards.
The ifndef statement stands for "if not defined". When you wrap your header files with #ifndef statements, the compiler will only include a header file if the file has not yet been defined. In the current main.cpp example, the "engine.h" file would be included first. Then the compiler includes "car.h". But "car.h" will try to include "engine.h" again; however, the inclusion guard in the "engine.h" file will ensure that "engine.h" does not get included again.
Here is what the "engine.h" file looks like with an ifndef statement:
#ifndef ENGINE_H
#define ENGINE_H

#include <string>

class Engine
{
    private:
        std::string enginesize;

    public:

        Engine ();

        Engine (std::string);

        void setSize(std::string);

        std::string getSize();

};

#endif /* ENGINE_H */
#ifndef FILENAME_H
#define FILENAME_H

header code ...

#endif /* FILENAME_H */
Using all caps with the _H is a naming convention. It is also customary to put a comment after the #endif statement with the filename.
You would want to wrap all of your header files with #ifndef statements. That way other programs do not have to keep track of what files have already been included when they want to use your code.
Here are the results of including #ifndef statements in the engine and car header files. If you click on "Test Run", you will see that the code now compiles.
// main.cpp
#include <iostream>
#include <string>
#include "engine.h"
#include "car.h"

using namespace std;

int main() {

	Engine enginelarge("4L");
	Engine enginesmall("2.5L");

	Car carone("red", 5);
	Car cartwo("green", 4);


	cout << "Small engine size "  << enginesmall.getSize() << endl;
	cout << "Large engine size " << enginelarge.getSize() << endl;
	cout << "Car one doors " << carone.getDoors() << endl;
	cout << "Car two doors " << cartwo.getDoors() << endl;

	cout << "Car one engine size " << carone.getEngine() << endl;
	carone.setEngine(enginelarge.getSize());
	cout << "Car one engine size new " << carone.getEngine() << endl;

	return 0;
}
// engine.h
#ifndef ENGINE_H
#define ENGINE_H

#include <string>

class Engine
{
	private:
		std::string enginesize;

	public:

		Engine ();

		Engine (std::string);

		void setSize(std::string);

		std::string getSize();

};

#endif /* ENGINE_H */
// engine.cpp
#include "engine.h"

using namespace std;

Engine::Engine () {
	enginesize = "4L";
}

Engine::Engine (string engine) {
	enginesize = engine;
}

void Engine::setSize(string newsize) {
	enginesize = newsize;
}

string Engine::getSize() {
	return enginesize;
}
// car.h
#ifndef CAR_H
#define CAR_H

#include <string>
#include "engine.h"

class Car
{
	private:
		std::string color;
		int doors;
		Engine enginetype;

	public:
		Car (std::string, int);

		void setColor(std::string);
		void setDoors(int);
		void setEngine(std::string);

		std::string getColor();
		int getDoors();
		std::string getEngine();

};

#endif  /* CAR_H */
// car.cpp
#include "car.h"

using namespace std;

Car::Car (string newcolor, int newdoors) {
	color = newcolor;
	doors = newdoors;
	enginetype.setSize("2.5L");
}

string Car::getColor() {
	return color;
}

int Car::getDoors() {
	return doors;
}

string Car::getEngine() {
	return enginetype.getSize();
}

void Car::setColor(string newcolor) {
	color = newcolor;
}

void Car::setDoors(int newdoors) {
	doors = newdoors;
}

void Car::setEngine(string newengine) {
	enginetype.setSize(newengine);
}
Namespaces in Header Files
As an aside, you'll notice that the header files did not use the standard namespace. It's generally recommended to avoid using namespaces in a header file. This can help avoid naming conflicts later as functions and classes are reused in different parts of a code base.
Implement a Class
Now it's time to code your own class. For the remainder of this lesson, you are going to implement a matrix class much like what you did for the Python object oriented programming lesson.
At this point, we're assuming you are familiar with basic matrix operations. So the main focus of the lesson will be practicing writing C++ code. You are going to build up the class step by step starting with declaring variables and functions, writing functions, using inclusion guards and instantiating an object.
In the next part of the lesson, you'll be given certain tasks to complete. You'll also find solutions at the bottom of each page.
Class Variables
Your first task will be to declare the variables in your Matrix class. As a reminder, here is the general syntax for declaring a C++ class:
class Classname
{
    private:
        declare private variables;
        declare private functions;

    public:
        declare public variables;
        declare public functions;
};
The lines for actually declaring the variables are the same as any other C++ variable declaration:
datatype variablename;
The Matrix class has three private variables:
- grid - a 2D float vector to hold the matrix values
- rows - the number of rows in the matrix
- columns - the number of columns in the matrix
The rows and columns variables should be declared as a size_type. A size_type variable holds the size of a vector.
If your vector holds integers, the size_type declaration looks like this:
std::vector<int>::size_type variablename;
If your vector holds floats, then the size_type declaration would look like this:
std::vector<float>::size_type variablename;
The value that goes inside the brackets <> is based on whatever the original vector declaration was. A size_type variable is actually an unsigned int. The size_type variable is guaranteed to be able to hold up to the maximum size of a float vector.
Fill out the header file below with the variable declarations. This quiz is not graded, but the answer is included below.
// matrix.h
#include <vector>

// Header file for the Matrix class

/*
**  TODO:
**    Declare the following private variables:
**      a 2D float vector variable called grid
**      a vector size_type variable called rows
**      a vector size_type variable called cols
*/

class Matrix
{

        private:

            std::vector< std::vector<float> > grid;
            std::vector<float>::size_type rows;
            std::vector<float>::size_type cols;
};
// main.cpp
#include <iostream>
#include <vector>
#include "matrix.h"

int main () {

    // TODO: Nothing to do here

    return 0;
}
// matrix.cpp

// TODO: Nothing to do here
Class Functions
To write functions in your Matrix class, you need to declare those functions first. For the Matrix class, you can think of these functions as belonging to three separate categories:
- constructor functions
- set and get functions
- functions for Matrix functionality
Declaring these functions will be exactly like declaring functions in the previous lesson. The difference is that now you have to decide if a function is private, protected or public. And the function declarations go inside the class declaration.
You will define your functions in matrix.cpp. But first, let's briefly talk about each type of function. Constructor functions are for initializing objects. Python does this with the def __init__ syntax. The C++ syntax is a bit different, and you will learn about the differences in the next part of the lesson.
Set and get functions are specifically for accessing and assigning values to private variables. Because an object will not have direct access to private variables, the set and get functions give indirect access. Set and get functions have the same syntax as any other C++ function. Using set and get is a convention of object oriented programming rather than a specific C++ syntax.
And finally, there are the functions that consist of the matrix functionality such as printing out the matrix, adding matrices together, multiplying matrices, etc. You will implement these functions as part of the exercises.
Go to the next part of the exercise to declare and define the Matrix constructor functions.
Set and Get Function Declarations
Set and Get functions allow your objects to gain access to private variables. An object cannot access a private variable directly, so instead, set and get functions are used. You can see how this is done in the Gaussian object from earlier in the lesson.
Here were the declarations for the set and get functions:
class Gaussian
{
    private:
        ...

    public:
        ...

        void setMu(float);
        void setSigma2(float);

        float getMu();
        float getSigma2();

     ....
};
A set function changes the value of a variable whereas a get function returns the value of a variable. You'll notice that set and get function syntax is the same as any regular function. In fact, set and get are conventions rather than specific to C++. It's traditional to name these functions getVariablename() and setVariablename() although there is no requirement to do so.
You would declare set and get functions as public so that objects could have access to these functions.
Functions for Matrix Functionality
The third set of functions to declare are for the matrix functionality. The syntax is exactly the same as the get and set function syntax as well as any normal C++ function. You need to specify the return datatype, the function name, and the datatype for the input variables.
For example, the Gaussian class had three functions: evaluate, multiply and add. Here is how these functions were declared in the gaussian.h file:
class Gaussian
{
    ....

    public:

       ...

        // functions to evaluate
        float evaluate (float);
        Gaussian multiply (Gaussian);
        Gaussian add (Gaussian);
};
Declaring Functions in the Matrix Class
Now it's your turn to declare functions in the matrix.h file. Fill out the TODOS in the matrix.h file below. Don't forget that every function in matrix.cpp needs to be declared in matrix.h.
The answer is underneath the code block.
// matrix.h
#include <vector>

class Matrix
{

        private:

            std::vector< std::vector<float> > grid;
            std::vector<float>::size_type rows;
            std::vector<float>::size_type cols;

        public:

        /*
        ** TODO: Declare  constructor functions
        ** For the matrix class, you will need two constructor functions.
        ** 1. An empty constructor function
        ** 2. A constructor function that accepts a 2-dimensional vector
        */

        /*
        ** TODO: Declare set and get functions for the three private variables.
        ** You will need 1 set function and 3 get functions.
        ** The names of these functions should be setGrid, getGrid, getRows,
        ** and getCols.
        **
        ** The setGrid does not return anything and has a 2-D vector input
        ** getGrid returns a 2-D vector and has no input
        ** getRows returns a size_type and has no input
        ** get Cols returns a size_type and has no input
        */

        /*
        ** TODO: Declare the matrix functions. In a following exercise, you
        ** will program matrix_transpose, matrix_addition and matrix_print
        ** functions. So you will need to declare these two functions.
        **
        ** matrix_transpose has no input and outputs a 2D vector
        ** matrix_addition receives a Matrix and outputs a 2D vector
        ** matrix_print has no inputs and no outputs
        */
};

// solution
#include <vector>

class Matrix
{

        private:

            std::vector< std::vector<float> > grid;
            std::vector<float>::size_type rows;
            std::vector<float>::size_type cols;

        public:

            // constructor function declarations
            Matrix ();
            Matrix (std::vector< std::vector<float> >);

            // set and get function declarations
            void setGrid(std::vector< std::vector<float> >);

            std::vector< std::vector<float> > getGrid();
            std::vector<float>::size_type getRows();
            std::vector<float>::size_type getCols();

            // matrix function declarations
            std::vector< std::vector<float> > matrix_transpose();
            std::vector< std::vector<float> > matrix_addition(Matrix);
            void matrix_print();
};
// matrix.cpp
#include "matrix.h"

/* TODO: Define the default constructor. Remember the syntax is
**      Classname::ClassName() {
**
**          initialize variables
**
**       }
**
**
**      You need to initialize the grid variable to a default value such as
**      a 4x4 matrix with all zeros.
**
**      Then initialize the rows variable, and the cols variable using the
**      vector size method. For example myvector.size() will give the size of
**      a vector. For a 2-dimensional vector, myvector.size() would be the
**      number of rows in a matrix.
**
*/

/* TODO: Define a constructor that receives a 2-Dimensional vector
**       and assigns the vector to the grid variable.
**
**      Remember the syntax is
**      Classname::ClassName(datatype inputvariablename) {
**
**          classvariable = inputvariablename
**
**       }
**
**      Then initialize the rows variable, and the cols variable exactly
**      as you did for the default constructor.
**
*/
// main.cpp
#include <iostream>
#include <vector>
#include "matrix.h"

int main () {

    // TODO: Nothing to do here

    return 0;
}
Declaring Constructor Functions
Both Python and C++ have constructor functions. Constructor functions define what happens when you instantiate an object.
Python Constructor
These are the functions that define what happens when an object is instantiated. In Python, the syntax is:
def __init__(self, variable1, variable2, ..., variablen):
    self.variable1 = variable1
    self.variable2 = variable2
    self.variablen = variablen
C++ Constructor Declaration
In C++, you declare a constructor like this:
Classname (datatype variable1, datatype variable2, …, datatype variablen);
You can also simultaneously declare a default constructor function, which implies the function has no inputs:
Classname ();
This default constructor function is used when you instantiate an object without providing values for the variables. To be more concrete, you will initialize a Matrix variable with a two-dimensional vector. If you do not provide a two-dimensional vector, you could initialize your Matrix variable with a default vector. This second case is what the empty constructor function is for.
The Gaussian constructor declarations looked like this:
class Gaussian
{
    private:
        ...

    public:
        ...
        Gaussian ();
        Gaussian (float, float);

   ....
};
Whether or not you use a default constructor function will depend on your particular application and use-case. For example, if an object always has the same initial values, then it would make sense to have a default constructor function.
Defining Constructor Functions
Once you've declared your constructor functions, you need to actually define them in a .cpp file.
The constructor function definitions have the following syntax:
// empty constructor function syntax
Classname::ClassName() {

    constructor function definition
}

// constructor function syntax
Classname::ClassName(datatype variable1, datatype variable2, …, datatype variablen) {

    constructor function definition

}
You can see how this was done for the Gaussian class:
Gaussian::Gaussian() {
    mu = 0;
    sigma2 = 1;
}

Gaussian::Gaussian (float average, float sigma) {
    mu = average;
    sigma2 = sigma;
}
Note that constructor functions do not return anything. They merely initialize class variables. You might also be wondering how the function definitions can access mu and sigma2 if those were private variables. Remember that private variables can be accessed from within the class code itself but not from outside the class.
Initializing with Default Values
In both Python and C++, you can use default values in your construction functions. In Python, the syntax is:
def __init__(self, variable1 = default1, variable2 = default2, ..., variablen = defaultn):
    self.variable1 = variable1
    self.variable2 = variable2
    self.variablen = variablen
You can also get this functionality in C++ although the syntax might not be what you'd expect; you actually define default values in the .h file function definition. Here is a trivial example for an addition Class that holds two integers and outputs their sum.
Here is the header file add.h:
class Add
{
    public:
        int a;
        int b;

        Add(int, int second = 17);

        int addition();
};
and then here are the definitions in add.cpp:
#include  "add.h"

Add::Add(int first, int second) {

    a = first;
    b = second;
}

int Add::addition() {
    return a + b;
}
Notice that the default value was declared in the header file. Now, if you only specify one value when instantiating an add object, variable b will have a default value of 17:
#include <iostream>

#include  "add.h"

int main() {

    Add adder(5);
    std::cout << adder.addition() << std::endl;
    return 0;

}
The above code outputs 22.
Declare and Define Matrix Class Constructors
Now it's your turn. Fill out the TODO sections in the matrix.h and matrix.cpp files.
// main.cpp
#include <iostream>
#include <vector>
#include "matrix.h"

int main () {

    // TODO: Nothing to do here

    return 0;
}
// matrix.cpp
#include "matrix.h"

Matrix::Matrix() {
    std::vector <std:: vector <float> > initial_grid (10, std::vector <float>(5, 0.5));
    grid = initial_grid;
    rows = initial_grid.size();
    cols = initial_grid[0].size();

}

Matrix::Matrix(std::vector <std:: vector <float> > initial_grid) {
    grid = initial_grid;
    rows = initial_grid.size();
    cols = initial_grid[0].size();
}
// matrix.h
#include <vector>

class Matrix
{

        private:

            std::vector< std::vector<float> > grid;
            std::vector<float>::size_type rows;
            std::vector<float>::size_type cols;

        public:

            // constructor function declarations
            Matrix ();
            Matrix (std::vector< std::vector<float> >);
};
Set and Get Function Declarations
Set and Get functions allow your objects to gain access to private variables since objects cannot access private variables directly. You can see how this is done in the Gaussian object from earlier in the lesson.
Here were the declarations for the set and get functions:
class Gaussian
{
    private:
        ...

    public:
        ...

        void setMu(float);
        void setSigma2(float);

        float getMu();
        float getSigma2();

     ....
};
And here were the function definitions:
void Gaussian::setMu (float average) {
    mu = average;
}

void Gaussian::setSigma2 (float sigma) {
    sigma2 = sigma;
}


float Gaussian::getMu () {
    return mu;
}

float Gaussian::getSigma2() {
    return sigma2;
}
The syntax for defining set or get functions is the same as any other class function (besides constructors):
return datatype Classname::functionname() {
        code to define the function;
}
In fact, get and set functions are a convention rather than a special function with a special syntax. It's traditional to name these functions getVariablename() and setVariablename() although there is no requirement to do so.
You would declare set and get functions as public so that objects could have access to these functions.
Matrix Class Set and Get Functions
Continue developing your Matrix class code.
- Use a set function to be able to modify the grid variable.
- All three private variables (grid, rows, cols) should have get functions.
Make sure to fill out the TODOs in both matrix.cpp and matrix.h
// matrix.h
#include <vector>

class Matrix
{
    private:

        std::vector< std::vector<float> > grid;
        std::vector<float>::size_type rows;
        std::vector<float>::size_type cols;

    public:

        // constructor functions
        Matrix ();
        Matrix (std::vector< std::vector<float> >);

        // set functions
        void setGrid(std::vector< std::vector<float> >);

        // get functions
        std::vector< std::vector<float> > getGrid();
        std::vector<float>::size_type getRows();
        std::vector<float>::size_type getCols();
};
// matrix.cpp
#include "matrix.h"

Matrix::Matrix() {
    std::vector <std:: vector <float> > initial_grid (10, std::vector <float>(5, 0.5));
    grid = initial_grid;
    rows = initial_grid.size();
    cols = initial_grid[0].size();

}

Matrix::Matrix(std::vector <std:: vector <float> > initial_grid) {
    grid = initial_grid;
    rows = initial_grid.size();
    cols = initial_grid[0].size();
}


void Matrix::setGrid(std::vector< std::vector<float> > new_grid) {
    grid = new_grid;
    rows = new_grid.size();
    cols = new_grid[0].size();
}

std::vector< std::vector<float> > Matrix::getGrid() {
    return grid;
}

std::vector<float>::size_type Matrix::getRows() {
    return rows;
}

std::vector<float>::size_type Matrix::getCols() {
    return cols;
}
Matrix Functions
The last part of the Matrix class involves implementing the matrix functionality. You are welcome to program as many matrix operations as you'd like: addition, multiplication, transpose, inverse, etc.
We recommend at least implementing matrix addition and a function called matrix_print that outputs the matrix to the terminal using cout. In the solution given at the end of this page, we've also provided code for a matrix_transpose function.
Implementing these class functions is the same as implementing the get and set functions from the previous part of the lesson; you will need to declare your functions in matrix.h and define your functions in matrix.cpp. The general syntax is the same:
class function declaration syntax
output_datatype functionname(datatype variable1,
datatype variable2, ..., datatype variablen)
class function definition syntax
output_datatype Classname::functionname(datatype variable1,
datatype variable2, ..., datatype variablen) {

    code defining the function;
}
Writing the Matrix Functions
In this exercise, you will declare and define a Matrix class function that adds two matrices together. Here are the inputs and outputs of the matrix addition function:
INPUTS:
- a matrix, which will be added to the grid variable
OUTPUTS
- a matrix containing the sum of the grid variable matrix and input matrix
Because the input to the matrix_addition function is a Matrix, you will need to declare and define your function using the Matrix class as the data type. This might seem a bit confusing, but the Gaussian class presented earlier in the lesson did the same thing with the mul and add functions. You can use those as a guide for writing your matrix_addition functions.
As a reminder, here are the function declarations for the mul and add functions in gaussian.h:
        Gaussian mul (Gaussian);
        Gaussian add (Gaussian);
Both of these functions receive a Gaussian and output a Gaussian. Here are the function definitions from gaussian.cpp:
Gaussian Gaussian::mul(Gaussian other) {
    float denominator;
    float numerator;
    float new_mu;
    float new_var;

    denominator = sigma2 + other.getSigma2();
    numerator = mu * other.getSigma2() + other.getMu() * sigma2;
    new_mu = numerator / denominator;

    new_var = 1.0 / ( (1.0 / sigma2) + (1.0 / other.sigma2) );

    return Gaussian(new_mu, new_var);
}

Gaussian Gaussian::add(Gaussian other) {

    float new_mu;
    float new_sigma2;

    new_mu = mu + other.getMu();
    new_sigma2 = sigma2 + other.getSigma2();

    return Gaussian(new_mu, new_sigma2);
}
Although the implementation of the matrix_addition function will be different, the general structure will be the same as the mul and add functions from the Gaussian example.
You will also write a matrix_print function that outputs a matrix to the terminal using cout. The matrix_print function has no inputs and no outputs.
Fill out the TODOS in the matrix.cpp and matrix.h code.
// main.cpp
#include <iostream>
#include <vector>
#include "matrix.h"

int main () {

    // TODO: Nothing to do here

    return 0;
}
// matrix.cpp
#include "matrix.h"

Matrix::Matrix() {
    std::vector <std:: vector <float> > initial_grid (10, std::vector <float>(5, 0.5));
    grid = initial_grid;
    rows = initial_grid.size();
    cols = initial_grid[0].size();

}

Matrix::Matrix(std::vector <std:: vector <float> > initial_grid) {
    grid = initial_grid;
    rows = initial_grid.size();
    cols = initial_grid[0].size();
}

void Matrix::setGrid(std::vector< std::vector<float> > new_grid) {
    grid = new_grid;
    rows = new_grid.size();
    cols = new_grid[0].size();

}

std::vector< std::vector<float> > Matrix::getGrid() {
    return grid;
}

std::vector<float>::size_type Matrix::getRows() {
    return rows;
}

std::vector<float>::size_type Matrix::getCols() {
    return cols;
}

Matrix Matrix::matrix_transpose() {
    std::vector< std::vector<float> > new_grid;
    std::vector<float> row;

    for (int i = 0; i < cols; i++) {
        row.clear();

        for (int j = 0; j < rows; j++) {
            row.push_back(grid[j][i]);
        }
        new_grid.push_back(row);
    }

    return Matrix(new_grid);
}

Matrix Matrix::matrix_addition(Matrix other) {

    if ((rows != other.getRows()) || (cols != other.getCols())) {
        throw std::invalid_argument( "matrices are not the same size" );
    }

    std::vector< std::vector<float> > othergrid = other.getGrid();

    std::vector< std::vector<float> > result;

    std::vector<float> new_row;

    for (int i = 0; i < rows; i++) {
        new_row.clear();
        for (int j = 0; j < cols; j++) {
            new_row.push_back(grid[i][j] + othergrid[i][j]);
        }
        result.push_back(new_row);
    }

    return Matrix(result);
}

void Matrix::matrix_print() {

    std::cout << std::endl;

    for (int i = 0; i < rows; i++)
    {
        for (int j = 0; j < cols; j++)
        {
            std::cout << grid[i][j] << " ";
        }
        std::cout << std::endl;
    }
    std::cout << std::endl;
}
//matrix.h
#include <vector>
#include <iostream>
#include <stdexcept>

class Matrix
{
    private:

        std::vector< std::vector<float> > grid;
        std::vector<float>::size_type rows;
        std::vector<float>::size_type cols;

    public:

        // constructor functions
        Matrix ();
        Matrix (std::vector< std::vector<float> >);

        // set functions
        void setGrid(std::vector< std::vector<float> >);

        // get functions
        std::vector< std::vector<float> > getGrid();
        std::vector<float>::size_type getRows();
        std::vector<float>::size_type getCols();

        // matrix functions
        Matrix matrix_transpose();
        Matrix matrix_addition(Matrix);

        // matrix printing
        void matrix_print();

};
Use an Inclusion Guard
ifndef
In this case, you don't really need an ifndef statement because the code is simple. You have only written one class, so there isn't a way to mistakenly include another class multiple times. However, it's a good habit to write inclusion guards with an ifndef statement.
For this exercise, use the ifndef syntax to write an inclusion guard in the matrix.h file.
// matrix.h
#ifndef MATRIX_H
#define MATRIX_H

#include <vector>
#include <iostream>
#include <stdexcept>

class Matrix
{
    private:

        std::vector< std::vector<float> > grid;
        std::vector<float>::size_type rows;
        std::vector<float>::size_type cols;

    public:

        // constructor functions
        Matrix ();
        Matrix (std::vector< std::vector<float> >);

        // set functions
        void setGrid(std::vector< std::vector<float> >);

        // get functions
        std::vector< std::vector<float> > getGrid();
        std::vector<float>::size_type getRows();
        std::vector<float>::size_type getCols();

        // matrix functions
        Matrix matrix_transpose();
        Matrix matrix_addition(Matrix);

        // matrix printing
        void matrix_print();

};

#endif /* MATRIX_H */
Instantiate an Object
Now it's time to use your matrix class in a program! The C++ syntax for instantiating an object is like this:
Classname objectname(inputs for initializing an object of Classname);
Then you can access any public variables like:
objectname.variablename
And you can access your public functions with:
objectname.methodname(inputs)
Remember that any private variables or functions will not be available to your program. That was why you wrote the public get and set functions for your private variables.
Gaussian.cpp Example
Before you start using your matrix class, here is a reminder of what the main.cpp looked like for the Gaussian.cpp example:
#include <iostream>
#include "gaussian.h"

int main ()
{

    Gaussian mygaussian(30.0,20.0);
    Gaussian othergaussian(10.0,30.0);

    std::cout << "average " << mygaussian.getMu() << std::endl;
    std::cout << "evaluation " << mygaussian.evaluate(15.0) << std::endl;

    std::cout << "mul results sigma " <<
               mygaussian.mul(othergaussian).getSigma2() << std::endl;
    std::cout << "mul results average " <<
               mygaussian.mul(othergaussian).getMu() << std::endl;

    std::cout << "add results sigma " <<
               mygaussian.add(othergaussian).getSigma2() << std::endl;
    std::cout << "add results average " <<
               mygaussian.add(othergaussian).getMu() << std::endl;

    return 0;
}
Now it's your turn to instantiate a Matrix object. You will find some starter code below with a few TODOs.
// main.cpp
#include <iostream>
#include <vector>
#include "matrix.h"

int main () {

    // assign a 7x5 matrix to the variable initial_grid
    // all values in the matrix are 0.4
    std::vector <std:: vector <float> >
        initial_grid (7, std::vector <float>(5, 0.4));

    // TODO: Use the initial grid variable to instantiate a matrix object
    // The matrix object should be called matrixa
    Matrix matrixa(initial_grid);

    // TODO: Use the matrix_print() method to print out matrixa
    matrixa.matrix_print();

    // TODO: Print out the number of rows in matrixa. You will need
    // to use the getRows() function and std::cout
    std::cout << matrixa.getRows();

    // TODO: Print out the number of columns in matrixa
    std::cout << matrixa.getCols();

    // TODO: Take the transpose of matrixa and store the results in
    // a variable called transposea
    Matrix transposea = matrixa.matrix_transpose();

    // TODO: Print out transposea
    transposea.matrix_print();

    // Now you will use another 7x5 matrix called matrixb to
    // give the results of the matrix_addition function

    // 7x5 2-dimensional vector with values 0.2
    std::vector <std:: vector <float> >
        second_grid (7, std::vector <float>(5, 0.2));

    // TODO: Instantiate an object called matrixb. Use the second_grid
    // variable as the input to initialize matrixb
    Matrix matrixb(second_grid);

    // TOOD: Add matrixa and matrixb. Store the results in a new matrix
    // variable called matrixsum
    Matrix matrixsum(matrixa.matrix_addition(matrixb));

    // TODO: Print out the matrix contained in the matrixsum variable
    matrixsum.matrix_print();

    return 0;
}
Compiling your Program
If you haven't gotten C++ running locally on your computer, now's a good time to get that done!
This is just a quick note about compiling and running the matrix code on your local computer. Put your main.cpp, matrix.cpp and matrix.h into the same directory. On Linux and Mac you can compile your code with a command like:
g++ main.cpp matrix.cpp
or whatever the equivalent is for your system or compiler. You need to compile both main.cpp and matrix.cpp for the code to compile. Then you can execute your code with something like
./a.out
On Windows, compiling and executing your code will look something like this:
cl /W4 /EHsc main.cpp matrix.cpp

main
C++: Intro to Optimization
Watch this video.
Intro to Computer Hardware
Watch this video.
Compilers and Optimization
As mentioned in the video, a C++ compiler rewrites your code into binary instructions. Many compilers will try to optimize code for you. These optimizations aim to
- make the code run faster,
- use less memory, or
- consume less electric power.
Compilers can be quite good at optimizing as they write your C++ code into machine code; however, when running the same code through different compilers, you might find that the slowest parts of your code are not the same in each case. Hence, it's important to find the weak spots by actually measuring how long it takes to execute or how many resources the code uses. You'll learn more about measuring your code later in the lesson.
Hardware Limitations
Hardware can put limitations on your programs and lead to code inefficiencies.
In embedded systems engineering, you might not always be working with the newest and most powerful computer processors. A typical example would be trigonometric functions. Some computer architectures might use relatively slow software approximations for a sine function rather than using the arithmetic/logic unit. If you can use an approximation that runs directly on the CPU's arithmetic/logic unit, you might get your code to run faster.
C++ Demonstrations
This lesson contains a series of demonstrations showing how C++ manages memory. You'll see in the next part that these demonstrations are embedded into the classroom.
Each demonstration is contained in a separate folder with a set of instructions and code. The next section gives more details about how you will run the demonstrations.
Embedded Terminal
In this lesson (C++ Intro to Optimization) and the following lesson (C++ Optimization Practice), you'll be using a feature of that classroom that you haven't seen yet.
When you go to the next part of the lesson, an embedded command line tool will load. The command line allows you to execute commands directly to a computer instead of using a mouse and user interface. On Macs and Linux machines, there is a program called Terminal that allows you to type and execute these commands. The equivalent in Windows is the Console Window.
Here is a screenshot of what the embedded command line tool interface looks like:
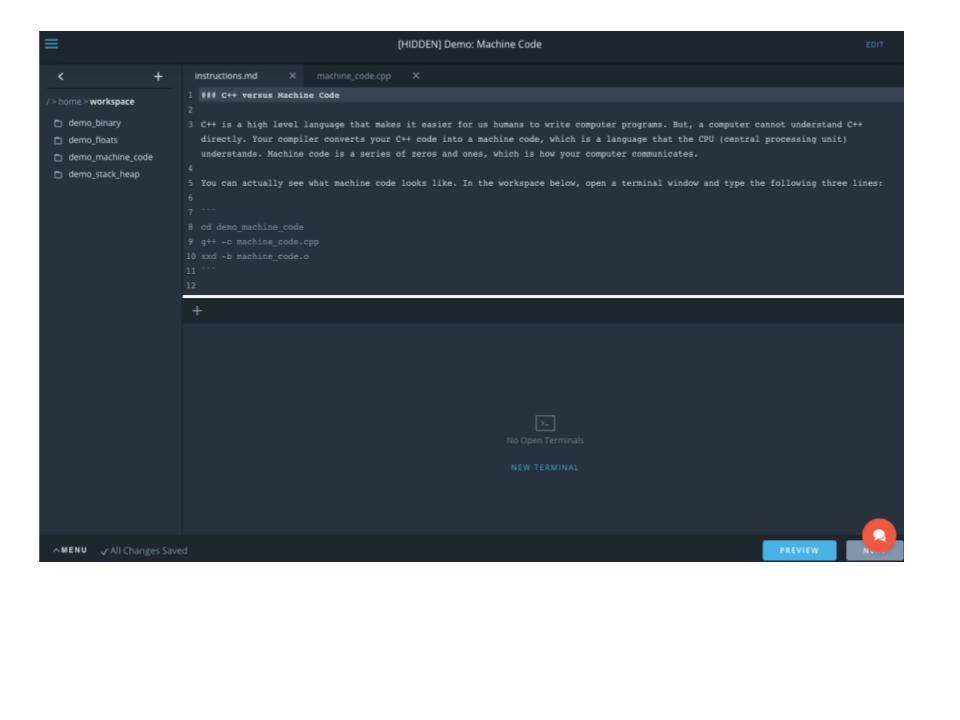
Command Line Interface
The following video walks you through how to use the embedded terminal.
Watch this video.
Linux Commands
To learn more about using the command line in the terminal, check out these links:
File Navigation
In the C++ lesson, each demonstration or exercise uses this interface. In the top left corner, you'll find the file browser. Each demo or exercise is contained in its own folder. The name of the folder corresponds with the title of the current lesson section. For example, the next lesson section is called "Demo: Machine Code", and the folder is called "demo_machine_code".
Here is a screenshot of where the file browser is located:
File Browser
If you double click on a folder, the folder will open. Likewise, double clicking on a file will open the file in a text editor. You can also right-click on a file or folder to download or delete it among other options. The plus sign is used to add new files or folders as well as to upload files or folders.
This next image shows where the text editor is located:
Text Editor
Text Editor
You can edit text files in the text editor. In the C++ exercises, this is where you will be modifying or writing C++ code. The classroom saves your work automatically as you modify files.
Terminal Window
To actually run commands that will compile and execute your C++ programs, you will need to open a terminal window. You click where it says "New Terminal" in the middle bottom of the screen:
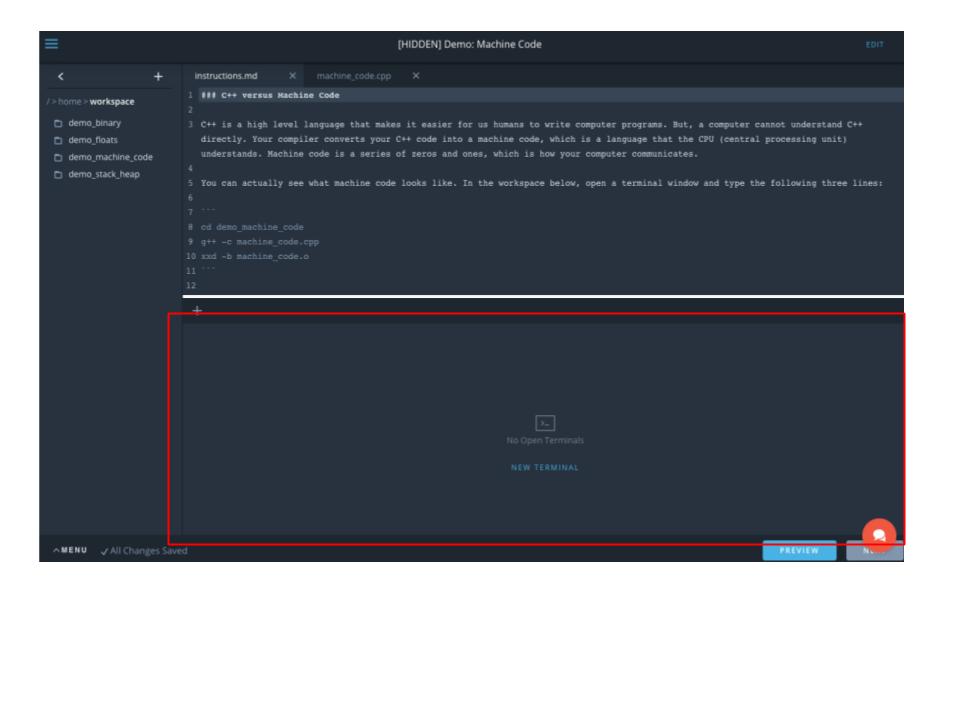
New Terminal Button
And this opens a new terminal window:
Terminal Window
The terminal window is where you'll type commands to execute your C++ code. The exercises and demos include instruction files that tell you what commands to type and in what order. So you do not need to learn command line syntax for these lessons.
However, here is an explanation of what those commands do:
cd foldername
cd stands for "change directory". You can use the cd command to change what directory your terminal window is looking at
g++ main.cpp other_files.cpp
This command compiles your C++ program. Sometimes you'll also see a command like:
g++ -std=c++11 main.cpp other_files.cpp
This command tells the compiler to use the C++11 standard. By default the compiler uses C++98. C++11 contains a handful of features that C++98 does not contain. So whenever a program uses a feature of C++11, you need to tell the compiler.
The last command you'll see in these lessons is
./a.out
When you compile your programs, the compiler outputs a file called a.out.
Executing ./a.out on the command line will run your program.
If you'd like to learn more about the basics of terminal commands, here is a link to an introductory article: terminal commands.
Menu
The embedded command line interface also has a menu in the bottom left corner.
If you click on the menu, you'll see two options:
REFRESH WORKSPACE will restart the workspace. It will not erase your work.
However, RESET DATA will restart the workspace AND replace all of your files with the original workspace files. You will lose all of your work including any extra files you created in the workspace.
If you notice a red dot down in this corner, that means there have been updates made to the Workspace. If you'd like to work with the updated version of the Workspace, you will need to RESET DATA, but again, make sure you have separately saved down any work you want to keep to outside of the workspace!
DEMO: Machine Code
Instructions
C++ versus Machine Code
C++ is a high level language that makes it easier for us humans to write computer programs. But, a computer cannot understand C++ directly. Your compiler converts your C++ code into machine code, which is a language that the CPU (central processing unit) understands. Machine code is a series of zeros and ones, which is how your computer communicates.
You can actually see what machine code looks like. In the workspace below, open a terminal window and type the following three lines. Make sure to hit enter after typing each line:
cd demo_machine_code
g++ -c machine_code.cpp
xxd -b machine_code.o
The -c flag in g++ tells the compiler to output an object file, which is machine code.
The xxd command ouputs the .o file in its binary representation. Looking at the output, the first column is just a row number written in hexadecimal. Then each of the following six columns contains one byte of information. And the last column shows you the text representation that is in the file.
You'll see there are over 1200 lines of machine code just to represent a program that assigns an integer value to a variable.
// machine_code.cpp
int main() {

  	int x;
  	x = 5;
 	return 0;
}
demo binary
-
Double click on the demo_binary folder and open the main.cpp file. Study the code. The demo shows you the binary representations of the character 'a', the integer 97 and the float 97.0. In C++, all variables are stored in binary.
-
If you don't already have a terminal window open, click below on "new terminal" to open a new terminal window.
-
To run the demo, type the following two commands into the the command line:
cd  /home/workspace/demo_binary
g++ main.cpp
./a.out
// main.cpp
#include <iostream>
#include <bitset>
#include <cstring>

int main() {

    std::cout << "Representations of the number 97 \n";

  	// Character 'a' represented in binary
    std::cout << "\n char: \n" << std::bitset<8>('a') << "\n";

  	// Integer 97 represented with 8 bits
    std::cout << "\n 8-bit integer: \n" << std::bitset<sizeof(char) * 8>(97) << "\n";

  // Integer 97 represented with 32 bits
    std::cout << "\n 32-bit: \n" << std::bitset<sizeof(int) * 8>(97) << "\n";

  // Float 97.0 represented with 32 bits
    float example = 97.0;
    char binary[sizeof(float)];

    memcpy(binary, &example, sizeof(float));

    std::cout << "\n 32-bit float 97.0:  " << "\n";

    for (int i = 0; i < sizeof(float); ++i) {
        std::cout << std::bitset<sizeof(char)*8 >(binary[i]);
    }

    std::cout << "\n";

    return 0;
}
demo floats
Instructions same as above.
#include <stdio.h>
#include <iostream>
#include <bitset>
#include <cstring>


int main() {

    // Float represented with 32 bits
    float example = 97.148;
    char binary[sizeof(float)];

    memcpy(binary, &example, sizeof(float));

    std::cout << "\n 32-bit float 97.148:  " << "\n";

    for (int i = 0; i < sizeof(float); ++i) {
        std::cout << std::bitset<sizeof(char)*8 >(binary[i]);
    }

    std::cout << "\n";

    // Float represented with 32 bits
    example = 97.1485945;

    memcpy(binary, &example, sizeof(float));

  std::cout << "\n 32-bit float 97.1485945:  " << "\n";

    for (int i = 0; i < sizeof(float); ++i) {
        std::cout << std::bitset<sizeof(char)*8 >(binary[i]);
    }

    std::cout << "\n";


    // Float represented with 32 bits
    example = 97.148594576678755667;

    memcpy(binary, &example, sizeof(float));

  	std::cout << "\n 32-bit float 97.148594576678755667:  " << "\n";

    for (int i = 0; i < sizeof(float); ++i) {
        std::cout << std::bitset<sizeof(char)*8 >(binary[i]);
    }

    std::cout << "\n";

    return 0;
}
Demo: Stack vs Heap
This demo shows how memory is allocated on the stack versus on the heap. To run the demo, open a new terminal window and type the following commands:
cd /home/workspace/demo_stack_heap
g++ main.cpp
./a.out
The demo code creates five integer variables on the stack and five integer variables on the heap. The program then prints out their adddresses in memory. You'll see the results in hexadecimal as well as in binary format. Notice that the stack first assigns a higher number address and then works backwards. Each integer takes up 4 bytes of memory.
The heap, on the other hand, starts with lower number addresses and increases. Exactly what addresses get assigned will vary from system to system when the program executes.
#include <iostream>

int main() {

    // declare integer variables
    int a, b, c, d, e;
    a = 5;
    b = 17;
    c = 2;
    d = 40;
    e = 38;

    // print out the addresses for each variable
    // The ampersand symbol gives access to the address of a variable
    std::cout << "hexadecimal addresses on the stack: \n";
    std::cout << &a << "\n";
    std::cout << &b << "\n";
    std::cout << &c << "\n";
    std::cout << &d << "\n";
    std::cout << &e << "\n \n";

    // show the addresses in decimal notation so that they are easier to interpret
    std::cout << "same addresses in decimal: \n";
    std::cout << (long int)&a << "\n";
    std::cout << (long int)&b << "\n";
    std::cout << (long int)&c << "\n";
    std::cout << (long int)&d << "\n";
    std::cout << (long int)&e << "\n";

    // declare pointers for integer variables
    int * f;
    int * g;
    int * h;
    int * i;
    int * j;

    // use the new operator for dynamic memory allocation
    f = new int;
    g = new int;
    h = new int;
    i = new int;
    j = new int;

    // assign values to the pointers
    *f = 5;
    *g = 17;
    *h = 2;
    *i = 40;
    *j = 38;

    // print out the hexadecimal addresses for these variables
    std::cout << "\n hexadecimal addresses on the heap: \n";
    std::cout << f << "\n";
    std::cout << g << "\n";
    std::cout << h << "\n";
    std::cout << i << "\n";
    std::cout << j << "\n \n";


    // print out the decimal addresses for these variables
    std::cout << "same addresses in decimal: \n";

    std::cout << (long int)f << "\n";
    std::cout << (long int)g << "\n";
    std::cout << (long int)h << "\n";
    std::cout << (long int)i << "\n";
    std::cout << (long int)j << "\n";


    delete f;
    delete g;
    delete h;
    delete i;
    delete j;

    f = NULL;
    g = NULL;
    h = NULL;
    i = NULL;
    j = NULL;

    return 0;
}
Assembly Language
In between C++ and machine code there is actually another language called assembly language. Assembly language is a human readable low-level language that gets you even closer to the hardware than C++.
Your compiler might not actually produce assembly language code and instead go directly to machine code. But you can still see assembly language code if you're curious. And there might be rare cases when you are trying to improve code efficiency and write assembly language directly in order to improve performance.
In the previous demonstration, you can use the following commands to output the assembly language code:
cd ~/home/workspace/demo_machine_code
g++ -S machine_code.cpp
This will output a file called machine_code.s, which you can then double-click to see its contents.
Assembly language is not nearly as intuitive as C++, but it is still human readable. When you do something as simple as declaring and defining a variable,int x = 5;. the computer has to break this up into a series of steps like assigning a space in memory to the variable x and then placing the value 5 into the assigned space.
You can write out each of these steps directly in assembly language. For the purposes of this course, you do not need to be familiar with assembly language. But just looking at assembly code will prove to you that every line of C++ code has consequences in terms of efficiency. Look at the number of steps involved with just assigning the value to x.
Unnecessary lines of code mean that the CPU will take more time to execute a program than what is actually needed.
Binary
Watch this video.
How much space do my variables use?
The standard that defines C++ specifies the minimum number of bytes required for each variable type. For instance, an integer is guaranteed to have at least 2 bytes or 16 bits.
That does not mean your computer will use 16 bit integers by default. The default number of bits will depend on how your computer system was designed. An int variable might be 16 bits on some systems but 32 bits on other systems. You can get more information at this link.
Although the exercises later in this lesson will focus on increasing the speed of your code, you might find yourself at other times trying to optimize for memory use as well. The more comfortable you are with how your computer works, the more tools you will have for optimization.
All Variables are Binary
C++ stores all variables in multiples of bytes:
- a char is 1 byte
- a 16-bit integer would be 2 bytes
- a 32-bit integer would be 4 bytes
- a 32-bit float would be 4 bytes
Thus all variables are represented by binary number. A 32-bit integer and a 32-bit float number take up the same amount of space; they would both be represented by a series of thirty-two 0s and 1s.
How Bytes Limit Value Ranges
In C++, your variables will take up either 8, 16, 32, or 64 bits of memory, which are 1, 2, 4, and 8 bytes respectively.
The number of bytes put a limit on the minimum and maximum values that your variables can hold. As mentioned in the video, a 32 bit integer can have a maximum value of 4,294,967,295; however, if a variable might take on either a positive or negative value, then you need to use one bit to represent the variable's sign. This leaves 31 bits to represent the integer giving a max value of 2,147,483,647.
Likewise, 32-bit floats can only contain about seven decimal places whereas 64-bit doubles can have about 15. The explanation for how floats are stored is a bit complex; however, you can imagine that a fixed number of bits puts a limit on the amount of decimal places that can be kept. In fact, you'll see this in an upcoming demo.
Is my system 32 bit or 64 bit?
Your CPU probably either has a 32-bit architecture or a 64-bit architecture. That means the CPU was designed to work well with storing and manipulating information in 32-bit chunks versus 64 bit chunks.
If your CPU uses a 32-bit architecture, you can still create 64-bit variables in your programs as long as your compiler has this feature. But, the code will most likely run more slowly than using a 64-bit architecture with 64-bit variables. On a 32 bit system, the compiler has to create extra instructions to move and do math on 64-bit variables.
If you'd like to see whether your computer has a 32-bit or 64-bit system, here are instructions for:
Memory and the CPU
Watch this video.
Stack vs Heap
Stack
When you declare a variable in C++, the variable will automatically be placed on the stack. Once a function terminates, for example the main function, then the variable is removed from the stack; however, in terms of the code you've written so far in the nanodegree, there is one exception. The elements in a vector actually get placed on the heap, but the compiler still manages the allocation and deallocation of memory for you.
The stack removes variables by the "last in first out" rule; in other words, the last variable to be placed on the stack will be the first variable removed from the stack. This makes sense given that when a function is called, variables will be allocated to memory and then when the function terminates, variables will be removed from memory.
The stack also tends to be relatively small: perhaps 1 MB depending on your system. One advantage to keeping the stack small is for multi-threading. Let's say you only have 50 MB of RAM for the stack. Your CPU could do about 50 simultaneous tasks because of the smaller stack size. But because the stack is small, the stack can run out of memory; this is called stack overflow.
Heap
The heap, on the other hand, is only limited by the amount of RAM currently available. So variables that hold a lot of memory have to go on the heap. But when you declare a variable on the heap, you are responsible for removing the variable from memory. If you don't, then it becomes more likely that your program will run out of memory before the program terminates. And then your program will crash.
The heap also tends to be slower; a compiler organizes the stack for you and knows where the next available memory slot is; on the other hand, a program might have to search for an empty spot to put a variable on the heap.
In relation to code efficiency, only use the heap when necessary. Although you will not need to use the heap in the nanodegree, you'll at least become familiar with the syntax so that you can recognize when a program is using the heap. In the next section, you'll also see a demonstration about the stack versus the heap.
Variables and Memory
Variables make programming much easier. Imagine what programming would be like if variables did not exist; you would have to determine
- determine how many bytes your variable needs
- find an available address to store the value
- make sure there are enough consecutive bytes available for storage
- you would also have to remember what value was stored at each hexadecimal address so that you could retrieve the right value as needed.
But with variables, the compiler does all of the memory management for you. And you can use descriptive names to help you remember what is contained in each variable.
This is essentially what the compiler is doing for you in terms of variables and memory management; without you having to think about it, the compiler efficiently finds space for your variables and keeps track of their location.
Dynamic Memory
To understand the next demo, you need to know about dynamic memory allocation and pointers.
Dynamic memory allocation refers to when you, the programmer, assign variables to memory manually. These variables will go on the heap rather than the stack.
The opposite of dynamic memory allocation would be static memory allocation. You've already been using static memory in your programs; when you declare variables in your programs, the compiler knows ahead of time how much memory each variable will need; the amount of memory your variables need does not change as the program executes, so this memory is "static". The stack is used for static memory allocation.
The compiler doesn't know how much memory will be needed for dynamically allocated variables; hence, dynamic memory gets allocated when you execute your programs. Dynamically allocated variables go on the heap.
To use dynamic memory, you need to be familiar with pointers and the new and delete C++ syntax. A pointer is a special type of variable that holds a memory address rather than a value. You don't need to know how to use pointers, but they show up in the demo in the next part of the lesson.
Here is an example of dynamic memory allocation using pointers:
#include <iostream>

int main() {

    // asterisk syntax creates a pointer variable, which can hold a memory address
    int * pointervariable;

    // new is used to create a variable on the heap. This line
    // assigns an addresss to pointervariable and reserves enough space
    // told hold an integer.
    pointervariable = new int;

    // Pointer variable holds an addresss. The address allows placing a value in
    // memory at the address.
    *pointervariable = 10;

    std::cout << "pointer value:  " << *pointervariable << "\n";
    std::cout << "pointer address: " << pointervariable << "\n";

    // remove pointervariable from the heap
    delete pointervariable;
    pointervariable = NULL;

    return 0;
}
With the result outputting something like:
pointer value: 10
pointer address: 0x1004053c0
although the exact memory address will differ from machine to machine. The pointer address is a hexadecimal number representing the location in memory.
The new operator assigns memory to the heap. You are are responsible for removing the variable when you are done with it, which is what the delete operator is for. Setting the pointer to NULL is good practice.
If you do not remove the variable, your program could run out of memory during execution; some operating systems might delete memory from the heap when your program terminates but some might not. Forgetting to remove dynamically allocated variables is called a memory leak.
Newer versions of C++ also include smart pointers that delete automatically when the program terminates.
Next, you'll see a demonstration of static versus dynamic memory allocation.
C++ Optimization Techniques
Now comes the practical part of C++ optimization. You are going to learn a handful of code optimization strategies and then apply those strategies to increase the speed of a C++ program.
However, remember that optimizing a program involves other facets besides the programming language itself. Your program's speed will also depend on your hardware, your compiler and what computer algorithms you choose. The more familiar you become with all of these different facets, the more tools you will have for optimization. Here is a brief summary of why each of these aspects is so important.
Hardware
Some hardware might have limitations that slow down your code. For instance, when calculating trigonometric functions, a processor might use a slow software approximation. If instead, you could use small-angle approximation, you might get your code to run faster.
Embedded hardware might not have much memory or have a 16-bit or 32-bit architecture instead of a 64-bit architecture. Using 64-bit integers on a 16-bit architecture might be possible with your compiler, but it would also probably be inefficient.
Compilers
Many compilers will optimize at least parts of your code for you. For instance, it might be more efficient for the CPU to unroll a for loop to avoid checking the conditional statements:
// for loop
for (int i = 0; i < 5; i++) {
     std::cout << i << "\n";
}

// for loop unrolled
std::cout << 0 << "\n";
std::cout << 1 << "\n";
std::cout << 2 << "\n";
std::cout << 3 << "\n";
std::cout << 4 << "\n";
The unrolled version could run faster because unrolling avoids checking if i < 5 is true. For a more complete list of what your compiler might try to do, read this article here.
Algorithms
Some algorithms are known to be faster than other algorithms. A common case would be sorting algorithms; quicksort, for example, is known to be faster than bubble sort.
Here is another important point to keep in mind; C++ libraries are very convenient, but that doesn't mean they use the fastest algorithms especially for your individual case. Being aware of what is happening under the hood provides more opportunities for improving efficiency.
C++
And now, let's move on to optimizing C++. You are going to learn a handful of techniques and practice implementing them. Then at the end of the lesson, you'll have the opportunity to optimize a C++ histogram filter.
Here is a preview of the type of things you will be learning: Did you know that every time you call a function, C++ copies the input variables into memory? Take this example:
#include <iostream>

int addition(int a, int b);

int main() {

    int x, y;
    x = 5;
    y = 7;

    std::cout << addition(x, y) << "\n";

}

int addition(int a, int b) {
    return a + b;
}
C++ puts the x variable into memory and the y variable into memory as expected.
When you call the addition function, C++ actually then puts the a variable and the b variable into memory as well; essentially C++ is copying x and y into memory twice even though the x and y values could have been used directly.
For a 32-bit integer, this might not be an issue; however, once you start working with larger variables such as 2-D vectors, the extra read and writes can slow your programs down.
In this lesson, you'll learn how to speed up your code in situations like these.
Software Development
Writing functioning code is arguably your number one goal as a software developer. Depending on your application, code efficiency might be very important as well.
You could break down the code development process into the following steps:
- code design
- implementing the design
- testing for bugs and fixing the bugs
- optimization
For a more detailed explanation of each of these steps (design, implementation, testing), see this link.
As mentioned previously, there are many facets to code optimization related to hardware, compilers, algorithms and the C++ language itself. In this lesson, you'll focus on the C++ language. What you've just learned about the CPU and RAM will provide the context for why your code is able to run faster.
You will have the opportunity to learn and implement a few techniques that make C++ run even faster. Each exercise presents a "slow" version of the code and a technique for making the code faster. You will then implement the technique to see how much faster the code runs. While these techniques do not encompass all of the ways to optimize C++ code, you'll gain an understanding of how memory, the CPU and coding choices affect how fast your code runs.
At the end of the lesson, you are going to receive a set of files for a functioning C++ histogram filter. Your job will be to make the histogram filter code run faster using the techniques you've learned in the lesson.
How to Optimize: Testing versus Instinct
To optimize your code, rely on testing and verification rather than instinct!
Test your code to find areas that are inefficient in terms of time, memory or power use. Then, verify that any changes you have made really do make the code more efficient. If you test first, you might even find that your code is already efficient enough for your particular application.
If you were optimizing a large amount of code, you would want to use something called a profiler. A profiler is a piece of software that measures how long parts of your code are taking to execute or how many resources the code uses. The profiler helps you find congestion points so that you can optimize the least efficient parts of the code first.
Both Visual Studio and Xcode come with profilers, which you can read about at these links:
Testing your Code with Standard Clock
In the following exercises, we've set up some simple profiling code for you; you'll time how long it takes to run a function using the C++ standard clock.
You will optimize by:
- seeing how long it takes to run a function
- change some aspect of the code
- run the code again to see if the code runs faster
The profiling code has already been set up for you, and it looks like this:
#include <ctime>

std::clock_t start;
double duration;

start = std::clock();

function_name(var1, var2);

duration = ( std::clock() - start ) / (double) CLOCKS_PER_SEC;

std::cout << "duration milliseconds initialize beliefs " << 1000 * duration << '\n';
The code stores the current standard clock time, then runs a function, and then calculates the elapsed time.
The standard library clock measures time in terms of clock ticks. Clock ticks are like a counter variable that goes up at a constant rate of time. But the length of time varies from system to system; therefore, dividing by the constant CLOCKS_PER_SEC gives the results in terms of seconds. The CLOCKS_PER_SEC variable is defined in the ctime library.
Overview of Techniques in this Lesson
Here is an overview of the techniques you will be learning and using to optimize C++ code. Refer back to this page as you work through the exercises and on the final project. Each of these techniques will be expanded further throughout the lesson.
If you are wondering why we chose these techniques, it's because you can use all of them to optimize Andy's histogram filter code. This is not a comprehensive list of optimization techniques by any means; rather, practicing these techniques will get you thinking about your code from a new perspective. While your focus up until now has been on code implementation, now you will appreciate the consequences of your coding decisions.
Remove Dead Code
When you write your code, you might end up with a chunk of code that is no longer used but still part of the program. Watch out for cases like these: remember that every line of code involves some work by the CPU and oftentimes a read or write to memory. Any unnecessary code could slow things down.
Avoid Extra if Statements
Code with multiple branching if statements is oftentimes inefficient:
int x = 5;
if (x >= 5) {x = x + 1;}
if (x < 5) {x = x - 1;}
You could transform the above code into if else statements, which avoids the CPU checking whether x is less than 5.
Avoid Nested for Loops
A section of code like this:
for (int i = 0; i < 5; i++) {
   for (int j = 0; j < 4; j++) {
         matrix[i][j];
   }
}
should look somewhat familiar. This is how you have been iterating over the values in a matrix. Sometimes you have no choice but to use a nested for loop; however, depending on the application, you might not need a nested for loop if you think about the problem in a different way. And instead of needing twenty iterations like in the above code, you might only need 9 or fewer iterations.
Avoid Creating Extra Variables
You'll see that Andy sometimes creates extra variables that aren't needed. For example,
float x = 2;
float y = 7;
float z = 4;

float volume = x * y * z;

float volume_reciprocal = 1 / volume;
The volume variable isn't really necessary. You could calculate the reciprocal directly:
volume_reciprocal = 1 / (x * y * z);
You might not get much of a performance boost; float variables are relatively efficient in C++. But imagine creating a new variable to hold a larger variable like a 2D vector. All of the extra memory writes will definitely slow things down.
Reserve Space in Memory for Vectors
You've been using 2D vectors to represent matrices. C++ vectors have a big benefit in terms of convenience; you can add new elements to the vector as needed. Arrays, on the other hand, have a fixed length that cannot be changed after declaring them.
But this flexibility comes at a cost; C++ vectors are very inefficient in terms of execution time. In fact, programs that require speedy execution would generally not use C++ vectors and especially not big for loops to iterate through vectors; instead, programs are written to take advantage of parallel processing on either the CPU or a GPU (graphics processing unit).
When you declare and define a vector, the compiler reserves space in memory plus some extra bytes in case the vector expands. Once the vector's length expands past the reserved memory, the entire vector will get copied over to a different place in RAM with enough available space.
That is very inefficient! In Andy's histogram filter code, you already know how large your vectors need to be because the robot world has a fixed number of grid spaces. If you reserve space for the vector, then you can avoid all of the extra memory reallocations as you expand the vector's length. The syntax is as simple as coding:
std::vector<int> foo;
foo.reserve(15);
Now the foo vector is guaranteed to have enough space for holding fifteen integers.
Passing Variables by Reference
Whenever you call a function, C++ copies any input variables into memory even if those variables are already in memory. For fundamental data types like int, char, or float, this might not be a problem.
But with variables that take up a more significant amount of space, such as vectors, the extra copying can slow down your programs.
You'll learn how to pass variables by reference instead of by value. Passing by reference tells your function to use the variable directly in memory rather than copying the entire variable to memory over again.
Using Static
In Andy's code, you'll see that he calculates certain vectors and values inside a function, but these values are always the same every time the function is called.
Instead of calculating the variables over and over again, you can declare these variables as static. When the function is called the first time, C++ stores the values in memory and re-uses the values every time the function is called.
Next Part of the Lecture
The next part of the lessons has a series of exercises that will get you ready for the project. In each exercise, you will receive code that has one of the issues discussed on this page. And then you will change the code to get the program to run faster.
You'll see that every time you run the code, the timer gives slightly different results; when you run your C++ program, the CPU might be carrying out other tasks that could affect timing. Be sure to execute your code multiple times to convince yourself that your code is (or isn't) running faster.
What is Dead Code?
Dead code is extra code in your program that no longer serves a purpose. Maybe while implementing a solution, you started down a path that did not end up working out. Or you put in extra code for debugging purposes, but this code is not actually part of the solution. The dead code just sits in your program without affecting the implementation.
Dead code can slow down a program; the code will still be executed on the CPU and might include reads and writes to memory although the code is never used.
Two other issues related to dead code, and sometimes also considered to be dead code, are redundant code and unreachable code.
Redundant Code
Redundant code is just like it sounds; this is code that gets repeated multiple times although isn't necessary. Here's a quick example:
// example of redundant code
int x = 6;
if (x > 5) {
   return true;
}
else {
   return false;
}
Essentially, saying x > 5 and then returning True is redundant. You could eliminate the if statement by just saying
return x > 5;
Here's another example
    if (x < 5) {
           x = x + 1;
    }
    else if (x >= 5 && x < 10) {
        x = x + 2;
    }
There is no need to check if x >= 5; the first if statement has essentially already proven whether x is greater than or less than five.
Finding redundant code, however, might not be so easy. It could be an extra variable declaration or maybe some extra logical statements like in the above example.
Unreachable Code
Unreachable code never gets executed. Unreachable code might not have too much of an effect on code speed, but the code still takes up space in memory and can make memory management less efficient.
A simple example would be the following:
unsigned int x;

...

if (x >= 0) {
   do_something ..
}
else {
  do_something ..
}
An unsigned integer is always zero or positive, so the else statement will never execute. The code inside the else statement is unreachable.
When you get to Andy's code at the end of the lesson, just keep an eye out for dead code or redundant code. You might find a couple of spots.
In the next part of the lesson, you will see a program that adds two matrices together. You'll execute the code to see how fast it runs. But the program contains dead code. So you will remove the dead code to see if the program runs faster.
If Statements
Many compilers will try to optimize if statements for you. So writing something like this:
int x = 7;

if (x > 0) {
  return y;
if (x <= 0) {
   return z;
}
might become
int x = 7;
if (x > 0) {
   return y;
else {
   return z;
}
The compiler won't literally rewrite your C++ code into optimized C++ code; the compiler does the optimization when outputting assembly language or machine code. But in general, you'll want to avoid too many if branches because each branch's logical expression requires time on the CPU.
Thinking about how if statements are executed, it's also more efficient to put the most common cases on a higher branch.
Here is a simple example:
    for (int i = 0; i < 1000; i++) {
        if (i > 0 && i < 5) {
            cout <<  "low \n";
        }
        else if (i >= 990) {
            cout << "high \n";
        }
        else {
            cout << "normal \n";
        }
    }
Most of the time, the above code will print out the word "normal". So the code needs to go through all of the if and else branches most of the time as the CPU compares i in each branch.
It would be more efficient to put the "normal" case at the top of the branches instead of at the bottom:
for (int i = 0; i < 1000; i++) {
    if (i >= 5 && i < 990) {
        cout <<  "normal \n";
    }
    else if (i >= 990) {
        cout << "high \n";
    }
    else {
        cout << "low \n";
    }
}
Now, most of the time, the CPU can skip the else if and else branches.
If Statements on the CPU
There's one other aspect of if statements that you don't have much control over when using a high level language like C++. The CPU also tries to optimize if statement calculations by running simultaneous calculations.
When running a calculation, the CPU can look ahead and start working on another calculation in parallel. In terms of if statements, the CPU will try to predict which branch will be taken next and starts running the calculations inside the predicted branch. When it's time to evaluate the logical expression, the CPU might realize that it made a bad prediction. If the prediction is wrong, the predicted calculation stops and the CPU starts running the correct calculation.
So be aware that you might not get too much of a time boost when rearranging or eliminating if statements. Both the compiler and the CPU are already trying to optimize these operations for you.
For Loops
There is nothing wrong with using nested for loops (ie for loops inside of for loops). Sometimes you need them when working with C++ vectors.
However, don't use them if you don't need them! There are a few places in Andy's code where he has used nested for loops that were not needed.
If you are iterating through or initializing an m by n matrix, you might be tempted to always use nested for loops like this:
    for (unsigned int i = 0; i < matrix.size(); i++) {
        for (unsigned int j = 0; j < matrix[0].size(); j++) {
            do something...
        }
    }
Iterating through the entire matrix involves m times n operations. However, depending on what you are trying to do, you might be able to get away with doing something like this:
    for (unsigned int i = 0; i < matrix.size(); i++) {
        do something
    }

    for (unsigned int j = 0; j < matrix[0].size(); j++) {
        do something
    }
This only requires m + n operations instead of m * n operations. Remember that fewer instructions for the CPU will get your code to execute faster!
Intermediate Variables
In Andy's code, you'll notice that he sometimes uses intermediate variables. Intermediate variables could be considered redundant code.
For example:
float x = 5.8;
float y = 7.1;

float area = x * y;
float reciprocal_area = 1/(area);
If you only needed to calculate the reciprocal, you could have written:
float x = 5.8;
float y = 7.1;
float reciprocal_area = 1/(x*y);
Fundamental variable types like float, int, and char are relatively efficient. So you probably won't notice much of a different when running these two versions of the code. In fact, your compiler might end up eliminating any inefficiencies between the first version and the second version.
So why discuss intermediate variables?
Intermediate Matrix Variables
You'll find a spot in Andy's code where he actually uses a 2D vector as an intermediate variable. It's not as obvious as the above example. But if you find it, you can definitely make the code run faster by eliminating the extra variable.
As mentioned in the beginning of the lesson, vectors are convenient but not particularly efficient; the compiler allocates a certain amount of memory for a new vector and adds a few more bytes as a buffer. The buffer can hold extra elements that you might push to the back of the vector.
But when the vector increases beyond its allocated size, the whole entire vector gets copied to another part of RAM. That is super inefficient!
So if you already have a variable vector that you can update directly, avoid making a copy of the vector!
Vector Memory Storage
As previously mentioned, vectors are not the most efficient variable type in C++. One reason is because you do not need to specify a vector's length when declaring a vector variable. So the compiler will not know ahead of time how much memory to allocate. And once the vector's length goes beyond the initial allocated memory, the entire vector gets copied to a part of RAM with more space.
A vector is more efficient if you specify the vector's length before pushing values. You can do this with the reserve() method, which will guarantee that the vector can hold the number of elements reserved.
Example
Here is an example of how to use the reserve() method.
#include <iostream>
#include <vector>

using namespace std;

int main() {
    vector<int> myvector;
    int vector_size = 50;
    myvector.reserve(vector_size);

    for (int i = 0; i < vector_size; i++) {
        myvector.push_back(i);
    }

    return 0;
}
In C++, there are multiple ways to initialize a 2D vector. When optimizing your programs, you'll need to test out different ways to initialize to see which works best in your specific program.
The fastest way could end up depending on the vector length and vector types.
References
Did you know that every time you call a function, those input variables get copied into memory? You can prove this to yourself with the following code:
#include <iostream>
#include <vector>

using namespace std;

// function declaration that prints out a matrix's address in memory
void matrix_address(vector< vector<int> > my_matrix);

int main() {

    // initialize a matrix
    vector< vector<int> > matrix(5, vector<int>(6,2));

    // print out the matrix address
    cout << "original variable address: " << &matrix << "\n";

    // run a function that prints out a matrix address
    matrix_address(matrix);


    return 0;
}

// function to print out a matrix address
void matrix_address(vector< vector<int> > my_matrix) {

    cout << "function variable address: " << &my_matrix << "\n";

}
When you run this code, you'll get output that looks something like this:
original variable address: 0x7fff5fbff650
function variable address: 0x7fff5fbff608
So what is this code doing? The code initializes a 5x6 2D vector in a variable called matrix. Then the code prints out the address in memory where the 2D vector starts.
Next, the code calls a function that prints out the address in memory of the function's input variable. Notice that the addresses are not the same even though the two variables hold the same value.
This is because C++ is copying the 2D vector into memory again when you call the matrix_address() function.
Ampersand Symbol
In the above code, you might have noticed the ampersand symbol: &.
This symbol gives you the address of a variable rather than the value of a variable. Do you remember in the previous lesson when you briefly learned about pointers? The ampersand is an easy way to access a variable's address without the danger of you mistakenly messing something up in memory.
And you can use the ampersand to help speed up your code!
How the Ampersand Can Speed Up Code
C++ has a few fundamental data types like int, char, and float that are relatively fast to work with. So the coding strategy you're about to learn might not make much of a different with fundamental data types; however, with variables that take up a lot of memory such as arrays or vectors, the ampersand can be quite useful.
What if the matrix_address function shown above had been defined like this?
void matrix_address(vector< vector<int> >&my_matrix);
The ampersand (&) tells the compiler to pass the input variable by reference. That means inside your function, you'll be working with the original variable instead of a copy. In the case of a 2D vector, you've just saved yourself a lot of reads and writes.
And, depending on your application, you might be able to modify the input vector directly instead of creating a new vector inside your function. For example, if you were going to code scalar multiplication on a vector, and you didn't need to keep the original vector, you could modify the original vector directly. You'll see what this means in the exercise.
The Static Keyword
Sometimes you'll need to use the same variable over and over again in your functions. If you think back on Andy's Python histogram filter code, the blur() function was an example.
The blur function contains a handful of blurring factors that are always the same every time the function gets called; however, in Andy's C++ code, which you'll be working with soon, he recalculates these blurring factors every time the code gets run.
What if you could declare and define these variables once no matter how many times your function gets called? You'd be able to eliminate some reads and writes to memory. This is the perfect use case for the C++ static keyword.
Example
When you declare and define a variable inside a C++ function, the value gets allocated to memory.
For example,
some_function() {
   int x = 5;
}
allocates space in memory for the variable x and then assigns the value five. Then, when the function finishes, the CPU will remove the x variable from RAM. That means every time you run the function, the CPU will allocate and deallocate memory for the x variable.
If, on the other hand, your code uses the static keyword, the x variable gets allocated to memory the first time the function runs. And the x variable just stays allocated in memory for the duration of the entire program. You've just saved yourself some reads and writes to RAM:
some_function() {
    static int x = 5;
}
Notice that you need to declare and define the variable simultaneously. You cannot define a variable with the static keyword without giving the variable a value.
Global Variables versus Static Variables
Static variables are actually placed in the same area of RAM as global variables. The difference is that global variables are declared outside of functions and are available anywhere in your program to any file or function. On the other hand, static variables remain in scope. So in the above example, some_function() is the only place that can access the x variable.